Friday, February 7, 2014

How to Convert MKV, AVI, VOB, Tivo, MPG, WMV, FLV to Galaxy Note 8.0 for Video Playback

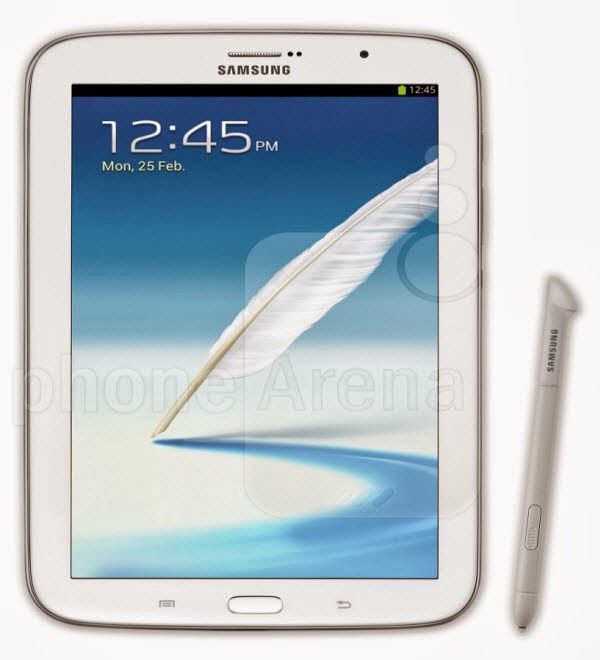
This article shows brief instruction about how to put and play MKV, AVI, VOB, Tivo, MPG, WMV, FLV videos on Galaxy Note 8.0 by converting various videos to Galaxy Note 8.0 supported video formats.
The Samsung Galaxy Note 8.0 is an 8-inch Android tablet by Samsung with S Pen functionality. It features a 1,280 x 800-pixel TFT screen, powered by a quad-core 1.6GHz processor, all running on Android 4.1.2. Its most notable features are the extremely thin body, expandable storage and light weight. It comes in a 3G or Wi-Fi version.


The Galaxy Note 8.0 rocks for watching movies. When playing local content, Samsung Galaxy Note 8.0 impressed us by supporting versatile video file types/formats including MPEG4, H.263, H.264, WMV, DivX video codecs.

However, your movie isn't already in one of the Galaxy Note 8.0 supported video formats like MKV, AVI, VOB, Tivo, MPG, WMV, FLV, you'll need to change the format for Galaxy Note 8.0 first. Here is how:

Here you can go to download and install the best video to Galaxy Note 8.0 Converter is recommended to achieve it effortlessly. Easy-to-use workflow, superfast speed with the help of CUDA acceleration, multiple input and output videos with high quality as well as powerful editing function. If you are stilling annoyed about troubles in playing MKV, AVI, VOB, Tivo, MPG, WMV, FLV videos with Galaxy Note 8.0, download this software to wipe it out.

(Mac users go to download Pavtube video to Galaxy Note 8.0 Converter for Mac)

The whole operation is just three steps; follow below step-by-step guide to learn how to put MKV, AVI, VOB, Tivo, MPG, WMV, FLV to Galaxy Note 8.0, which also applies to Mac users.

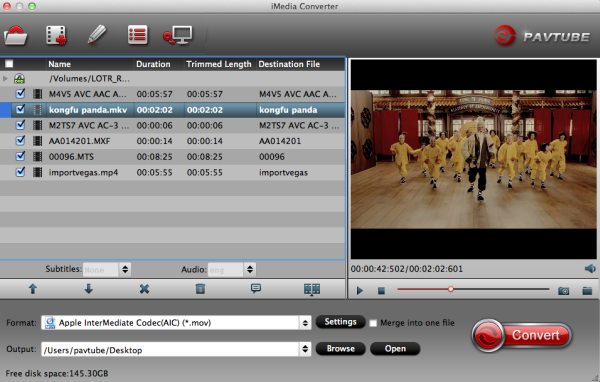
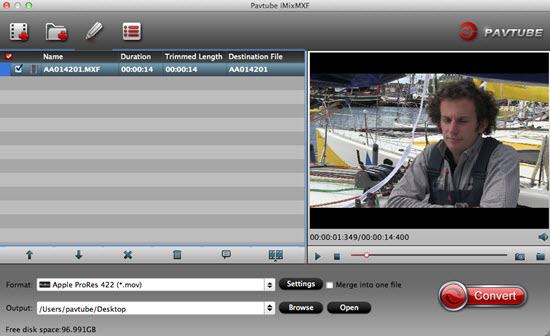
1. Import video source files for Galaxy Note 8.0.

Locate the videos in MKV, AVI, VOB, Tivo, MPG, WMV, FLV on your computer, then drag and drop the desired movie files into the software directly. Or click "Add video" or "Add from folder" button to find the video and then import them. Multiple files can be imported for converting together.


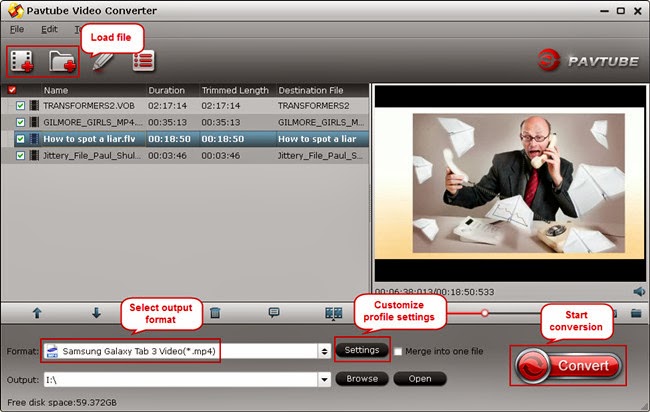
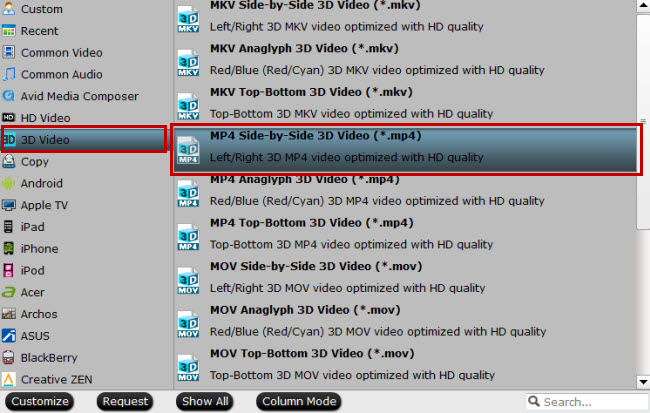
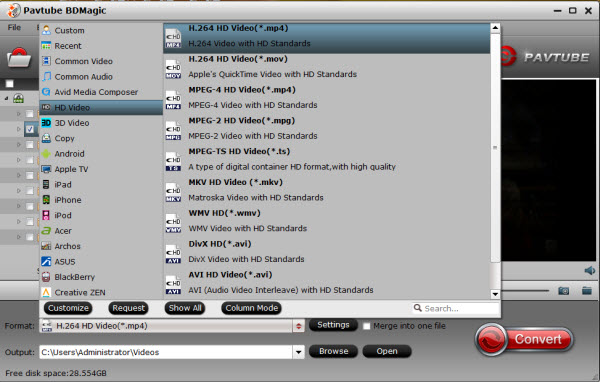
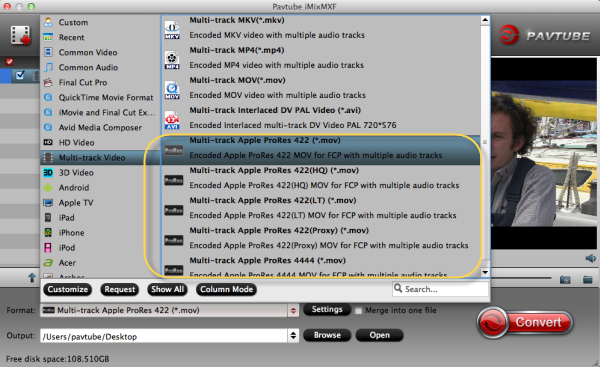
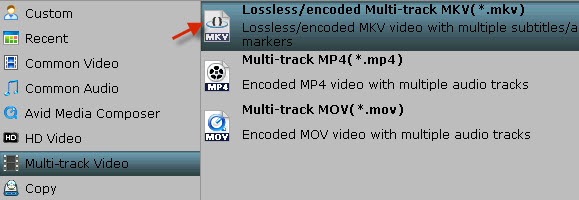
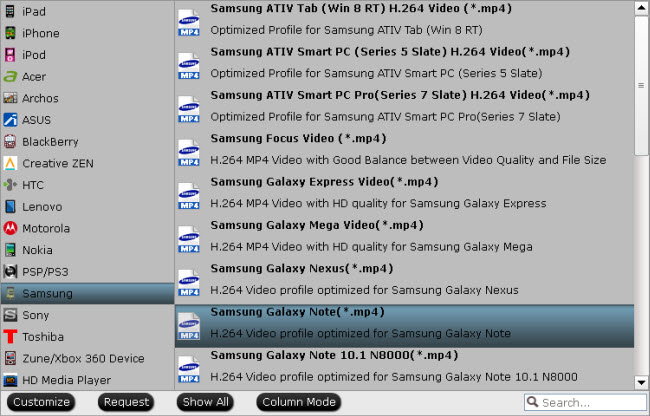
2. Choose Galaxy Note 8.0 H.264 MP4 format for output.

H.264 MP4 format is the best format for Galaxy Note 8.0. Click "Format" menu and go through the dropdown list, you are recommended to choose the " Samsung Galaxy Note(*.mp4)" under "Samsung". It is also fit for Galaxy Note 8.0.
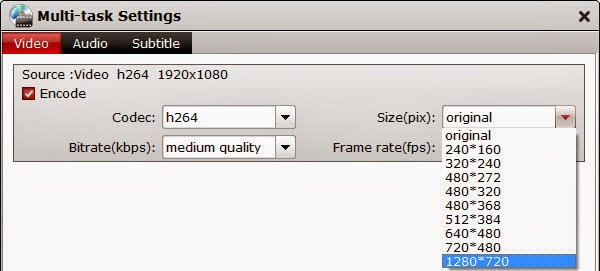


Tips:

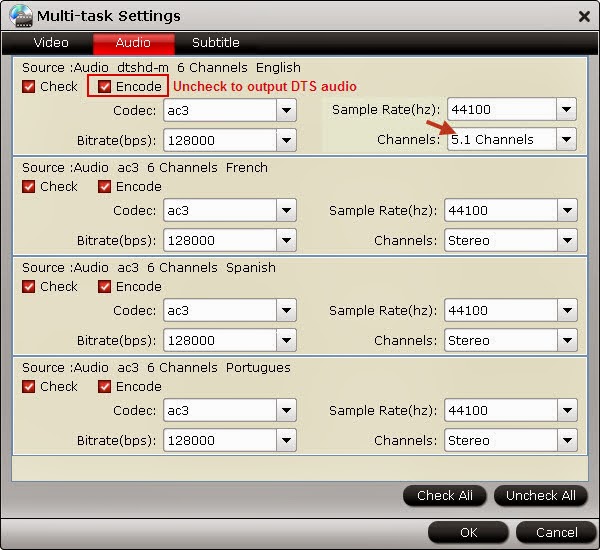
a. Click "Settings" button to adjust video and audio parameters like bitrate, size, audio channels, etc to meet your requirement. According to my experience, for watching MKV, AVI, VOB, Tivo, MPG, FLV movies on the Galaxy Note 8.0, 720p with 1500kbps~2000kbps (depending on the movie length) is just all right.

b. This wonderful Video to Galaxy Note 8.0 Converter provides us powerful edit function. The basic video editing features include subtitle attaching, video length trimming, frame cropping, text & image watermark attaching and video image effect adjusting, etc.

Trim, Crop, Edit Audio/subtitles before conversion

Click the pencil-like icon on the top to open Video Editor window; we can trim, crop, add watermark, deinterlacing or edit audio/subtitles before conversion here.

3. Convert MKV, AVI, VOB, Tivo, MPG, WMV, FLV to Galaxy Note 8.0.


Hit the big "Convert" button to start converting any videos for Galaxy Note 8.0 with the help of technology of CUDA acceleration, you can get 6X faster conversion speed. If you do not remember the location of generated files, click "Open" button to find it quickly.
You've done it, now you can enjoy the generated video with Galaxy Note 8.0.

Note: If you are considering getting DVD and Blu-ray movies into your new Galaxy Note 8.0, all-in-one software named Pavtube Video Converter Ultimate is a great choice for you. A Mac user is suggested to try iMedia Converter for Mac. Both are 20% off now.

More related:
Recommended Best Video Formats for Galaxy Tab 3/Note 3 
Transform Music DVD to H.264 MP4 for Galaxy Note 3 & Android Tablets 
Get Galaxy Note 3 play DVD (ISO/IFO) movies on Windows/Mac 
Rip Blu-ray to Samsung Galaxy Note 3 for enjoying 
Ripping All kinds of Disney Movies to Galaxy Note 3 for playing for my kids

From: http://samsung-galaxy-video-converter.blogspot.com/2014/02/put-and-play-videos-on-galaxy-note-8.html

Wednesday, January 29, 2014

Rip Blu-ray movies with 3D effect and TrueHD audio for enjoying on home theater projector

This article works you through the whole process of transferring Blu-ray to best 3D video quality with TrueHD audio.

Do you have a large blu-ray collection and want to build a media server for your home? A home theater provides a theater-like experience in your home. It can be as simple as a few A/V devices in your living room or as complex as a completely renovated basement designed to look like Hollywood's El Capitan Theater. At its core, a home theater system should provide a high-quality video experience and an immersive audio experience that breathe life into your favorite movies.
 
"Hi, mostly we watch movies in our home theater. We’ll play them on a home theater server and project using a home theater projector. We want the very highest quality, including 3D movies in 3D, and TrueHD audio. I have tried various other pieces of software to encode and have had mixed luck. Any help?”

Expect the good quality of home theater system, the videos quality is also an important factor that for you to have a good enjoyment at home. In the Blu-ray specification, Dolby TrueHD, DTS-MA, LPCM, Dolby Digital, DTS and PCM are optional codecs for Blu-ray audio encoding. Earlier Blu-ray Discs save audio in Dolby Digital and DTS codec, most recent Blu-ray movies usually comes with Dolby TrueHD and DTS-MA audio tracks to deliver higher quality audio with 7.1 channels. Not every AV receiver/amplifier can decode Dolby TrueHD and DTS-MA audio, but most of them support Dolby Digital, i.e., AC-3 5.1 audio codec.

At this moment, you just need a professional Blu-ray Converter to output high quality videos. Here, Pavtube ByteCopy (Read review) allows for such a wide range of encoding with very highest quality, including 3D movies in 3D, and TrueHD audio. Pavtube gives a couple of options that makes those possible. Very quick and easy!

Tips:

1. Besides output videos with 3D effect and TruHD, ByeCopy support backup BD/DVD to MKV with multiple tracks and subtitles and preserve chapter structure as well.
2. It also has Mac version Pavtube ByteCopy for Mac for the users who operate on x86 Mac X 10.5 or later.
3. 3D effect on converted video is added by program; it may not be exactly the same as your original 3D blu-ray disc.

Tutorials: How to rip Blu-ray to 3D MKV/MP4/MOV/AVI in SBS, Anaglyph, T/P
 
Step 1: Run Pavtube ByteCopy as the the 3D Blu-ray Ripper, load disc.

Click “Load files” to load blu-ray movie from ROM, blu-ray folder or import Blu-ray ISO file directly. There’s no need to run virtual drive to mount the ISO files; Pavtube ByteCopy will recognize them automatically.

load blu-ray dvd movie

Step 2: Choose format

Click the “Format” bar and find “3D video”, you will find several presets for MKV/MP4/MOV/AVI in Side-by-Side 3D, Top-Bottom 3D and Anaglyph 3D. Usually MKV and MP4 are most recommended formats, but you still need to check your device specification to choose one accordingly.

convert 3d blu-ray to 3d sbs mp4

Step 3: Adjust 3D effect

Click “Settings” to enter customize specs window; you can adjust resolution (size), bitrate, frame rate, 3D mode and depth here.

Step 4: Start Conversion
Click the big red” Convert” to start the conversion. Wait for a while and click “Open output folder” to locate the converted video easily. Now transfer your 3D movies to home theater projector vis USB for playback.

Related Articles:

Monday, January 27, 2014

Edit your GoPro Hero 3 footage in iMovie and share on Instagram with friends

This is a brief guide of how to convert your GoPro Hero 3 footage to iPhone, so that you can edit it in iMovie and share it to friends on Instagram. 
GoPro's lineup of mount-anywhere cameras have been dazzling extreme sports enthusiasts for years. With the GoPro 3, you can easily shoot footages with your hands free – that's pretty convenient yet safe when you are surfing, skating, snowboarding or traveling.

I'm rather fond of taking this little magic box out on vacation with great fun. However, unlike professional cameras, I always need to edit some of them. As I just got a new iPhone 5S, iMovie should be a good choice which is free to IOS 7 users.


With the help of Pavtube iMedia Converter for Mac, I am able to import GoPro Hero 3 footage to iMovie on iPhone and post it on Instagram.

Pavtube iMedia Converter for Mac is a professional Mac GoPro to iMovie converter; it's very easy-to-use and totally painless during the whole conversion from GoPro MP4 to Apple Intermediate Codec.

Good News! Pavtube Release a New Site - multipelife.com with Product Migration and Name Change.

To thanks for your continued support all along our previous site and the new www.multipelife.com, we are holding a 'New Site Special' with fantastic discounts up to 40% off. You can get 20% off BDMagic, 30% off ByteCopy, 40% off DVDAid and 20% off Video Converter Ultimate on Windows/Mac platform:

https://www.facebook.com/pavtubefans/app_209569249055691

Read more: http://mediaconverting.blogspot.com/2014/05/pavtube-new-official-website.html

How to convert GoPro Hero 3 MP4 video to iMovie on iPhone?

Step 1. Load files to the GoPro to iMovie Converter for Mac.

Launch the GoPro MP4 to iMovie Converter for Mac and add footage files to it. Keep your GoPro Hero 3 on and connect it to Mac; click "Add video" to load video clips or "Add from folder" to load the entire folder. Then you can preview the whole videos in the preview window on the right area.


Step 2. Choose AIC MOV format for iMovie.

Click "Format" drop-down list and choose "iMovie and Final Cut Express > Apple InterMediate Codec (AIC) (*.mov)" as the most compatible format for iMovie.


Notes: If the default settings do not fit your needs, you can click "Settings" button to customize output video bitrate, channels, frame rate, etc. In general, the higher video bit rate you choose, the larger output file size will it be; and vice versa.

Step 3. start conversion.

Now hit the big "Convert" button to start converting GoPro Hero 3 MP4 to AIC MOV for iMovie on iPhone. After it completed, hit "Open" button to find the generated.

Now transfer the converted video to iPhone via iTunes and open it in iMovie for iPhone app. Edit it and upload to Instagram; just have a try.

Read More:

Source: http://device-camcorder-tips.blogspot.ca/2014/01/convert-gopro-hero-3-footage-to-imovie-on-iphone.html

Sunday, January 26, 2014

How do I make Blu-ray movies playable on VTech InnoTab 3/InnoTab 2 for my Kids

This guide explains how you can convert Blu-ray movies for your VTech InnoTab 3/InnoTab 2, so that you can watch them on your InnoTab 3/2, without having to purchase them again from a digital movie store.
Nowadays, with the ability to purchase movies online, and watch it in a matter of seconds, more and more people prefer to digital content. But if we look at digital content, we will find each brand and device category has their own movie store. iTunes only works with Apple, Google Play works only with Android, Samsung MediaHub only works with Samsung devices, etc.

None of these stores take the content you already have into account, so if you want to play these movies on your VTech InnoTab 3/2, you will need to purchase it twice, and what makes things even worse is that purchases from one don't mix with those from another.


These disadvantages make physical form stand out. Have you happened to have some Blu-ray disc and want to play on your VTech InnoTab 3/2? You can use a program such as BDMagic to convert your Blu-ray movies to a format that will work perfectly on your VTech InnoTab 3/2, and if you do upgrade later-on, you can either use the same file, or convert the disk again for your other devices.

Requirements:

Of course your VTech InnoTab 3/2. While you don't need it for the conversion process, but you need it to be able to put the movie onto it.

The connection cable for your VTech InnoTab 3/2.

An sd memorycard that works with your VTech InnoTab 3/2.

A computer with either Windows OS or Mac OS as Pavtube Blu-ray Ripper is available for Windows XP/2003/Vista/Window 7/Windows 8/Windows 8.1, while Pavtube BDMagic for Mac supports Mac OS X 10.9 Mavericks, 10.8 Mountain Lion, 10.7 Lion, Snow Leopard 10.6, Leopard 10.5

There is a large variety of different tools available for this. But for this guide I am using Pavtube BDMagic, one of the most popular conversion application for phones and tablets due to its ease of use, the support provided when needed, and of course the very affordable price.

You can purchase Pavtube Blu-ray Rippper 30% off for New New Year Promotion, or download the free trial version (The trial version has Pavtube watermark on the output video.)

A DVD drive for you to convert DVDs while Blu-ray drive for converting Blu-rays for your VTech InnoTab 3/InnoTab 2

Step-by-step Guide:

This guide will take Windows OS as a example, if you are a Mac user, just choose the right version and the process is almost same.

Step 1: Download and install Pavtube BDMagic on your computer.

Step 2: Load the Blu-ray movies to the program.


Step 3: Choose the output format. Click "Common Video" > " H.264 Video (*.mp4)" as the output format.


Step 4: Click the "Convert" button to start the Blu-ray to VTech InnoTab kid tablet conversion.

Step 5: Connect your VTech InnoTab 3/InnoTab 2 to your computer and copy the file over to the MOVIE folder located in the LLN folder on your VTech InnoTab 3/InnoTab 2's memeorycard.

Once completed, just open the build-in video player app on your VTech InnoTab 3/InnoTab 2, and tap the movie to play it.

What happen during the conversion:

The actual movie conversion process takes some time. Many people don't realize that converting a Blu-ray to play on the VTech InnoTab 3/InnoTab 2 is a bit more involved than just copying over the movie from the Blu-ray to the tablet. Conversion tools such as Pavtube Blu-ray Ripper actually have to do a lot more than that:

Disc Transfer. You can not just stick Blu-ray in your VTech InnoTab 3/InnoTab 2 as it don't have a Blu-ray drive, even though you connect a Blu-ray drive with some cables and adapters to your tablet, there are no Blu-ray player apps available, so it will not work anyway. So, a conversion tool such as Pavtube Blu-ray Ripper plays the role of reading your Blu-ray and storing it on your computer in a video file.

Format Change. The VTech InnoTab 3/InnoTab 2 do not support the format like AVI and MKV, so in order for VTech InnoTab 3/InnoTab 2 to play your movies, the video files needed to be optimized. This is where the actual conversion part comes in. Pavtube Blu-ray Ripper reads your Blu-ray movies and then transforms it into a format that is optimized for VTech InnoTab 3/InnoTab 2 so that it will play your video without any issues.

Compression. It is usually that a movies on Blu-ray takes up 5-9GB of space. When you copy a movie over to your VTech InnoTab 3/InnoTab 2 of that size, you can only store a few movies, and there is no room left. Pavtube Blu-ray Ripper can compress movies to a much smaller file size enabling you to store much more movies on it.

Screen size adjustment. The conversion process adjust size of your movies to make it fit properly on the VTech InnoTab 3/InnoTab 2 screen.

Related Articles:


Source: http://device-camcorder-tips.blogspot.com/2014/01/transfer-blu-ray-to-vtech-innotab-3.html

Friday, January 24, 2014

How can I edit my MXF video from Avid in Premiere Pro and upload to Youtube

Want to edit the mxf video from Avid in Premiere and post Avid MXF onto Youtube for sharing? Here will give you an easy solution to achieve it with this powerful MXF MultiMixer.
I'm a freelance tv producer, mainly music and comedy. Now I have some source video from EVS XT3 multichannel video server, what I want to do is to put my edited Avid MXF video onto YouTube for sharing. At the beginning, I wanna edited multicam on an avid media composer system, and afterwards effects and red epic footage on Adobe Premiere.

After editing MXF in Avid MC, I'm trying to import Avid DNxHD 36 media from Media Composer 5.5, but I get some issue saying that the codec isn't supported. Am I wrong that DNxHD is supposed to be native in Premiere Pro CS5+? Let alone uploading the MXF files onto Youtube.


In fact,MXF is used natively by Avid applications to store video and audio "essence" with associated metadata. It has also become the preferred file format for interchange of media files between Avid solutions and products developed by other vendors.

Well, the original MXF files is from Avid, to ingest Avid Media Composer generated MXF media-container to Premiere Pro and upload onton Youtube, the easy workaround is to transcode Avid MXF footage to Premiere/Youtube compatible videos. Along with some help from a professional Avide MXF Converter for Mac. It can be done.

Convert Avid MXF video for Editing in Premiere Pro and Uploading to Youtube on Mac

Software that can help:

Pavtube iMixMXF. I think it's much easier for me.Cost and efficiency. Avid MXF support, and not too expensive. It can not only convert Avid MXF to PPro best editing format, but also has editing functions and unique multi-track preserving feature. For guys who may find it difficult to import and edit Avid MXF files in Premiere Pro with keeping multi audio channels on Mac and want to easily upload to Youtube for sharing, here is the fast guide for you.

Step 1. Get this Mac multi-track MXF Converter installed, click Add Video to load individual mxf videos; or click Add from folder to load the entire folder. It will recognize all the audio channels.


Step 2. Click "Format" and choose Multi-track Video>Multi-track Apple Prores 422(*.mov) for editing with Premiere Pro natively.


If you want directly import your MXF videos onto Yoube, choose Common Video > H.264 Video(*.mp4) or Multi-track Video > Multi-track MP4(*.mp4) as Youtube supported video format.

Step 3. Click "Settings" to customize your video size, bitrate, frame rate and other specs; and check video channels that you want to keep.

Follow the bottom left icon to "mix into one channel"; or that it will keep all the audio tracks apart.


Step 4. Click "Convert" to start converting multi audio channels MXF from Avid to Prores 422 saving multi audio channels for editing with Premiere Pro on Mac.

Theis Pavtube Mac MXF Mixer can help you to change Avid MXF files to for Premiere Pro native Prores codec, then you can directly turn to your Youtube account and upload them to your Youtube for sharing.

Tips:

For users don't need to deal with multi-track thing, just simple want to convert Avid MXF to other formats, the MXF Converter for Mac (only $29) is highly recommended.

Read More:

Lossless backup Blu-ray/DVD for playing on Plasma TV with keeping 10:9 widescreen and 5.1 DTS video

Description: Just follow the step-to-step guide to learn how to lossless backup DVD to QNAP NAS via DLNA or TwookyMedia Server with 10:9 widescreen and 5.1 DTS video preserving, and then stream to Samsung plasma TV for playback.

Question:

I'm seriously considering to buy a DVD ripping tool. As I ripped Toy Story 2 from a 16:9 standard DVD and there are so many choices of different files & codecs, I was pretty confused. All I'm really after is the "highest quality" 16:9 Video/5.1 DTS file available to stream from my QNAP NAS via DLNA or TwookyMedia Server to my Samsung plasma (which has Smart Hub).

What setting would I use for standard DVD's, Blu-rays, & 3D Blu-ray's to achieve this? I assume I wouldn't use the same setting for a blu-ray as I would a standard DVD? Please keep in mind that I'm after the closest representation of the DVD/Blu-ray (video & 5.1 sound) as possible.


What we need?
If you want to enjoy the Blu-ray/DVD movie on your Samsung plasma TV streaming from QNAP NAS and TwookyMedia Server, you need to first lossless backup your Blu-ray/DVD disc to media server.

To achieve it, I did many free trials, and then I choose to 
use is Pavtube ByteCopywhich runs as the the top of the list of the best Blu-ray rippers. I was able to copy both my Blu-rays and DVDs with keeping 16:9 widescrenn with fast speed. It can keep the original V/A settings without quality loss, the chapter markers so I can skip viewing easily, and the most important original DTS audio. Mac version is available here:Pavtube ByteCopy for Mac; well support Mac Mavericks! Now I will show you how to lossless backup your Blu-ray to QNAP NAS and TwookyMedia Server on Win and Mac. 

Download a trial before purchase; or you can get 20% OFF any Pavtube programs by sharing to your FB.

How to backup Blu-ray to QNAP NAS and TwookyMedia Server keeping 16:9 widescreen and DTS audio

Step 1. Launch Pavtube ByteCopy, click “Load files(s)” to import Blu-ray disc, ISO/IFO files, and BD/DVD folder.


Step 2. Choose “Multi-track Video >Lossless/encoded Multi-track MKV(*.mkv)" in “Format” drop-down list as the lossless preset for QNAP NAS and TwookyMedia Server.


Step 3. Adjust video/Audio settings. Click “Settings” in the main interface, you will find three tabs for Video, Audio and Subtitles. In the Video tab, uncheck “Encode” to output MKV file without quality loss.

If you check the “Encode”, it will output MKV files compressed with H.264 or Xvid uses the original aspect ratio. If you are using Blu-ray as input, you needn’t change anything here, because this ratio is proper for full HD Blu-ray movies, and you can get a 16 x 9 file in 1080p. But if your source media is standard DVD, we suggest you set the size down to 1280*720 to produce a 720p video in widescreen (16x9).


Then switch to Audio tab, choose wanted audio tracks and uncheck “Encode” and can set up channels to 5.1 for output to get 5.1 DTS audio.


Step 4. Start Conversion.

Start backing up Blu-ray/DVD movie to lossless MKV, all the chapter markers will be save and Pavtube ByteCopy will take the rest. After the conversion, click “Open” to quick find converted videos.

Simply copy the output MKV file to your QNAP NAS and TwookyMedia Server and stream them via DLNA to Samsung plasma TV for freely playback.

Money saving bundles:

ByteCopy($42) + Video Converter Ultimate($65) = Only $79.9, Save $27.1 
ByteCopy($42) + DVD Creater($35) = Only $44.9, Save $32.1 
ByteCopy($42) + Vidpie($29) = Only $54.9, Save $16.1 
ByteCopy($42) + MXF MultiMixer($45) = Only $69.9, Save $16.1 
BDMagic($49) + Vidpie($29) = Only $49.9, Save $28.1 

Related articles:

Tuesday, January 21, 2014

Best way to Copy/Store DVD disc on a Sonology Diskstation

More and more people keep an eye on how to protect your favorite DVD disc from scratched. This article mainly tells you how to backup/copy DVD discs on a sonology diskstation for wathing or syncing.

I wanted to store my DVD collection on a sonology diskstation, then I can watch the videos from any mobile device or on my tv when I connect my laptop. How to make it?

DVDs, as with all kind of optical media, is that they are pretty easy to damage. DVD players need the DVD to be in a specific format. To can easily play DVD content from sonology disk station with no restrictions and without needing the DVDs every time. You need to use a DVD ripping software to rip and transfer the DVDs to sonology disk station for watching.

So I'm looking for the best software to copy dvd digitally without sacrificing the picture quality on the internet for quite a while until I met this Best Blu-ray Ripper- BDMagic. I like that it’s simple to use as I’m not a computer technician. The ripped video works well on my galaxy s4, iPad 2, and a laptop.

Overall, BDMagic is a professional Blu-ray/DVD converting program which works with 1:1 backup solution and convert Blu-ray/DVD to MKV/MP4/MOV/M4V/MPG/FLV/AVI/WMV, etc. Well I haven’t got the chance to try every profile, but it’s really the best Blu-ray/DVD backup tool I’ve met ever; I mean it’s ease of use, not fuss and simple to follow. This best Blu-ray Ripper can rolls off Blu-ray/DVD disc protection, supports loseless 1:1 Blu-ray backup and keeps all the disc titles and chapter structure perfectly.

Don’t you like to have a try?

They provide free trial (no time limitation) before purchase; and you can reach the Mac version here. Here is a guide for Mac users: How do I Back up and Burn a Blu-ray with Mac?

How to backup DVD disc on a sonology disk station with best video quality

Step 1. Import DVD discs to Pavtube BDMagic.

Run the best DVD backup software, click "Load files" icon to load the DVD discs. After successful 100% load, click the select main title you are able to preview the whole movie in the preview window, which works just like a media player.

I also noticed if you have a ISO file to import, it will recognize the ISO file automatically with no need to run virtual driver and mount ISO files firstly. Good design.


Step 2. Different ways for copying DVDs to sonology disk station.

Here I will show you two different ways of lossless backup DVD disc:

Method 1. Full disc copy: 1:1 backup the entire disc with original structure and chapter marks

If you want to copy a 3D/2D DVD discs and remain 3D/2D in output files for further playback, or keep the original structure of disc for further creating ISO files or DVD discs, that is what exactly "Full disc copy" can do for you.

Click "Copy the entire disc" icon on the interface and you are brought to conversion progress immediately.

After conversion, go to "Open output folder" you will get a generated folder combined with two folders: "BDMV" and "CERTIFICATE". All the M2TS files are located in BDMV folder.

Method 2. Directly Copy: 100% backup the intact main movie of DVD discs

If you just want to copy the main movie for playback without the menu and promotional clips etc, "Directly Copy", which will takes less time for conversion and occupies less space than Full disc copy, is right for you.

Click "Format" menu and go to "Copy" option, choose "Directly Copy" for output format.


Then click "Convert" button to start coping. Once finished, you will get a converted file in M2TS format for DVD disc.

Every time when the conversion is finished, "Open" button on the main interface will help you to locate the generated files. If you try to copy one DVD disc in different ways, you do not need to worry about that the previous one will be covered because of the same file name. In this case, the software will automatically add number 1, 2, 3… in the end of file name because of built-in setting of renamed the same file name.

You can choose any way of them to copy your DVD disc without quality loss. Now connect your sonology diskstation to computer and transfer them into it, then share them with your family or friends.

Read More: