Description: Just follow the step-to-step guide to learn how to lossless backup DVD to QNAP NAS via DLNA or TwookyMedia Server with 10:9 widescreen and 5.1 DTS video preserving, and then stream to Samsung plasma TV for playback.
Question:
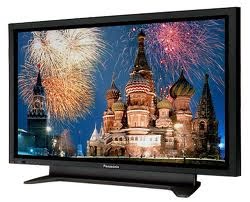
I'm seriously considering to buy a DVD ripping tool. As I ripped Toy Story 2 from a 16:9 standard DVD and there are so many choices of different files & codecs, I was pretty confused. All I'm really after is the "highest quality" 16:9 Video/5.1 DTS file available to stream from my QNAP NAS via DLNA or TwookyMedia Server to my Samsung plasma (which has Smart Hub).![]()
What setting would I use for standard DVD's, Blu-rays, & 3D Blu-ray's to achieve this? I assume I wouldn't use the same setting for a blu-ray as I would a standard DVD? Please keep in mind that I'm after the closest representation of the DVD/Blu-ray (video & 5.1 sound) as possible.
What we need?
If you want to enjoy the Blu-ray/DVD movie on your Samsung plasma TV streaming from QNAP NAS and TwookyMedia Server, you need to first lossless backup your Blu-ray/DVD disc to media server.
To achieve it, I did many free trials, and then I choose to use is Pavtube ByteCopy, which runs as the the top of the list of the best Blu-ray rippers. I was able to copy both my Blu-rays and DVDs with keeping 16:9 widescrenn with fast speed. It can keep the original V/A settings without quality loss, the chapter markers so I can skip viewing easily, and the most important original DTS audio. Mac version is available here:Pavtube ByteCopy for Mac; well support Mac Mavericks! Now I will show you how to lossless backup your Blu-ray to QNAP NAS and TwookyMedia Server on Win and Mac.
Download a trial before purchase; or you can get 20% OFF any Pavtube programs by sharing to your FB.
How to backup Blu-ray to QNAP NAS and TwookyMedia Server keeping 16:9 widescreen and DTS audio
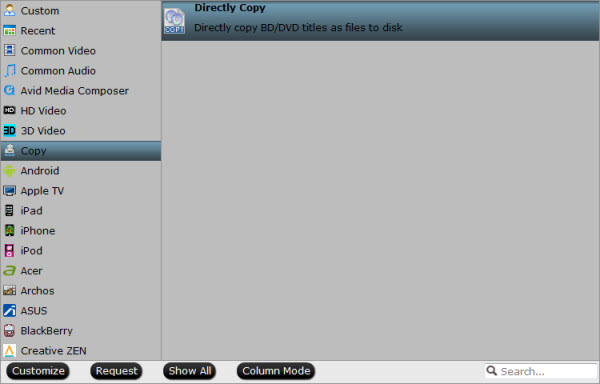
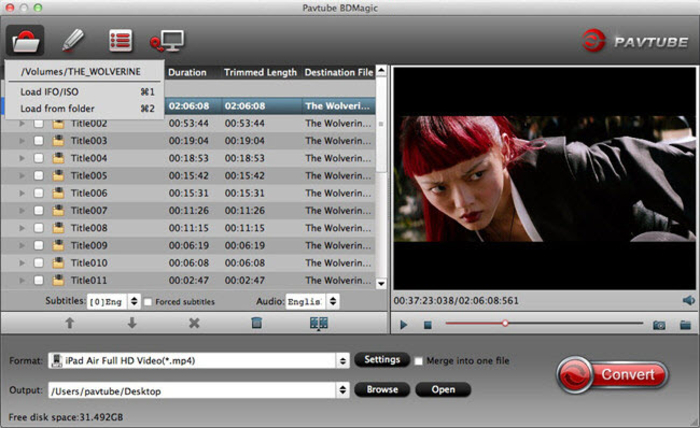
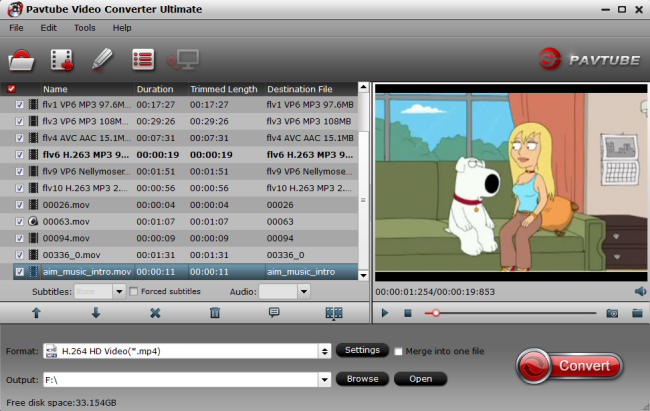
Step 1. Launch Pavtube ByteCopy, click “Load files(s)” to import Blu-ray disc, ISO/IFO files, and BD/DVD folder.

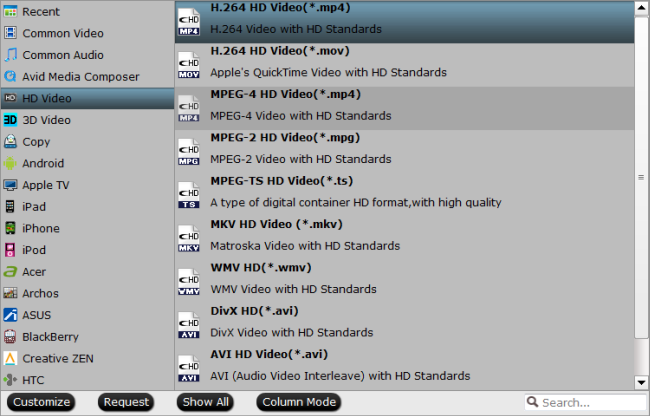
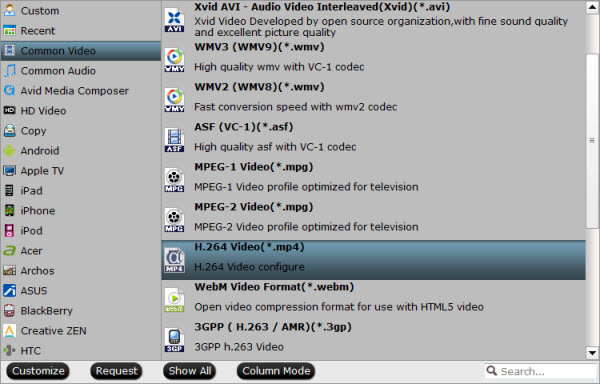
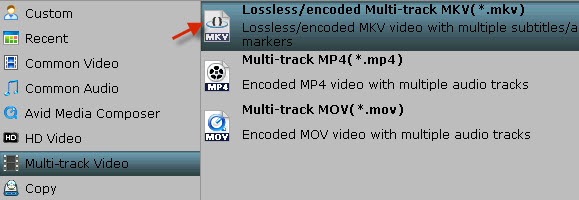
Step 2. Choose “Multi-track Video >Lossless/encoded Multi-track MKV(*.mkv)" in “Format” drop-down list as the lossless preset for QNAP NAS and TwookyMedia Server.
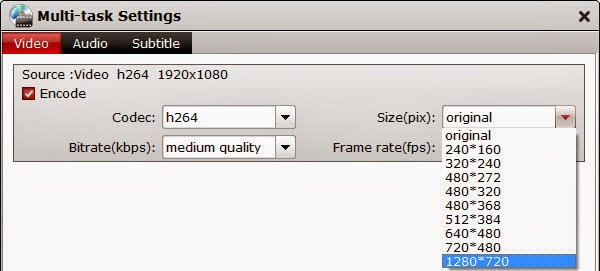
Step 3. Adjust video/Audio settings. Click “Settings” in the main interface, you will find three tabs for Video, Audio and Subtitles. In the Video tab, uncheck “Encode” to output MKV file without quality loss.
If you check the “Encode”, it will output MKV files compressed with H.264 or Xvid uses the original aspect ratio. If you are using Blu-ray as input, you needn’t change anything here, because this ratio is proper for full HD Blu-ray movies, and you can get a 16 x 9 file in 1080p. But if your source media is standard DVD, we suggest you set the size down to 1280*720 to produce a 720p video in widescreen (16x9).
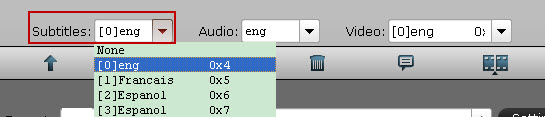
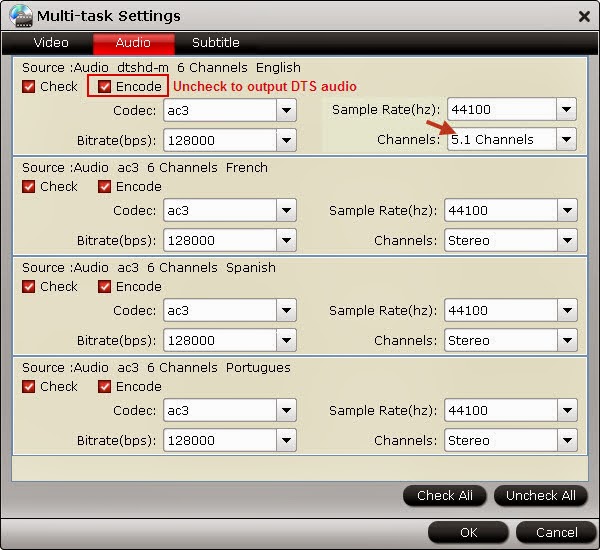
Then switch to Audio tab, choose wanted audio tracks and uncheck “Encode” and can set up channels to 5.1 for output to get 5.1 DTS audio.
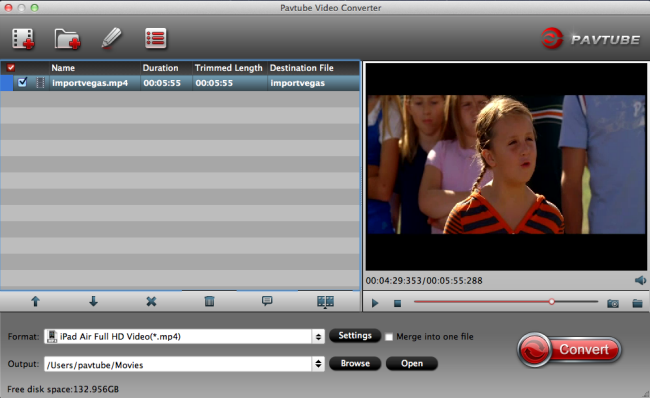
Step 4. Start Conversion.
Start backing up Blu-ray/DVD movie to lossless MKV, all the chapter markers will be save and Pavtube ByteCopy will take the rest. After the conversion, click “Open” to quick find converted videos.
Simply copy the output MKV file to your QNAP NAS and TwookyMedia Server and stream them via DLNA to Samsung plasma TV for freely playback.
Money saving bundles:
ByteCopy($42) + Video Converter Ultimate($65) = Only $79.9, Save $27.1
ByteCopy($42) + DVD Creater($35) = Only $44.9, Save $32.1
ByteCopy($42) + Vidpie($29) = Only $54.9, Save $16.1
ByteCopy($42) + MXF MultiMixer($45) = Only $69.9, Save $16.1
BDMagic($49) + Vidpie($29) = Only $49.9, Save $28.1
Related articles:
Question:
I'm seriously considering to buy a DVD ripping tool. As I ripped Toy Story 2 from a 16:9 standard DVD and there are so many choices of different files & codecs, I was pretty confused. All I'm really after is the "highest quality" 16:9 Video/5.1 DTS file available to stream from my QNAP NAS via DLNA or TwookyMedia Server to my Samsung plasma (which has Smart Hub).
What setting would I use for standard DVD's, Blu-rays, & 3D Blu-ray's to achieve this? I assume I wouldn't use the same setting for a blu-ray as I would a standard DVD? Please keep in mind that I'm after the closest representation of the DVD/Blu-ray (video & 5.1 sound) as possible.
What we need?
If you want to enjoy the Blu-ray/DVD movie on your Samsung plasma TV streaming from QNAP NAS and TwookyMedia Server, you need to first lossless backup your Blu-ray/DVD disc to media server.
To achieve it, I did many free trials, and then I choose to use is Pavtube ByteCopy, which runs as the the top of the list of the best Blu-ray rippers. I was able to copy both my Blu-rays and DVDs with keeping 16:9 widescrenn with fast speed. It can keep the original V/A settings without quality loss, the chapter markers so I can skip viewing easily, and the most important original DTS audio. Mac version is available here:Pavtube ByteCopy for Mac; well support Mac Mavericks! Now I will show you how to lossless backup your Blu-ray to QNAP NAS and TwookyMedia Server on Win and Mac.
Download a trial before purchase; or you can get 20% OFF any Pavtube programs by sharing to your FB.
How to backup Blu-ray to QNAP NAS and TwookyMedia Server keeping 16:9 widescreen and DTS audio
Step 1. Launch Pavtube ByteCopy, click “Load files(s)” to import Blu-ray disc, ISO/IFO files, and BD/DVD folder.
Step 2. Choose “Multi-track Video >Lossless/encoded Multi-track MKV(*.mkv)" in “Format” drop-down list as the lossless preset for QNAP NAS and TwookyMedia Server.
Step 3. Adjust video/Audio settings. Click “Settings” in the main interface, you will find three tabs for Video, Audio and Subtitles. In the Video tab, uncheck “Encode” to output MKV file without quality loss.
If you check the “Encode”, it will output MKV files compressed with H.264 or Xvid uses the original aspect ratio. If you are using Blu-ray as input, you needn’t change anything here, because this ratio is proper for full HD Blu-ray movies, and you can get a 16 x 9 file in 1080p. But if your source media is standard DVD, we suggest you set the size down to 1280*720 to produce a 720p video in widescreen (16x9).
Then switch to Audio tab, choose wanted audio tracks and uncheck “Encode” and can set up channels to 5.1 for output to get 5.1 DTS audio.
Step 4. Start Conversion.
Start backing up Blu-ray/DVD movie to lossless MKV, all the chapter markers will be save and Pavtube ByteCopy will take the rest. After the conversion, click “Open” to quick find converted videos.
Simply copy the output MKV file to your QNAP NAS and TwookyMedia Server and stream them via DLNA to Samsung plasma TV for freely playback.
Money saving bundles:
ByteCopy($42) + Video Converter Ultimate($65) = Only $79.9, Save $27.1
ByteCopy($42) + DVD Creater($35) = Only $44.9, Save $32.1
ByteCopy($42) + Vidpie($29) = Only $54.9, Save $16.1
ByteCopy($42) + MXF MultiMixer($45) = Only $69.9, Save $16.1
BDMagic($49) + Vidpie($29) = Only $49.9, Save $28.1
Related articles: