Thursday, October 9, 2014

Get AVI Files Work with Premiere Elements 12

This paper mainly tells us how to work Premiere Elements 12 well with AVI files which recorded by HD camcorders.

Facing the problem when importing AVI files into Premiere Elements 12 for further editing? If so, just follow the easy work around here.

Question showed here:
‘I tried to import AVI files (recorded by a HD camcorder, manufacturer "MEDION" on a SDHC memory card) to a new premiere elements 12 video project. These video-files are mis-interpreted by premiere elements as audio-files. But they can be played well on windows media player. So any suggestions how I can convince premiere elements to recognize my AVI files as video-files?’

Know more about why cannot Premiere Pro work with AVI files
AVI is a container also called wrapper, It is the codec that determines whether or not it will be supported. You may noticed that, AVI can play pretty well in Windows Media Player, VLC Player or QuickTime Player. So have you think of converting AVI to Premiere Elements 12 best supported formats? We need an assistant called AVI to Premiere Elements 12 Video Converter to make it possible.

How can AVI to Premiere Elements Video Converter work?
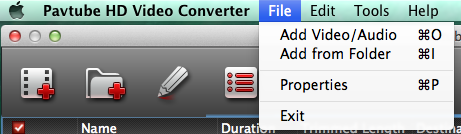
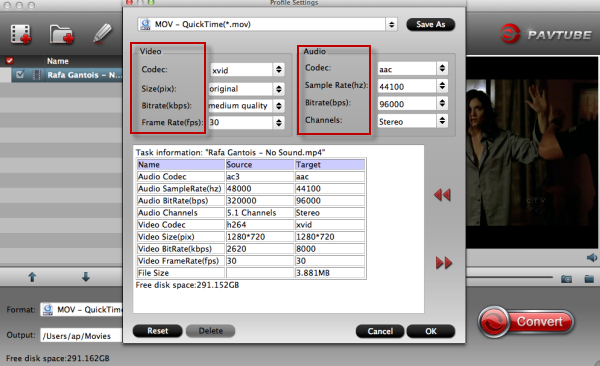
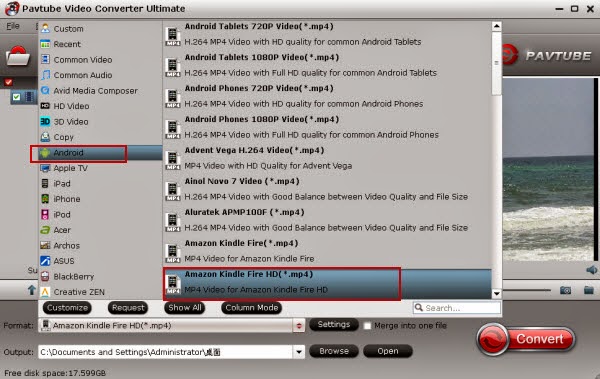
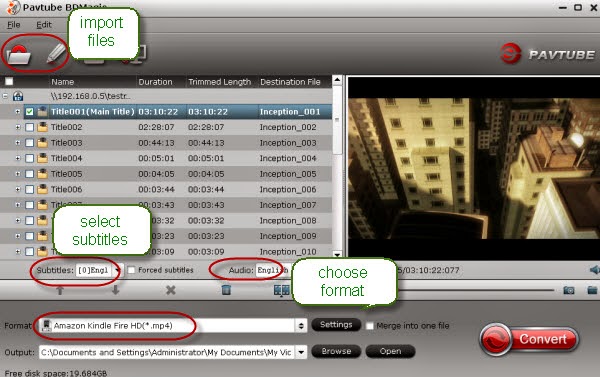
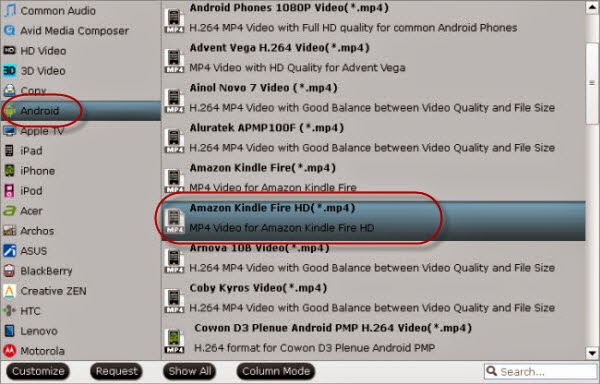
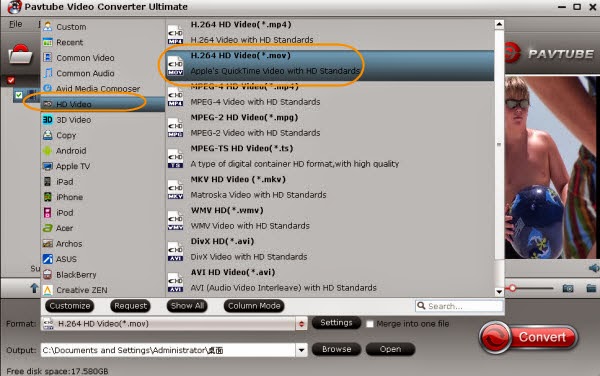
Just like most converting tools, for a first step, we should download this program here from official website and launch it to load your AVI files. You can choose ‘Add video’ for importing. Then as the picture shows below, we’ll select our best video format with normal video and audio retained well. Follow the ‘Format’ list, from ’HD Video’ to ‘MPEG-2 (*.mpg) or H.264 HD Video (*.mov). Both are available for Premiere Elements 12. 


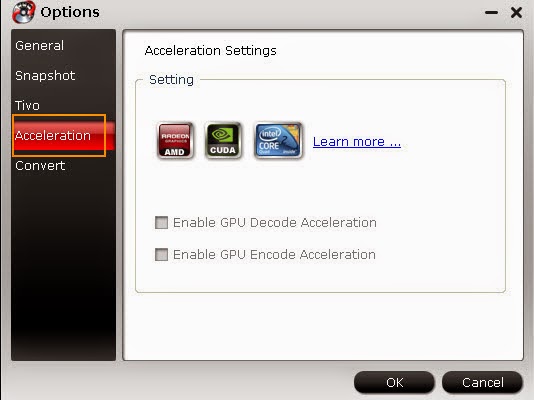
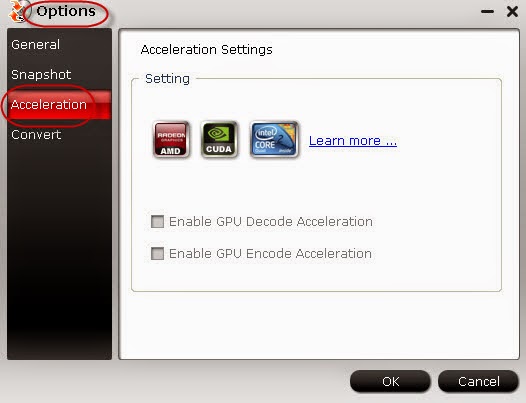
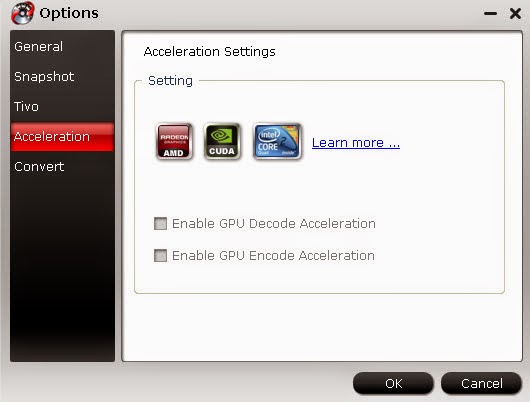
Additionally, if you get into the ‘Options’ item you may find the ‘Acceleration; icon. If there is an NVIDIA/AMD graphics card that supports CPU en-decoding acceleration installed on your computer, we suggest you select the H.264 MOV as target format because the CUDA and AMD APP acceleration only work when creating H.264 encoded video files.


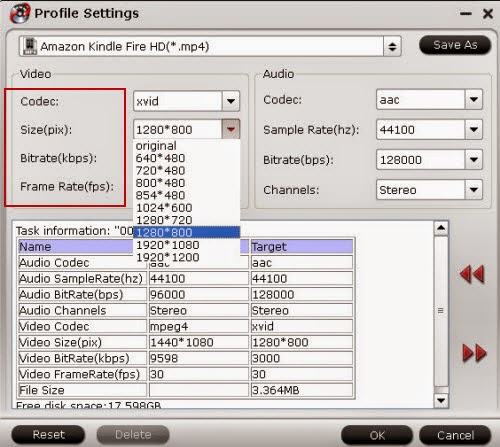
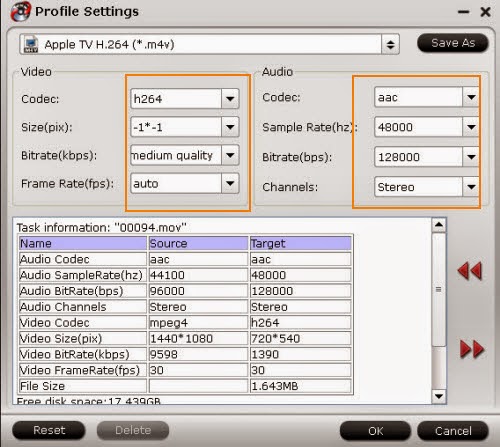
Before you click ‘Convert’ to start your work, you find other surprises in ‘Settings’ item. Cause the two buttons above export 1080p quality, so if you need 720p quality, just select video size as 1080*720. Other items like frame rate or bitrates, etc are also available.


Thanks for your reading and you can leave some opinions or suggestions below. 

More:

Monday, October 6, 2014

Compress FCP X Files for Vimeo in a Comprehensive Way

Solve the problem how to compress FCP X Files for Vimeo with no extra difficulties.


How do we solve the problem of playing or sharing videos with Vimeo? That’s indeed a good question. As we all know, Vimeo---a high-quality home for ad-free HD videos. However people will meet some questions like this.

‘Hi Just purchased Final Cut Pro X and I'm really impressed with it so far. However, I have just discovered that it cannot import mts files. My question is - What is the best method of doing this while still retaining the quality of the footage? I have look at various convertors but tricky to choose which one top go for?’

We know that Vimeo offers compression suggestions for FCP 7 but not for FCP X, it doesn’t describe the settings it is using for Vimeo. You can take the Vimeo website specs here for a reference. So now when you ask me again how to compress FCP X files for Vimeo, I’ll introduce you a Pavtube HD Video Coverter for Mac and it looks like a perfect match for what Vimeo needs. A very easy-to-use converting tool with great video quality kept.

Look here on how to compress FCP X files in Vimeo. Just take a main reference.
Run the program FCP X to Vimeo Compressor and import files with ‘Add video’ or ‘Add from folder’ and then we will go to the specify output settings. From ‘Format’ bar to ‘HD Video’, we can choose the item’ H.264 (*.flv) as the output format, as the picture follows:


Also, we can customize the detailed output video parameters in the “Settings” menu, such as changing the video resolution. My recommendation is to size your files to 720p. This allows you to improve image quality with a higher bit rate, without creating the massively bigger files of 1080p.


Click the ‘Convert’ button to start your conversion, you will get an output video perfectly fits the Vimeo with great quality. Now feel free to have a try! You can ask some other questions and leave comments below.

Read more:

Thursday, October 2, 2014

Play MKV, AVI, VOB, MPG, M2TS, FLV on Kindle Fire HD 6-inch Tablet

For those Android tablets users, this paper will go through a way on how to play MKV, AVI, VOB, MPG, M2TS or flv on Kindle Fire HD 6-inch Tablets.


Along with the more and more fierce competition on tablet market, do you know why Amazon Kindle Fire HD Tablet is still an important role in digital world? Some reasons are summarized below:

  • Fast quad-core processor up to 1.5 GHz
  • Beautiful 6" HD display
  • Best selection of digital content
  • Stay connected and productive

As Android fans said, watching videos on Kindle Fire HD 6-inch Tablet is a great enjoyment. But unfortunately, not all videos can work well with Kindle Fire HD tablet, such like, AVI, VOB, MPG, M2TS or FLV. Any methods that make it possible for all videos playing on Kindle Fire HD can do us a big favor. Then you may think that How wonderful if there is athird-party tool to convert all the videos. As the old saying goes, God never shuts one door but opens another. Here we recommend you a Kindle Fire Video ConverterforMac/Windows to put the difficulties away. Just keep going to see more converting steps below:

Download, install and launch the best Kindle Fire Video Converter And then click "Add Video" or "Add from folder" to import your source materials including FLV, AVI, M2TS, VOB, MPG, etc. files to the program. Batch conversion is supported so that you can add multiple files. Professional item of choosing compatible format for Kindle Fire HD tablet here, ‘Android’>>’Amazon Kindle Fire HD (*.mp4)’ for Android users. 


For advanced settings? Don’t worry about it because the program has ‘Settings’ button too. For various tablet size, you can adjust them in this interface. Audio channels are also included.


At last, you can start your conversion after all the preparations done. If you have no idea of transferring videos to Kindle Fire HD tablet, open here is okay.

More:

Saturday, September 27, 2014

Released!!! An amazing update of Pavtube HD Video Converter for Mac 3.6.1

Good News! We are so proud to announce that Pavtube has an amazing updated version of its all multimedia tools. Acted on customers requests and Pavtube adds some amazing new features at the latest release. 

What's new?

1. Add profiles for iPhone 6, iPhone 6 Plus and Samsung Galaxy Note 4
2. fix some bugs

The new version of Pavtube HD Video Converter for Mac 3.6.1 is specially designed for converting your recored MTS/MXF/MOV/MP4/Tivo videos to iPhone 6, iPhone 6 Plus and Galaxy Note 4 for watching!

new version of Pavtube HD Video Converter for Mac

Version: 3.6.1

Supported OS: Windows 2003/XP/Vista/Windows 7/Windows 8/Windows 8.1

Download the lateast version of Pavtube HD Video Converter for Mac here.

Three new profiles:

iPhone 6 Plus Video Format

iPhone 6 Video Format

Galaxy Note 4 Video Format

Best Profile Settings:
iPhone 6 Plus Video Settings

iPhone 6 Video Settings

Galaxy Note 4 Video Settings

Friday, September 26, 2014

Transfer Video and Music files to 6-inch Kindle Fire HD from PC

This guide specially told for those Android users on how to transfer videos and music files to 6-inch Kindle Fire HD from PC.


Equipped with a most impressive looking 6-inch tablet screen, Amazon Kindle Fire HD has attracted a lot of fans since it was announced on tablet market. Kindle Fire HD is perfect for browsing, playing, reading, and shopping on-the-go. What’s more, it comes with some special feature like Exclusive Dolby audio and dual-driver stereo speakers. But how to transfer contents to this tablet is always a problem for those new customers. Here we have figured out the easiest solutions to transfer videos and music to Kindle Fire HD from PC.

Solution No.1Drag or drop files---USB Wired Transfer
1.Connect Kindle Fire HD to your PC via USB. 2.Once you've connected your Kindle Fire HD to a computer with a USB cable (sold separately), your Kindle Fire HD will appear in the same location as external USB drives usually appear. For Windows users, this is typically in the "Computer" or "My Computer" menu. 3.Open the Kindle drive, you will see several folders inside, drag and drop them into the applicable content folder, Videos and Music are included.


Solution No.2 Download your favorite contents from Cloud
Do you know the wireless cloud service? From the Amazon Cloud, you can download such like Apps, videos, music or books that you want. Just connect your Kindle Fire HD with via Wi-Fi and choose to access your content through the Cloud.

Specific Step-by-steps

1.Download content from the Cloud to your device and confirm that your tablet is connected to Wi-Fi.
2.Tap the Cloud tab within Apps, music and videos, etc
3.Tap an item in the Cloud and download to your device.

Solution No.3 A third-party friend---DoubleTwist
DoubleTwist---a friendly tool that can manage and sync your contents to your device well. Not only for your media but also for your playlists and track ratings. You can downloadhere and install it on PC with installation instructions.

Other Tips for synchronizing incompatible videos to Kindle Fire HD

For those senior Kindle Fire users, you must know that not all videos can be accepted by this tablet except for MP4,3GP and VP8(.webm). So for other video formats such like MKV, WMV, AVI, FLV, MTS, M2TS, MOV, MPEG, MPG, MOD, TiVo, VOB, etc, we have recommend Kindle Fire HD Video Converter for you to convert various videos formats to native that you want. Download tips you can allow here.

To those DVD lovers, maybe DVD to Kindle Fire HD Converter is a good choice for you. With 6X faster conversion speed, it can export playable videos for Android and Apple Tablets. Download this way.

While for our Blu-ray fans, Pavtube BDMagic is no doubt a true friend that deserved to make. With professional Blu-ray/DVD to any video solution and customize with built-in video editor, it has popular among BD market. Why not have a try here?

What’s more, if you have the intention to transfer Blu-ray, DVD movies as well as your personal HD video files to Kindle Fire HD, you’d better get the best all-in-one video convert tool Pavtube Video Converter Ultimate to have fastest and most effective conversion. Download the program and get into the interface , you’ll find more useful items.

More guides?

Thursday, September 25, 2014

Work Panasonic HD MTS Files with iPad or Apple TV Well

Today we are here to have a hot topic on how to work Panasonic HD MTS files with iPad and Apple TV well in an efficient way.
If you got a hobby of taking home videos with some portable cameras, it’s a nice enjoyment when you watch your recordings on tablets or devices, such as iPad and Apple TV. Two guys which can play indoor or outside. Let me show you an example:

‘Hello, everybody! When we have family meetings or outdoor activities, I’m used to recording HD home videos with a Panasonic HD camera and use a NAS for storage. Cause the recordings are MTS files so as you know, they can’t work well with my iPad or Appple TV. I will be appreciate if there are any solutions to convert MTS to M4V files with original HD effects too.’

For searching online with the key words’ MTS Converter’, surely there are a few professional converting tools. But do you observe that HD MTS Video Converter is the best one which has been estimated well. Just with the simplicity of the UI and over more versatile videos offered, it is popular among videographers.

Before we introduce some main steps of how to convert MTS files to M4V videos with HD retained, here are two additional items you deserve to know.

Tip 1. For Windows users, we can save much time for waiting your conversion, Why? Get into the ‘Options’ and you will see the ‘Acceleration’ choice. Click it if you are in a hurry.


Tip2.Extra ‘Editor’ for those advanced users. Open the pencil icon to walk into another interface. ‘Trim’ to make the suitable length of you output video. ‘Crop’ to cut off unwanted clips. You can also add some ‘Subtitles’ to explain something to the audience.


Main steps of converting the Panasonic MTS files to HD M4V are showed here. For a first step, add your MTS files with ‘Add video’ or ‘Add from folder’. Then come to the most important point, choose the best format, click ‘Format’ list to find the item’ Apple TV’>>’Apple TV H.264 M4V(*.m4v). For iPad, ‘iPad’>>’iPad Video H.264 (*.mp4). Don’t know clear how to transfer videos from iTunes to iPad? Open here to get the answer.

Oh, almost forget to mention the ‘Settings’ button for you! For more video size, frame rate, bitrates or even audio channels. You can have a try here. Like the picture below:


For all iPad or Apple TV fans, if this guide helps you a lot, please leave us some comments below. Thanks a lot.

More:

Tuesday, September 23, 2014

Rip Blu-ray to MP4 for Playing on Kindle Fire HDX

For those Android fans, this paper can tell you something about how to rip Blu-ray to MP4 for playing on Kindle Fire HDX.

For those Android tablets fans, they must have a familiar sense with Kindle Fire HDX, which has equipped with 2.2 GHz quad-core Snapdragon 800 processor, it provides 3x more processing power than Kindle Fire HD. Furthermore, it also provides faster app launches, faster speed operation and better voice effect. It has been popular in our Android fans’ hearts. However, to those Blu-ray makers, it has still been a tough task to rip Blu-ray on Kindle Fire HDX because the supported video and audio formats for this tablet are listed below:

Amazon Kindle Fire HDX supported Video/Audio Formats:
Video Format: MP4, M4V, MKV, 3GP, VP8(WEBM)
Audio Format: Dolby Digital(AC-3), Dolby Digital Plus (E-AC-3),non-DRM AAC, MP3, MIDI, WAV

Due to the reasons listed above, if you want to make full use of this display to watch Ble-ray rips, we can’t figure out a proper method to do so. So here you have come to the right place. A Blu-ray to Kindle Fire HDX Converter to make it possible to offer you a reliable solution on ripping Blu-ray movies to MP4, which you can easily play back with your Kindle Fire HDX Tablet.

See alsoHow to transfer videos to Kindle Fire HD?

How to transfer Blu-ray to Kindle Fire HDX?


Load your source Blu-ray media
DownloadPavtube BDMagic and get into the interface, can you see the button ‘Load files’ ? Click it and load your Blu-ray movie contents from your BD drive. Also, you can select wanted subtitles and audio track, as the picture below:


Choose the best output format specially for Kindle Fire HDX.
This program has a high-light that it provides the special items for Android series, click the format bar to ‘Amazon Kindle Fire HD (*.mp4), as the target video format.


Additionally, it never mind if you are in a hurry with conversion, for Windows version, it has the personal design, ‘Acceleration’ from ‘Options’ button.


When all the work done above, just click the ‘Convert’ item to finish the conversion, frankly speaking, more items are waiting for your exploration here.

More guides: