Overview:
You got an idea of extracting one stereo WAV from MXF 4 Audio Tracks? Why not read the following guide to get more details? Quite easy!

Summary: According to the following page, we will be provided a professional MXF Converter which has a strong ability of extracting one stereo audio such as WAV from MXF 4 audio tracks, also, if you want do some change with original MXF files, you won’t be disappointed with this program.
Just like the question asked below:’I have MXF that includes video and 4 audio tracks. First two tracks are left and another is fight so the rest one is empty. Now I would like to extract and compile these two channels into one stereo WAV, is that possible?’ As asked above, the high definition quality MXF usually has several audio tracks. However, it is not efficient enough and the extracted audio sounds wired. Sometimes, you will miss some audios when importing MXF files to popular editing tools for editing.
Adapting advanced audio encoding technology, Pavtube MXF Converter for Mac or iMixMXF can achieve this job well. The outstanding highlight is that e can trim the file to get we wanted or preferred audio length when converting MXF to stereo WAV. As one of the most efficient converters, the time-saving and easy-to-handle conversion process is also an essential feature. (See also Best MXF Converter for Mac Review)
Download and Install Pavtube MXF Converter for Mac.


Other Download:
- Pavtube old official address: http://www.pavtube.com/mxf-converter-mac/
- AppStore Download: https://itunes.apple.com/us/app/pavtube-mxf-converter/id502807634?mt=12
- Amazon Download: http://www.amazon.com/Pavtube-MXF-Converter-Mac-Download/dp/B00QID8K28
- Cnet Download: http://download.cnet.com/Pavtube-MXF-Converter/3000-2194_4-76177789.html
More specific steps by steps that we can make some references to learn how to work this program well and extract WAV audio from MXF audio tracks:
Step 1: Load your source audio files in
Open the main interface, you can directly drag your files in this program or with the ‘Add video’ button, we can individually import our audio clips. Batch conversion is available here.

Step: Extract your WAV audios
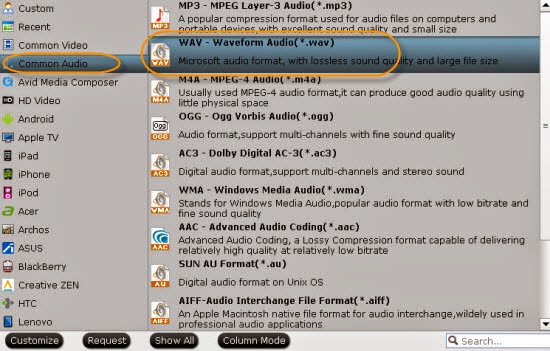
Click the ‘Format’ bar on the left of the preview window, you can input the ‘WAV’ in the searching box or just click the ‘Common Audio’ to find the ‘WAV-Waveform Audio (*.wav)’ as the best one the output list.

Step 3: get into the ‘Settings’ button, don’t forget to set the audio codec as ‘wav’ and in the ‘Edit’ interface, the equipped built-in editor tool allows you to trim the video length, so you can get your desired audio. Here you can drag the slide the block to decide where to start and where to end by ‘Trim. etc.

Note: What we have to mention here is the iMixMXF we also suggested above, it is designed for those people who want to the transcode the MXF video with multi-track audios as output. Why not free download it and have a try?
Finally, click the ‘Convert’ button, we can easily get the extracted WAV audio tracks from MXF audio tracks. You have my words you won’t be disappointed. Any other questions you can leave the comments below. Good luck!
You may also like:
- Transcode Multi-audio Channels MXF to MP4 with Original Audio Tracks preserved
- How to Mix Multiple Audio Tracks into One Track on Mac
- Canon XF300 MXF to FCP 6/7/X Workflow on Yosemite
- Best Multi-track MXF Converter Review on Windows
- Top multi-track MXF Converter for Mac Review: Pavtube vs Tipard
- Solve no audio issue when converting HVX200 P2 MXF to ProRes 422 for FCP X
- Import Ikegami HDS-V10 MXF to Avid Media Composer for Editing
- Work Avid DNxHD MXF Recordings with Premiere Pro CC