Many of us only copy the Canon C100 .mts files to Mac hard drives without knowing that Final Cut Pro doesn't work with individual .mts/.m2ts files unless the AVCHD file structure is preserved from the camera archive. If you'd like to import single .mts file from C100 to Final Cut Pro 7/6, here's a Canon C100 camera user's issues.
"I'm using a Canon C100 AVCHD camera. I want to log and transfer the raw footage to Final Cut Pro 7 for editing, then export the video and compress it to H.264 HD for normal playback. But I am confronted with a warning that reads "Invalid directory structure."…
Is there any easy way to do this?"
It's kinda complicated but could be easy if you have every step done easily and efficiently.
The correct way to backup AVCHD is copying the entire AVCHD folder with all directories and files to your Mac HDD. The AVCHD folder structure and all of its files must stay intact. If not, the video editing program will throw an error message when trying to import. You can try importing AVCHD from C100, or getting an AVCHD to Apple ProRes decoder that reads single .mts files, for instance, above mentioned Pavtube MTS Converter for Mac.
Here you need to do two conversions, first convert Canon C100 MTS clips to ProRes 422 MOV for FCP editing, then convert ProRes MOV to H.264 MOV for normal playback. Have a try firstly.


Notes:
- The free trial version is provided for you to see if it would be able to convert your AVCHD format video from a Canon C100 camera.
- The trial version will create videos with PAVTUBE logo standing in the center of the output image. To bypass the watermark, you should purchase its full version.
How to import Canon C100 raw footage to edit in Final Cut Pro? First convert C100 MTS clips to ProRes 422.
Step 1. Load source mts files shot with your Canon C100 camera
Launch Pavtube MTS Converter for Mac as C100 MTS to ProRes Converter. Click "Add video" or "Add from folder" icon to load your source files directly from your Canon C100 camera, or from a card reader, or from the file folder that contains the source MTS videos stored on your computer's hard disk drive. Or drag and drop Canon C100 AVCHD MTS file to the program. You can batch load several files to the program directly.

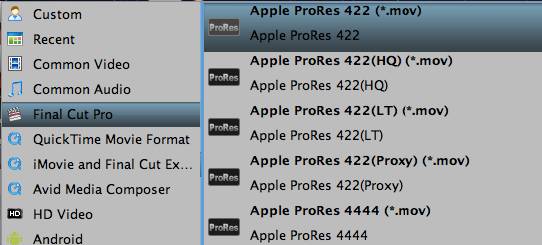
Step 2. Select "Apple ProRes 422 (*.mov)" as output format for Final Cut Pro
Go to "Format" menu, move to "Final Cut Pro" option, and choose "Apple ProRes 422 (*.mov)" as target format for FCP 6/7 or FCP X.
Tip: If you want to get to a smaller file, you’d better choose ProRes 422(LT)(*.mov).

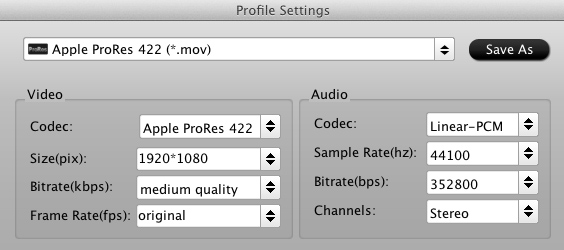
Do some settings as you want before conversion:

Click "Edit" to deinterlace 1080i MTS files for FCP.
Step 3. At last, hit the "Convert" button to convert Canon C100 MTS clips to ProRes 422 MOV for FCP editing.
After the fast conversion process, you are able to get the converted file by clicking "Open". Then you can import C100 MTS files to FCP 7 for editing.
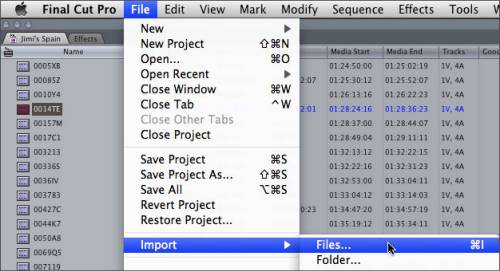
Launch Final Cut Pro 7, choose "File > Import > Files…", and browse to where you save the converted AVCHD clips to. Choose the videos that you'd like to add.

Apple ProRes encoded videos should be added instantly to FCP project. No rendering is required. Just drag the clips to timeline for editing.
If you want to export the video from FCP and compress it to H.264 HD for normal playback, Pavtube HD Video Converter for Macis the best choice for you.
Good Luck
Read More:
- MXF & FCP X Workflow: Help Importing MXF into FCP X
- How to Edit H.264 Natively with Final Cut Pro on Mac
- Fix Choppy Issues When Importing AVCHD Files to FCP
- How to Solve the freezes when importing MTS media to Premiere CC-2015.3?
- Top 5 MTS/M2TS Video Editors for Mac
- Top 5 MTS/M2TS Video Editors for Windows (10, 8.1, 8, 7, XP, etc)

