Showing posts with label Canon. Show all posts

Monday, August 11, 2014

An efficient way to Import Canon C500 PL 4K MXF to FCP X

Do you wanna import Canon EOS C500/C500 PL 4K MXF to FCP X? Maybe the strongest converting tool iMixMXF can do a favor.

1. Why not use iMixMXF to transfer Canon c500 PL MXF files? 

We all know, Canon EOS C500PL, as one of the most popular professional camcorders, it was loved by most photographers. Due to its vivid high-definition and multiple functions, it has brought us a lot of unforgettable moments and memories. But unfortunately, we can’t import our videos into FCP X directly for editing. Cause Canon C500 PL recoded files are MXF format while the best video format FCP X supported is Apple Pro Res 422 MOV. Thus we need a friendly converter called iMixMXF to transcode MXF format to ProRes 422 MOV.

import Canon 4K MXF to FCP X

2.iMixMXF---An efficient tool for converting with multi-track preversed.  

As a strong convert tool, iMixMXF supplies us a convenient way to accept the MXF files and make it easier for FCP X to edit. On the other hand, iMixMXF can not only output ProRes 422 MOV but also support some other formats, such as H.264/Mpeg-4, MKV,MPEG-2 Video ect. What’s more, this software has an outstanding feature that can output the videos with multi-track audio preserved. However, to those who have no needs in multi-track function, we can recommend another tool for you :Pavtube MXF Converter for Mac. It’s a good choice too.

Pavtube iMixMXF vs Tipard MXF Converter for Mac

3. Does iMixMXF also support other camcorder brands? 

Maybe there are still some users must be confused if iMixMXF can also support other camcorder brands .For example: Sony, Panasonic or other brands. There is no doubt iMixMXF has a strong capacity to solve these problems well. So why not have a try? I’ m sure you will love it.
The following URL showed us the specific steps on how to import MXF to FCP with iMixMXF. Open it if you need:

Recently we hear that some users reflect there was no audio when they convert MXF files to Apple Pro Res 422. Here we’ll supply several tips for our readers:
  • a. Before you put the recorded MXF files into FCP X , Please make sure they can be played well. So why not check it on your personal camcorders firstly?
  • b. The most important point for us to pay attention to is the process of converting videos. After selecting our task, click the “properties” item to choose a correct audio stream ID. Then we could have a try in the window on the right and convert these task smoothly.
convert MXF to ProRes with audio

Take the measures metioned above , we will successfully get our video format from Canon C500PL MXF to FCP X for editing.

Tips:

a. If our MXF footages are shot by Panasonic P2 camcorders, we must make sure we have imported the video and audio files at the same time, or we might get our audio or video missed.

Panasonic P2 Structure

b.For more details about iMixMXF, we can refer to the online help page.

Read more:

Monday, August 4, 2014

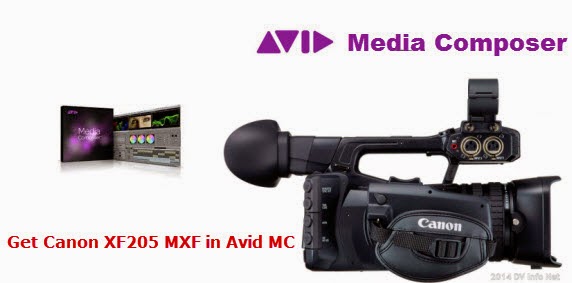
Fluid Workflow for getting Canon XF205 footage to Avid Media Composer

Read this awesome guide, you can smoothly get Canon XF205 MXF files into Avid Media Composer by converting XF205 MXF to DNxHD MOV format.

As a revolutionary HD codec technology, Avid DNxHD optimizes mastering picture quality and reduce storage requirement. And it can maintain quality during complex post production effects processing. It is specially designed for nonlinear editing, supported on Media Composer, NewsCutter and so on. In addition, DNxHD codec can be used seamlessly in Final Cut Pro with QuickTime HD codec.

get canon xf205 mxf in avid mc

Based on the above advantages, many people convert native camcorder format like Canon XF205 MXF to Avid DNxHD for further editing in Avid MC. So how to convert XF205 MXF files to Avid DNxHD? Here MXF MultiMixer and iMixMXF are the right choice to help you realize that easily. Next we will show you how to convert Canon XF205 MXF to Avid DNxHD codec for editing in Avid MC on Windows and Mac step by step in the following tutorial.

How to convert Canon XF205 MXF to Avid Media Composer on Win/Mac?

1. Run the best Mac MXF to Avid Converter. Connect XF205 camcorder to your computer hard drive via USB cable. Click the button "Add File" or "Add from folder " to add Canon XF205 MXF files, or directly drag and drop your MXF files.

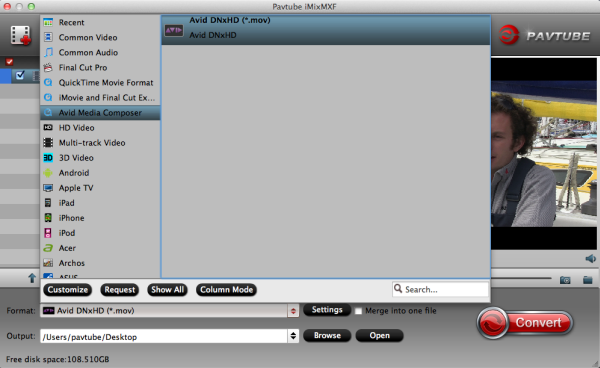
Step 2: Select an output format for Avid Media Composer and set the output folder.

Click on the "Format" and get the dropdown menu, then move you pointer to Avid Media Composer -> Avid DNxHD (*.mov), this format is best for Avid MC native editing.

convert mxf to avid mc


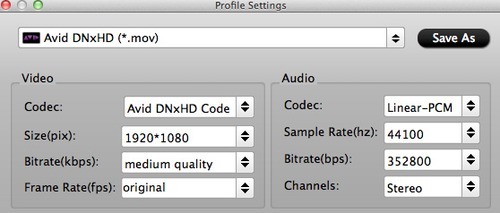
Step 3: Click "Settings" icon to adjust audio and video parameters. (Optional)

Click the "Settings" icon and you will go into a new interface named "Profile Settings". You can adjust codec, bit rate, frame rate, sample rate and audio channel in the interface according to your needs and optimize the output file quality.

avid dnxhd settings

Step 4: Start Converting.

Click the "Convert" button; it will convert Canon XF205 MXF to DNxHD for Avid Media Composer immediately. After the MXF to DNxHD conversion, you will be able to get the output files for Avid Media Composer via clicking on "Open" button effortlessly.

Afterwards, you can import the converted Canon XF205 MXF videos to Avid Media Composer freely for further editing without any trouble.

Tip:

1. For guys who may find it difficult to import and edit Canon XF205 MXF files in Avid Media Composer with keeping multi audio channels on Win/Mac, you can also try these multi-track mxf tools t
o help you mix and convert multi audio channels MXF to multi-track MOV for Avid MC. 

2. Refer to here to learn how to transcode Canon XF205 MXF to FCP X and work with Canon XF205 MXF in iMovie.

Monday, July 28, 2014

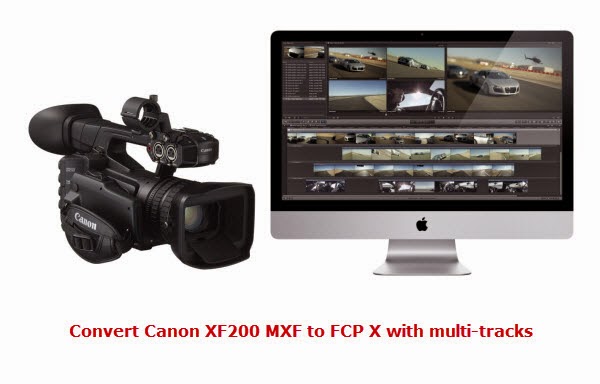
Transcode MXF film from Canon XF200 to FCP X (with multi-track)

How to edit Canon XF200 multi-track MXF video in FCP X? This guide will show you the easy way to achieve it by transcoding MXF to multi-track Prores 422 for editing.

Convert Canon XF200 to FCP X

The Canon XF200 (XF-200,XF 200) is a compact, high-performance Professional Camcorder which is ideally suited to newsgathering, documentary and independent filmmakers as well as videographers across a wide range of disciplines. The camcorder features a wide-angle 20x optical zoom lens with three control rings, full image stabilization, infrared capabilities, flexible MXF/MP4 dual recording at various data rates, two/four-channel audio recording, a network interface and dual-band Wi-Fi.

Workflow for Canon XF200 multi-track MXF and FCP X

Suppose that you are a professional musician and want to built a music video project in FCP for getting a short film for festivals and competitions. How to do this? Is there a tutorial? Is it possible to preserve or separate audio tracks in Canon XF200 MXF for further editing in FCP X.

The answer is Yes! Here I share with you a simple guide on how to convert Canon XF200 MXF files to Apple ProRes MOV format for FCP X editing flawlessly with multiple audio channels preserving.

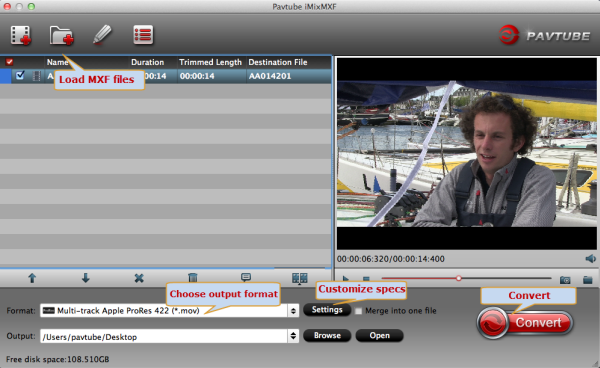
At first, come and meet this multi-track MXF Converter for Mac - Pavtube iMixMXF which can preserve all or any audio tracks for output Prores .MOV and mix the multiple audio tracks into one if you need. Below is a brief guide for you.

Transcode Canon XF200 MXF to Multi-audio track ProRes 422 for FCP X with all audio tracks preserved

1. Connect your XF200 to Mac and keep it on. (Please make sure you have the entire MXF file structure as it saved on your camcorder’s card)

Get Pavtube iMixMXF installed. Now follow the top left two icons to load individual mxf or in batch.

Pavtube iMixMXF

2. Choose compatible format for FCP X native editing.

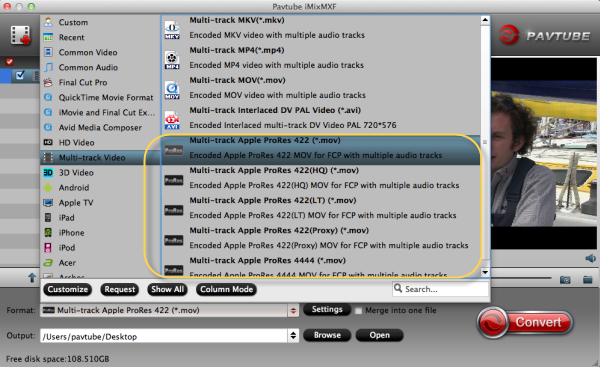
Click "Format" and choose Multi-track Video>Multi-track Apple ProRes 422(*.mov) as the most compatible codec for FCP X editing.

Tip:
If you don't need  multi-track format, choose Final Cut Pro > Apple Prores 422(*.mov)  for importing into FCP X.


compatible codec for FCP X editing

3. Click "Settings" to free select needed video/audio tracks.

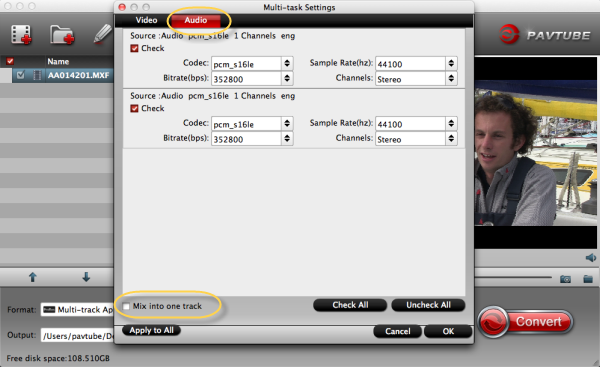
Check the tracks you need and left others unchecked, thus you can get Multi-track MOV with your needed audio streams. Note there’s a mix into one track icon on the bottom, it will combine all your checked audio tracks into single one.

Multi-track audio settings

4. Click the red "Convert" and just let it go!

Wait for a while to get this Canon XF200 multiple audio track into ProRes MOV for FCP X editing on Mac.

Read more:

MP4 to FCP ǀ AVCHD to FCP ǀ MOV to FCP ǀ H.265 to FCP

Monday, January 13, 2014

How to perfect home video editing workflow with 5D mark III mov files

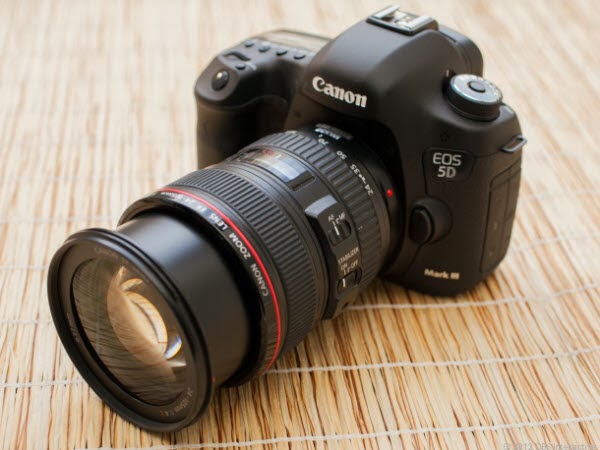
Does some Video Editor support ALL-I .mov video files from Canon 5D Mark III? If you want to edit or play 5D3 H.264 mov files, you have to convert mov to compatible MP4 format.
I have been an amateur photographer for 30 years and recently retired so am now able to spend more time on my main hobby of photography. I recently purchased a Canon 5D Mark III and while my main interest is photography and travelling, I am now starting to also use the video functionality with this DSLR camera.

I am taking some family and holiday videos at 1920 x 1080 at 24fps with compression ALL-I. When I exported the .mov files from my camera to AVS Video Editor, while the software would play the files, it could not convert or edit them. (As for me, AVS Video Editor is my preferrable editing software to help me trim out of focus portions or other unwanted footage and add transitions or text. After editing my mov videos from Canon 5D Mark III, I can give copies to family members and retain as a personal archive.)


After searching, I get these info: ALL-I stands for "Intra-coded Frame, the Intraframe (ALL-I) compression format is designed for users working in high-end editing systems or those looking for the highest quality possible. And 5D Mark III cameras record movies using the H.264 codec in the .mov container.

Maybe the ALL-I compression type within this codec is too high for some Editors to support. Then I'm looking for the best software to convert Canon 5D Mark iii mov files to mp4 for editing. I did some reading in forums and a number of people recommended Pavtube HD Converter from first-hand experience. I didn’t realise at the time that you also have another product Video Converter Ultimate which may have suited me better. (As it can deal with Blu-ray and DVD disc as well)

Previously I have been using AVS Video Converter and Video Editor for a number of years but when I purchased my camera recently I found AVS could not convert Canon mov files to mp4 or edit them. I like the availability of Pavtube Video Converter Ultimate to convert and merge all files into one to expedite editing. The conversion speed is excellent. With it, I can effortlessly transcode Canon 5D Mark III mov files to MP4 format for editing.

Overall, it is an all-in-all converter that can help all Windows users losslessly convert the HD footages and Blu-ray/DVD files to most popular video formats as well as importing MOV files from 5D Mark III to Pinnacle, Cyberlink, Sorenson Squeeze, Windows Movie Maker, AVS Video Editor etc. for editing. Besides, this smart converting program also provides users with useful editing functions and new features such as converting 2D videos to 3D, etc.

Guide: Transcoding Canon 5D Mark III to MP4 for editing and sharing 

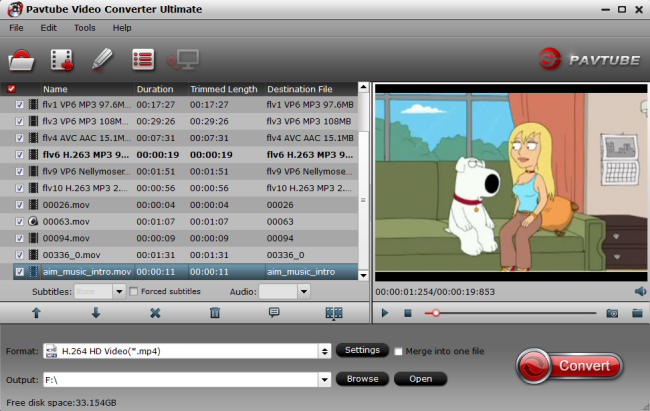
Step 1: Add mp4 footage from MP4 file folder to ALL-I H.264 MOV converter. You can directly drag and drop video files to this software.


Step 2: Choose best editing and playback format.

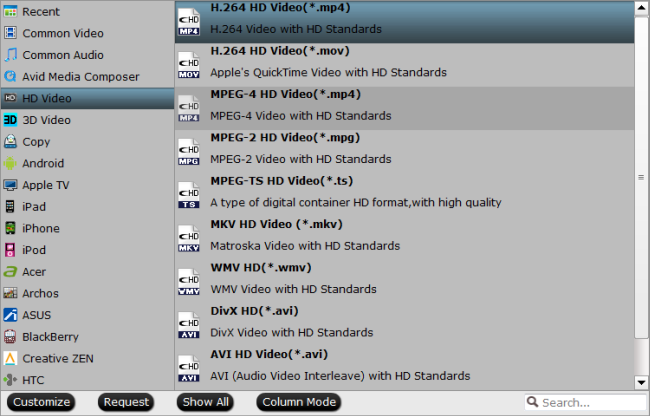
Select HD Video -->H.264 HD Video(*.mp4) or MPEG-4 HD Video(*.mp4) on the dropdown menu as output format. Besides, you can also choose Divx HD(*.avi) or WMV HD(*.wmv) is also fit for importing or watching.


Tips:
1. Video Settings:

You can adjust video and audio parameters, including the Bitrate of Video and Audio, the Codec of Video and Audio, Video Size, Sample Rate, Frame Rate, Audio Channels, etc., in the Profile Settings.

2. Edit videos as you like

Find “Edit” icon and then click it, you will find video editor. There you can Trim, Crop, Add watermark and Effect. Above all, Subtitle can be added here.

For creating customized subtitle, you can count on free software for subtitle editing: Subtitle Edit. Go to write the subtitle content there and it will be saved as SRT files, which is supported by Video Converter Ultimate. Then load it to the software for output videos and you will get a characteristic video.
3. Convert videos to different formats

Step 3: Hit "Convert" button to carry out the conversion process. When the conversion ends, you can import the resulted .mp4 files for playing or sharing easily.

Other useful guides for you:

Transcode Nikon D7100 H.264 MOV to Quicktime MOV for playing and editing on Mac 
Best way to Edit/Import Canon T3i/600D MOV video into iMovie 
Edit Recorded ALS Ice Bucket Challenge Videos on Mac 

Wednesday, December 25, 2013

Create 3D & Multi-track Videos for Videographers With Latest Update to Pavtube MXF MultiMixer

The latest upgrade to Pavtube's MXF MultiMixer and iMixMXF software allows users to now create 3D videos and still support multi-track audio preservation. The latest upgrade also allows MXF videos to be played on websites, tablets, smartphones, HD Media Players and TVs.

Source: PRWeb
 
Photographers and videographers can now convert 2D videos to 3D and preserve or mix MXF multi audio tracks with the latest upgrade to Pavtube's MXF MultiMixer and its Mac version, iMixMXF.


The MXF video format is familiar to most professional videographers and enthusiasts if they use any sort of professional camera or camcorder. However the MXF format is not supported by major editing software(Convert Canon MXF to multiple audio tracks ProRes 422 for FCP 6/7), most websites, tablets, smart phones and TVs, and people cannot play MXF video on them directly.

The Pavtube MXF MultiMixer software is designed to help those video-graphing fans to be able to edit or play videos on these platforms and also do much more with their videos.

"I get numerous customer requests everyday asking for ways to convert MXF video for all usable formats. A lot of users shoot videos with camcorders in HD quality and then want to upload the videos online, to websites like YouTube and others," said Sally Lee, one of Pavtube's customer support professionals.

Sally continued, "Many people converting MXF multi-track videos have tried to have all audio tracks in one video, but weren't able to do so. They simply mix them up into one, or lose one or two tracks. Some customers also have the need to output 3D videos. With the recent upgrade to our software, we found a way to help them."

Many professional cameras and camcorders now record videos with multiple audio tracks in MXF format. Canon XF series cameras, for example, are the most typical and widely used models which include two audio tracks, one is recorded by the microphone and the other recorded by headset. Of course, more audio tracks options come with more professional devices, such as Panasonic P2 MXF, and Sony XDCAM MXF.

Pavtube's developers found ways to meet customers' needs with some advanced technology in the first version of MXF MultiMixer/iMixMXF and helped users retain the original audio tracks in .MKV, .MP4 and .MOV. With this latest upgraded version they were able to add 3D output.

Sally continued "Some customers also found it helps fix some Cannon C300 clips that were corrupt, and can merge several clips into one bigger clip. These 2 features are also frequently mentioned and favored by other Pavtube users."

"With this latest update with 3D video output feature, Pavtube MXF MultiMixer/iMixer becomes unique among MXF converters. It is really good news for video editing hobbyists. They are now able to convert their current 2D videos to 3D in MKV, MOV, AVI, MP4, WMV formats so that they can play 3D video on various portable devices, and make 3D Stereoscopic editing with Premiere Pro CS5 etc. And it's still a perfect multi-track MXF mixer and preserver," concluded Sally. (How to Mix multiple audio tracks into one track on Mac?)

From Videographers Can Now Create 3D & Multi-track Videos With the Latest Update to Pavtube MXF MultiMixer
  

Tuesday, December 24, 2013

The Odyssey family: Odyssey 7 and Odyssey 7Q


Convergent Design is announcing two exciting new monitor/recorder products: Odyssey7 and Odyssey7Q. The Odyssey family is intended to follow users as they journey through their careers from DSLRs to high-end 4K raw cine cameras, hugging the ever-changing camera technology curve and adapting to change without invasive hardware changes or costly upgrades. The Odyssey series combines Convergent Design's knowledge and experience of both broadcast and cinematography recorders, while adding the capabilities of a high-end professional monitor for an amazing $1295 USD (Odyssey7 - monitor and compressed recording capability). Then you are able to rent or buy features as you need them via the web.

The Odyssey family is a professional 7.7" OLED monitor with high-end monitor features, including Waveform, Zebras, Histogram, Vectorscope, Focus Assist, False Color, Timecode Display and Audio Level Meters, and 1:1 Pixel mode. Odyssey7 includes HDMI I/O, and SD/HD/3G-SDI I/O; in both single and dual link configurations. As you have come to expect from Convergent Design, Odyssey is low power, lightweight and comes in a rugged magnesium case.
Odyssey 7 and Odyssey 7Q

Odyssey7

Odyssey7 is an amazing value at $1295 (USD price, international prices vary), and includes full monitoring capabilities and compressed recording. Odyssey7 is ideal for use as a monitor onANY camera, proxy recorder, and DSLR applications.

Convergent Design's Odyssey7 RAW Monitor & Recorder is an advanced follow-up to Convergent's Gemini 4:4:4 RAW monitor/recorder. The Odyssey7 features a 7.7" 1280 x 800 LCD with a 3400:1 contrast ratio and is equipped with advanced image analysis tools, including Vectorscope, Waveform, and RGB Parade. A compressed DNxHD codec is included and will record up to 1080p60/50 10-bit 4:2:2. The firmware for the codec is preloaded and gets activated once you install a Convergent SSD. The Odyssey7 supports Convergent Design 2.5" SSDs only and has two built-in SSD slots. The monitor features two SDI inputs and two outputs and automatically detects the incoming video format upon input and when possible creates an entire recorder/monitor setup based on camera metadata.

The interface is a capacitive touchscreen and simple to navigate, meaning less setup time. All the controls can also be remotely accessed with an iPhone or Android device via Bluetooth. Most of the inputs/outputs are on the bottom, and 1/4" mounting threads are on the sides. An AC adapter is included for continuous power, and compatible IDX, AB and Sony battery plates are available.

DNxHD Codec Included

The Odyssey7 includes a compressed DNxHD codec that will record up to 1080p60/50 10-bit 4:2:2. The firmware for the codec is preloaded and gets activated once you install a Convergent SSD.

Convergent Design Odyssey7 Family Tech Specs
FeatureSpecification
Display7.7″ OLED, 1280×800, RGB 8-Bit, 3400:1 Contrast, 176° Viewing, True Blacks
SDI Video I/OSD/HD/3G Support: Single/Dual Link, 2-Inputs, 2-Outputs
Odyssey7Q adds 2 Bidirectional HD-SDI 3G ports to allow:4 HD-SDI 3G Inputs, and 2 HD-SDI 3G Inputs or2 HD-SDI 3G Inputs and 4 HD-SDI 3G Outputs or other configurations
SDI Video FormatsHD/2K RGB 444 8/10/12-Bit up to 60p/60psf,HD/2K YCC 422 8/10-Bit Up to 120p, QHD/4K 422 up to 30fps,ARRIRAW (16:9) 12-bit up to 60fps, ARRIRAW (4:3) 12-bit up to 48fps,Canon Raw QHD/4K 10-bit up to 60fps
HDMI Video I/OHDMI I/O Version 1.4a support
HDMI Video FormatsUp to 1080p60 422 8-bit
LUT SupportARRI, Canon, Sony
Monitor Analysis ToolsFocus Assist, YRGB Waveform, Histogram, False Color, Vectorscope, Zebras,H/V Flip/Flop, 1:1 Mode, Recticule Markers, Horizon Indicator
Odyssey7Q adds ability to monitor four video streams in a quad-split display
Recorder OptionsAvid DNxHD up to 1080p30/1080i60, HD/2K Uncompreseed RGB 444 up to 60fps,HD/2K Raw up to 120 fps, ARRIRAW (16:9) up to 60fps, (4:3) up to 48fps, Canon RAW QHD/4K up to 60fps
Odyssey7Q adds Four Stream recording up to 1080p30, 4K Support,High-Speed (120fps) and Simultaneous RAW + Proxy (DNxHD-36) mode
Record File FormatsDNxHD = .mov, Uncompressed = .dpx, HD/2K Raw = .dng,Canon Raw = .rmf, ARRIRAW = .ari
Record TriggersTouchscreen, SDI record trigger (ARRI, Canon, Panasonic, Red, Sony),Optional remote cable
Digital Audio I/O2-Channel Embedded Audio (48KHz, 24-bit)
Odyssey7Q adds 8-Chan support
Analog Audio I/OMono Speaker, 3.5mm headphone output, mono unbalanced consumer input
Remote ControlRS-232 I/O, programmable GPIO
TimecodeLTC I/O (BNC) or Embedded SDI/HDMI TC
Wireless ControlBluetooth LE with iPhone/Android App
Recording Media2.5″ professional server grade SSD in 240/480/960 GB sizes,500MB/sec read/write speed, SATA-3 (6 GHz) interface,compatible with off the shelf USB 3.0 and Thunderbolt adapters
User InterfaceCapacitive Touchscreen, Two mechanical Function Keys
Firmware UpdateVia USB Port to host computer, download updates from website
DC Power Input10 to 34 VDC with built-in reverse polarity protection; built-in power switch
Power Dissipation8 Watts (monitor only), 8-15 Watts (monitor and record mode)
Weight540 grams / 1.2 lbs, cast-magnesium case
Size7.9″ x 6.1″ x 1.0″ (200 x 155 x 25 mm), measured from end of BNC to SSD tabs
Enviromental-10 to +40°C (Operating), -20 to +70°C (Storage)
NotesAll Specifications subject to change without notice (Revision: 25-Mar-2013)

Odyssey7Q

The Odyssey7Q adds two bi-directional SDI's (2-In, 2-I/O, 2-Out), enabling a 4K@60fps-ready option. Additional computational power supports recording/playback of up to four-compressed HD/2K simultaneously, support for one video stream up to 120fps and concurrent proxy and raw recording. Odyssey7Q includes a built-in Quad Splitter and Four-Channel Live Switcher. Odyssey7Q starts at $2295 (USD price, international prices vary), including compressed recording. 7Q can be upgraded to a full professional recorder with the following options: Alexa (ARRIRAW, full 16:9 and 4:3 support), Canon C500 4K Raw, and Sony Raw for the FS700, Weisscam Raw (CinemaDNG), and Quad Stream Recording.

As a recorder, Odyssey7 and 7Q support a wide range of recording formats including Avid DNxHD (up to 120fps), uncompressed HD/2K RGB 444 (up to 60p), 2K/HD Raw, ARRIRAW (4:3 and 16:9), and Canon 4K Raw. All recording formats are extra-cost options. New 2.5"; highly-reliable "Server-Grade" SSD's support read/write bandwidths in excess of 500 MBytes/sec per drive, enabling Canon 4K Raw at 60 fps on a single recorder. The unique dual SSD architecture can be configured in spanning mode (to double record times), RAID 1 mode, for auto-backup or in RAID 0 mode for data-rates in excess of 1 GByte/sec.

Comparison: Odyssey 7 vs 7Q

Based on extensive market feedback, Convergent Design is introducing a new purchasing model to on-board recorders. Odyssey7 or 7Q ships as a monitor only, which can be upgraded to a recorder as needed. For the first time, support for recording options can be purchased outright or "rented" at competitive rates. Add optional features anytime from anywhere, via a secure online purchase from the CD website to obtain an activation key, provided at the point of purchase and you're up and running! Rental of recording options (ARRIRAW, for example) provides many benefits including no shipping hassles, no insurance certificates, and none of the scheduling issues of traditional rentals. Recording options are rented in 24-hour blocks, with unused blocks available for future use.

The Odyssey7Q utilizes the same 7.7" OLED architecture; the Odyssey7 is intended for single stream support (up to 4K Raw), while the 7Q adds additional bi-directional HD-SDI 3G ports. The 7Q's extra processing power enables certain extra cost options to support: four-stream HD/2K monitoring (quad-split) and compressed recording, 4K video and high-speed (120fps) support, and simultaneous recording of proxy (DNxHD-36) and Raw video. The price of the Odyssey7Q is to be determined, but will be competitively priced and use the same, affordable 2.5" premium media as Odyssey7.

A wide range of battery accessories, mounting options, and sunshade, are planned to support both products. Odyssey7 and Odyssey7Q will be on display at NAB booth C6713.

Raw media files recorded with Odyssey 7/7Q are not supported by Windows/Mac or NLEs natively. If you want to edit or playback the videos, try Pavtube HD Video Converter and HD Video Converter for Mac to do a quick conversion to MOV, WMV, M4V, MP4, Apple ProRes for Final Cut Pro, AIC MOV for Avid Studio, MPG/WMV for Sony Vegas or Adobe Premiere Pro, etc.

Here are some guides for you:
  
Don't forget to click "Settings" and adjust target video size, bitrate and frame rate settings to get video in best quality.
  

Thursday, December 19, 2013

Convert Canon 70D MOV to ProRes 422, ProRes 422 LT, ProRes 4444, ProRes 422 HQ/Proxy for FCP editing

The article shows you the best workaround for editing Canon EOS 70D videos in FCP by transcoding Canon 7D MOV to FCP native editing format: Apple Prores 422 Codec or ProRes 422 LT, ProRes 4444, ProRes 422 HQ and ProRes 422 Proxy.
I'm working on a feature on my Mac, shot on Canon 70D, and am in the process of converting all my MOV files to manageable ProRes files. But I am unsure how to do this. Can someone give me a basic rundown of the procedure? I would be most appreciative.
This question is from one of my client, if you have used Canon 70D camera and recorded many 1080p videos, then how to ingest Canon 70D mov video into FCP for editing without crashing problem and avoid rendering?

In fact, MOV video format came from Canon 70D is a long GOP format that is highly compressed, which means it is not convenient for editing on Mac with Final Cut Pro. To import Canon EOS 70D 1080P video to Final Cut Pro for editing, the best way is to convert Canon EOS 70D 1080p HD MOV video to Final Cut Pro native Apple Prores .mov video on Mac.

Pavtube HD Video Converter for Mac is a professional Mac Canon 7D MOV to FCP Converter for you to easily convert Canon 70D 1080p H.264 MOV video to Apple ProRes 422 so that you can easily import the Canon h.264 recordings to Final Cut Pro X, Final Cut Pro 6, Final Cut Pro 7 for editing on Mac (10.9 Mavericks adn Mountain Lion included). This will help you import the file correctly and saving the rendering time.

Breaking news: Pavtube Studio has started the 2013 Christmas Hot Deals, if you get HD Video Converter for Mac, you can free get DVD Creator for Mac which can help you to free burn Canon mov footage to DVD on Mac with ease. Never miss!

Below is a brief guide for you.

How to import Canon EOS 70D H.264 MOV footage to Final Cut Pro on Mac? 

1. Free Download and run the best Canon 7D H.264 MOV converter and drag 70D MOV files to the software.


2. Click format bar to choose output format for use in FCP 6/7 or FCP X. For editing Nikon MOV on Mac, you can choose Apple ProRes 422 for FCP.


Tips:

Here listed the main difference of the five ProRes codecs.

a. ProRes 422 (HQ): offers the utmost possible quality for 4:2:2 or 4:2:0 sources and provides target data rate of approximately 220 Mbps and higher quality than Apple ProRes 422;

b. ProRes 422: provides target data rate of approximately 145 Mbps and higher quality than Apple ProRes 422 (LT);

c. ProRes 422 (LT): provides roughly 70 percent of the data rate of Apple ProRes 422 (thus, smaller file sizes than Apple ProRes 422) and higher quality than ProRes 422 (Proxy);

Learn how to convert Canon EOS 70D H.264 MOV to ProRes 422 LT for FCP X 

d. ProRes 422 (Proxy): provides roughly 30 percent of the data rate of Apple ProRes 422 and high-quality offline editing at the original frame size, frame rate, and aspect ratio;

e. ProRes 4444: offers the utmost possible quality for 4:4:4 sources and roughly 50 percent higher than the data rate of Apple ProRes 422 (HQ).

Step 4. You can click "settings" to customize the output parameters, adjust the resolution, bitrate as you want.

Note 1: You are allowed to adjust output video and video parameters. However, if you have no idea about profile setting, keep it as original recordings will provide you the files with less quality loss, and keep default settings is also a good choice for your to get a high quality files.

Note 2: In order to get customized videos, you can add subtitles to your own videos.

The free Subtitle Edit will help you to edit your own subtitles then put it into videos.

Read More: Subtitle FAQs: Free permanently attach subtitles to videos/movies

3. Click convert button in the main interface to start converting Canon 70D H.264 MOV videos to Prores for FCP.

Some more helpful features of the app:

1. Settings- Click to adjust the output parameters, such as resolution, frame rate, etc, customize the parameters as you want.

2. Editor (next to "Add" icon)- click to set deinterlace, denoise, mute, volume up, trim, crop, etc.

After converting the MOV to ProRes format, you can easily import/edit Canon EOS 70D h.264 mov files in Final Cut Pro 6/7 or FCP X smoothly on Mac.

Tips:

1. Before you try to do the conversion, if you are also a FCP X user, please make sure that you have installed the Apple ProRes Codec manually since the FCP X asks users to install it by themselves.

2. This Mac Canon MOV Video Converter can convert mov video to Prores with retaining timecode for FCP.

Refer to the picture below to see how this cool mac H.264 converting tool keep the timecode for FCP. It is not difficult to find that the timecode is kept.

3. Pavtube HD Video Converter can also convert Canon 70D mov videos to iMovie and FCEPremiere ProAvid Media ComposerDaVinci ResolveApple Aperture 3 and After Effects CS6 with good quality, just download the and have a try.

And you can get more info about how to import video to FCP (X) on pavtube website.

Source: http://pc-mac-compatibility-issues.blogspot.com/2013/11/edit-canon-70d-mov-in-fcp.html
    

Read more:

MP4 to FCP ǀ AVCHD to FCP ǀ MOV to FCP ǀ H.265 to FCP