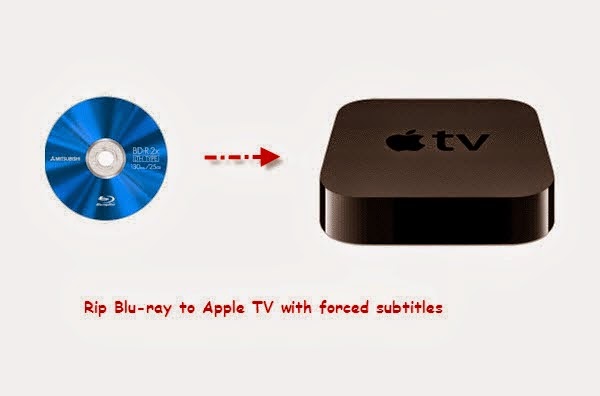
Want to make Blu-ray portable on Apple devices with preserving forced subtitles? This article mainly introduces the way to put Blu-ray on Apple TV with forced subtitles.
We like surfing, email, ebay, remote work, reading, watching movies on our IOS devices iPad2, iPad3, iPad mini, and also on Apple TV. Now I have Blu-Ray which I wanted to view via my AppleTV and store on my media drives. I hope to be able to set Forced subtitles, and write directly out to Apple TV format. Is there any way?

Indeed, you can not play Blu-rays directly on your Apple devices like Apple TV. To make Blu-ray portable with Apple TV, the answer is to rip Blu-ray to Apple TV compatible videos so you can transfer them for smoothly playback.
What's more, some Blu-ray contains the unknown language like Avatar and you cannot understand it without subtitles. So how to keep the subtitles for full Blu-ray enjoyment on Apple TV?
In this case, Pavtube BDMagic is the ideal software to you. It will help to rip and convert Blu-ray to Apple TV friendly MP4 format with fast speed and high video quality. Moreover, you can choose the desired subtitle for output and select forced subtitles for some unknown languages. Now let's go to learn how to do it.
How to convert Blu-ray to for Apple TV with forced subtitles?
Get your Blu-ray drive ready and insert Blu-ray you need to the drive. And keep networked when ripping Blu-ray.
Tips: If you are running on Mac, please try BDMagic for Mac.
Step 1. Load Blu-ray to Blu-ray to Apple TV Converter.
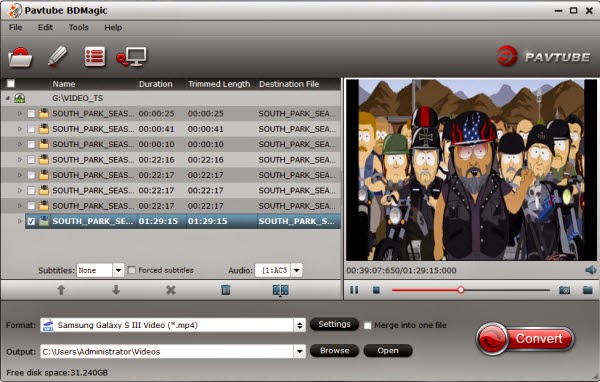
Run the best Blu-ray to Apple TV Converter, click "Load file" button to select the inserted Blu-ray and import it for transferring to iTunes. It will take only few seconds to rip Blu-ray. Then the software will recognize the actual main title of Blu-ray and pick it automatically. You do not need to look for the main title manually.
Press the selected main title you can preview the whole Blu-ray movies on the preview window on the right, which works like a media player.

Step 2. Check forced subtitles for output.
Because Blu-ray always contains multiple subtitle and audio tracks, you can go to choose the desired subtitle and audio on the interface for output.
Beside subtitles option, "Forced subtitle" is optional and uncheck by default. Go to check "Forced subtitles" for output. Take note that it will output forced subtitles only if it is checked.
Step 3. Choose Apple TV compatible format.
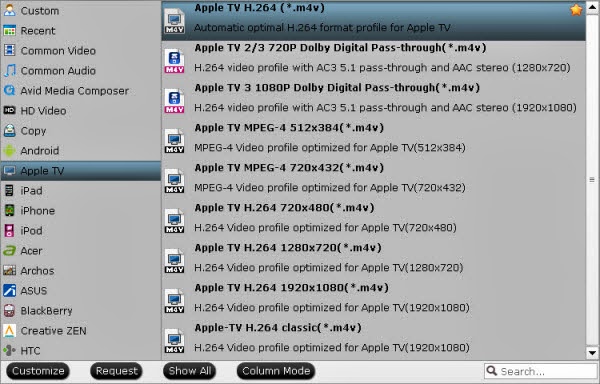
Choose "Format" dropdown list and go to "Apple TV" options to find "Apple TV H.264 (*.m4v)". This format is best for playing on Apple TV.

Tips: For some advances users, you can go to adjust video and audio parameters like bitrate, resolution, channels, etc. Click "Settings" button you can go to check and change them as you like.
Step 4. Convert Blu-ray to Apple TV.
Before conversion you can go to "Browse" your computer to find the folder for output files. Then click "Convert" button to get Blu-ray to Apple TV conversion started. After a while, you can find the generated file for Apple TV quickly via "Open" button. In this way, you can enjoy your favorite Blu-ray with forced subtitles on your Apple TV wherever you are.
Related articles:
Mac Tivo to ATV solutions- Play commercial-free Tivo recording on Apple TV
Get Blu-ray movies to Apple TV 3 for watching on Mac
Sync DVD ISO/IFO images to Apple TV 3, Apple TV 2 and Apple TV
We like surfing, email, ebay, remote work, reading, watching movies on our IOS devices iPad2, iPad3, iPad mini, and also on Apple TV. Now I have Blu-Ray which I wanted to view via my AppleTV and store on my media drives. I hope to be able to set Forced subtitles, and write directly out to Apple TV format. Is there any way?

What's more, some Blu-ray contains the unknown language like Avatar and you cannot understand it without subtitles. So how to keep the subtitles for full Blu-ray enjoyment on Apple TV?
In this case, Pavtube BDMagic is the ideal software to you. It will help to rip and convert Blu-ray to Apple TV friendly MP4 format with fast speed and high video quality. Moreover, you can choose the desired subtitle for output and select forced subtitles for some unknown languages. Now let's go to learn how to do it.
- Read more: 2013 Top 5 Blu-ray Ripper Program Review
How to convert Blu-ray to for Apple TV with forced subtitles?
Get your Blu-ray drive ready and insert Blu-ray you need to the drive. And keep networked when ripping Blu-ray.
Tips: If you are running on Mac, please try BDMagic for Mac.
Step 1. Load Blu-ray to Blu-ray to Apple TV Converter.
Run the best Blu-ray to Apple TV Converter, click "Load file" button to select the inserted Blu-ray and import it for transferring to iTunes. It will take only few seconds to rip Blu-ray. Then the software will recognize the actual main title of Blu-ray and pick it automatically. You do not need to look for the main title manually.
Press the selected main title you can preview the whole Blu-ray movies on the preview window on the right, which works like a media player.

Step 2. Check forced subtitles for output.
Because Blu-ray always contains multiple subtitle and audio tracks, you can go to choose the desired subtitle and audio on the interface for output.
Beside subtitles option, "Forced subtitle" is optional and uncheck by default. Go to check "Forced subtitles" for output. Take note that it will output forced subtitles only if it is checked.
Step 3. Choose Apple TV compatible format.
Choose "Format" dropdown list and go to "Apple TV" options to find "Apple TV H.264 (*.m4v)". This format is best for playing on Apple TV.

Tips: For some advances users, you can go to adjust video and audio parameters like bitrate, resolution, channels, etc. Click "Settings" button you can go to check and change them as you like.
Step 4. Convert Blu-ray to Apple TV.
Before conversion you can go to "Browse" your computer to find the folder for output files. Then click "Convert" button to get Blu-ray to Apple TV conversion started. After a while, you can find the generated file for Apple TV quickly via "Open" button. In this way, you can enjoy your favorite Blu-ray with forced subtitles on your Apple TV wherever you are.
Related articles:
Mac Tivo to ATV solutions- Play commercial-free Tivo recording on Apple TV
Get Blu-ray movies to Apple TV 3 for watching on Mac
Sync DVD ISO/IFO images to Apple TV 3, Apple TV 2 and Apple TV