To view Blu-ray movies on your new Surface Pro 2 tablet, the best way to rip Blu-ray disc/folder/ISO files to Surface Pro 2 support video format so that you can playback Blu-ray on Surface Pro 2 smoothly.
If you want to transfer Blu-ray movies to Surface Pro 2, a professional powerful ripping program will help you a lot.Pavtube Blu-ray to Surface Pro 2 Converter is such a tool with the easiest workflow to help you rip off Blu-ray disc/ISO/folder protection, then convert the decrypted movie to MP4 format with best video settings for Surface Pro 2. Get Blu-ray to Surface Pro 2 Converter for Mac here; well support Mac Mavericks!
Tutorials: How to transfer Blu-ray to Surface Pro 2?
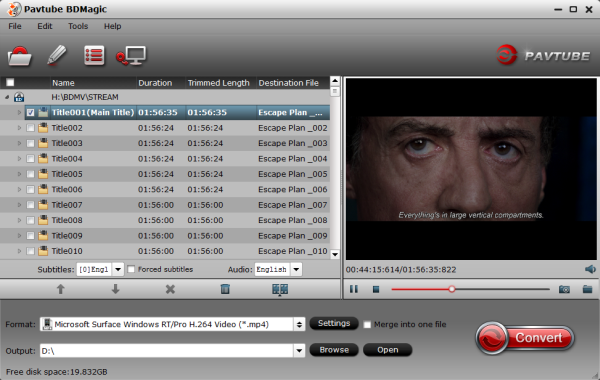
Step 1. Run Blu-ray to Surface Pro 2 Converter; load Blu-ray.
This converter does not only support Blu-ray disc/folder/ISO, but also able to convert DVD disc/folder/ISO/IFO files. Your ISO image file would be recognized automatically so there’s no need to run virtual drive to mount it any more.

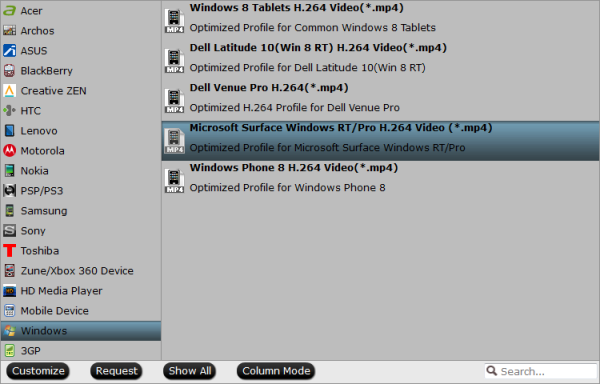
Step 2. Choose format.
Click the drop-down list besides “Format” list, you can find many presets and columns for different devices and programs. Let’s switch to “Windows” column and select “Microsoft Surface Windows RT/Pro H.264 Video (*.mp4)” as the best preset for Surface Pro 2. (For Surface 2 users, refer the guide: How to copy Blu-ray movies to Surface 2 for playback easily)
Or you can enter “Surface” in the small search box at bottom right corner.

Step 3. Adjust specs or edit video before conversion (Optional).
If you want to customize output video size, bitrate, frame rate and others, just click “Settings” to enter profiles settings window.
And you can click the pencil-like icon on the top to crop, trim, edit audio/subtitles/ or add watermarks before conversion.
Step 4. Start conversion.
Now hit the big red “Convert” to start converting Blu-ray movies to Surface Pro 2 MP4 with best settings for playback.
After the conversion, you can get the converted Blu-ray rips in .mp4 format by tapping the Open button.
How to transfer media files to Surface Pro 2?
To see how much storage space you have:
Scroll down to Available storage, to see how much storage space you have.
Or don’t move files to Surface. Store them in the cloud instead using your files on SkyDrive. This way you can access your files from other computers or your phone.
You can pick using one of the following methods to transfer video to Surface Pro 2
You can also move files to Surface, by copying them to a USB flash drive or memory card (microSD, microSDHC, or micro SDXC cards all work with Surface) and then adding the files to Surface. Here’s how:
1. Copy files onto a USB flash drive or memory card on your other computer.
2. Insert the USB flash drive or memory card into Surface.
3. Tap or click the notification that appears in the upper-right corner of the screen.
4. Tap or click Open folder to view files.
File Explorer opens.
5. Select the files or folders you want to add to Surface, tap or click Home, and then tap or click Copy to.
6. Select a location. For example, choose Documents if the flash drive or memory card contains documents.
Related Articles:
“For software that has to be loaded from a Blu-ray movie, how will I get my software on the Surface Pro 2? Will I have to use an external blu-ray drive whenever I want to watch Blu-ray movie on Surface Pro 2? Or is some other method involved??”Surface Pro 2 is just a laptop without a keyboard. You can plug in a disk drive or any of the other peripherals that can be connected to any Windows computer. You could connect an external Blu-ray drive to play a blu-ray disc; but you don’t have to so this every time when you want to play (3D) Blu-ray movie on Surface Pro 2 as it’s inconvenient. In my way, I’d prefer to rip Blu-ray disc to MP4 format that works perfect on Surface Pro 2 for playback.
If you want to transfer Blu-ray movies to Surface Pro 2, a professional powerful ripping program will help you a lot.Pavtube Blu-ray to Surface Pro 2 Converter is such a tool with the easiest workflow to help you rip off Blu-ray disc/ISO/folder protection, then convert the decrypted movie to MP4 format with best video settings for Surface Pro 2. Get Blu-ray to Surface Pro 2 Converter for Mac here; well support Mac Mavericks!
Tutorials: How to transfer Blu-ray to Surface Pro 2?
Step 1. Run Blu-ray to Surface Pro 2 Converter; load Blu-ray.
This converter does not only support Blu-ray disc/folder/ISO, but also able to convert DVD disc/folder/ISO/IFO files. Your ISO image file would be recognized automatically so there’s no need to run virtual drive to mount it any more.

Step 2. Choose format.
Click the drop-down list besides “Format” list, you can find many presets and columns for different devices and programs. Let’s switch to “Windows” column and select “Microsoft Surface Windows RT/Pro H.264 Video (*.mp4)” as the best preset for Surface Pro 2. (For Surface 2 users, refer the guide: How to copy Blu-ray movies to Surface 2 for playback easily)
Or you can enter “Surface” in the small search box at bottom right corner.

Step 3. Adjust specs or edit video before conversion (Optional).
If you want to customize output video size, bitrate, frame rate and others, just click “Settings” to enter profiles settings window.
And you can click the pencil-like icon on the top to crop, trim, edit audio/subtitles/ or add watermarks before conversion.
Step 4. Start conversion.
Now hit the big red “Convert” to start converting Blu-ray movies to Surface Pro 2 MP4 with best settings for playback.
After the conversion, you can get the converted Blu-ray rips in .mp4 format by tapping the Open button.
How to transfer media files to Surface Pro 2?
To see how much storage space you have:
- Open the Settings charm, tap or click Change PC settings.
- Tap or click General.
Scroll down to Available storage, to see how much storage space you have.
Or don’t move files to Surface. Store them in the cloud instead using your files on SkyDrive. This way you can access your files from other computers or your phone.
You can pick using one of the following methods to transfer video to Surface Pro 2
- -Connect to a networked computer
- Use a USB flash drive or a memory card -- microSD, microSDHC, or micro SDXC cards all work with Surface.
Connect to a network computer
Surface can access music, pictures, videos, and documents on computers that are part of your home network. To see the files and folders that have been shared on your network, go to the Start screen and open File Explorer. Shared items appear under HomeGroup or Network.
Use a USB flash drive or memory card
You can also move files to Surface, by copying them to a USB flash drive or memory card (microSD, microSDHC, or micro SDXC cards all work with Surface) and then adding the files to Surface. Here’s how:
1. Copy files onto a USB flash drive or memory card on your other computer.
2. Insert the USB flash drive or memory card into Surface.
3. Tap or click the notification that appears in the upper-right corner of the screen.
4. Tap or click Open folder to view files.
File Explorer opens.
5. Select the files or folders you want to add to Surface, tap or click Home, and then tap or click Copy to.
6. Select a location. For example, choose Documents if the flash drive or memory card contains documents.
Related Articles:
