Description: If you want to convert projects from FCP to MKV, MP4, WMV, AVI, MOV, MPG, VOB, FLV, etc. for playing, burning, editing, sharing and so on, this article will give you instruction. Follow this article to find the solution.
Final Cut Pro is a professional editing program developed by Macromedia Inc. and later Apple Inc. Many Mac users prefer to use FCP to create individual videos for sharing with family and friends and export videos as Apple ProRes 4444, Apple ProRes 422 (HQ), Apple ProRes 422, Apple ProRes 422 (LT), and Apple ProRes 422 (Proxy).
Do you want to convert FCP projects to MP4 or MKV for playing them in some mobile devices, tend to convert to WMV or AVI for sharing with your friends who use Windows Media Player on PC, or transcode to H264 MOV for more portable devices? When you search a solution in Google, you will find much third-party software can do conversion.
Free software like Handbreak may be your first choice. After trying it, you will be disappointed that the output video looks fine but the audio is out of sync. At this time, Turning to Pavtube HD Video Converter for Mac will bring you good-quality output videos without any video and audio out of sync issue. And easy-to-use workflow and fast conversion speed will provide you great customer experience. Now let me show you how to convert FCP projects.
Note: Trial version before purchase can help you to test all the functions, but there will be Pavtube watermark in the middle of output videos, which is the difference form retail version. Download it according to different Mac OS.

 Make preparation: Export videos with Final Cut Pro
When you have finished editing the video with Final Cut Pro, export it to MOV files. Hit “File” option and then go to “Export”, choose QuickTime Movies.
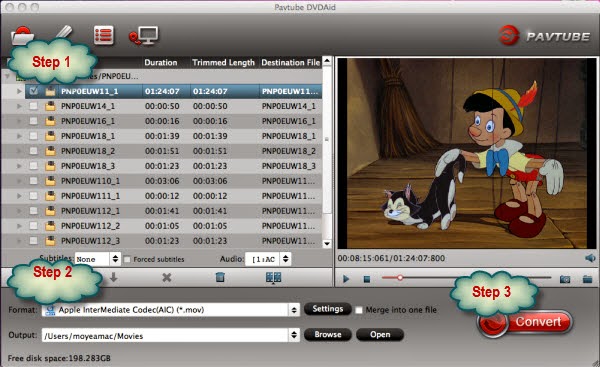
1. Import FCP projects
After you get the FCP output files successfully, launch HD Video Converter for Mac and then choose to locate the projects into the program by clicking “Add video” or “Add from folder”.
And there is an easier way that is to directly drag the projects into the program, which allows you to load multiple projects at one time. It loads files quickly and the dialogue box of progress will give you timely state of loading.
Tips: If your videos are different segments and you want to joint them into one output file, at this time, you can go to select the desired segment titles and then check Merge into one file button on the interface. In this way, you will get a big combined file.
2. Choose video format for output
This program offers you a variety of video formats in the “Format” dropdown list. Many common portable devices and editing software are listed. If you do not want to choose the devices, “HD Video”, “Common Video” and more options can give you more choices. Just choose the one you need from the list.
Make preparation: Export videos with Final Cut Pro
When you have finished editing the video with Final Cut Pro, export it to MOV files. Hit “File” option and then go to “Export”, choose QuickTime Movies.
1. Import FCP projects
After you get the FCP output files successfully, launch HD Video Converter for Mac and then choose to locate the projects into the program by clicking “Add video” or “Add from folder”.
And there is an easier way that is to directly drag the projects into the program, which allows you to load multiple projects at one time. It loads files quickly and the dialogue box of progress will give you timely state of loading.
Tips: If your videos are different segments and you want to joint them into one output file, at this time, you can go to select the desired segment titles and then check Merge into one file button on the interface. In this way, you will get a big combined file.
2. Choose video format for output
This program offers you a variety of video formats in the “Format” dropdown list. Many common portable devices and editing software are listed. If you do not want to choose the devices, “HD Video”, “Common Video” and more options can give you more choices. Just choose the one you need from the list.
 Tips: Sometimes you may think too many video formats listed is inconvenient because some options you won’t use at all. Don’t worry; you can remove some formats and customize the list according to your own need.
3. Adjust the output parameters (Optional)
This step is optional. If you are not good at settings, keep the system built-in settings will as give you great target videos. However, if you want to change codec, bitrate, frame rate, and so on, here is right for you. Click “Settings” to set them.
4. Convert FCP projects.
Before starting conversion, you may need to set the location of output videos in Browse. Now, hit the “Convert” button to get started. Then Open output folder to get the generated videos.
Tips: If you need to convert so many videos with big file size, you can not bear waiting for a long time when you are in a hurry to go out or go to bed. Just one click will solve the problem for you:
Go to check “Shut down the computer after conversion” and then you can go to do everything else. The computer will shut down automatically after completed conversion.
Tips: Sometimes you may think too many video formats listed is inconvenient because some options you won’t use at all. Don’t worry; you can remove some formats and customize the list according to your own need.
3. Adjust the output parameters (Optional)
This step is optional. If you are not good at settings, keep the system built-in settings will as give you great target videos. However, if you want to change codec, bitrate, frame rate, and so on, here is right for you. Click “Settings” to set them.
4. Convert FCP projects.
Before starting conversion, you may need to set the location of output videos in Browse. Now, hit the “Convert” button to get started. Then Open output folder to get the generated videos.
Tips: If you need to convert so many videos with big file size, you can not bear waiting for a long time when you are in a hurry to go out or go to bed. Just one click will solve the problem for you:
Go to check “Shut down the computer after conversion” and then you can go to do everything else. The computer will shut down automatically after completed conversion.
 It is an all-in-one program that many other videos besides FCP projects can be converted with this program.
What’s more, you can free burn FCP projects to DVD on Mac by Pavtube Free DVD Creator for Mac. (Here is a guide)
You can have a try when you need. Now please enjoy the output video.
It is an all-in-one program that many other videos besides FCP projects can be converted with this program.
What’s more, you can free burn FCP projects to DVD on Mac by Pavtube Free DVD Creator for Mac. (Here is a guide)
You can have a try when you need. Now please enjoy the output video.
Summary: If you want to backup/copy non-protected/protected DVDs to hard drive, hard disk, or copy DVD to a new DVD disc on Mountain Lion, there is a great Pavtube DVD Creator and DVD Ripper for Mountain Lion for you.
When faced with the necessity of making a copy of an unprotected DVD disc, Mac users should not worry--Mac OS X makes it simple. The built-in Disk Utility can easily back up/save a DVD movie to disk image (.cdr) file and make additional burns at a later date. If you want to take full advantage of your lightening speed DVD-ROM so as to shorten the burning process, go ahead to get Pavtube DVD Creator for Mac that lets you create/copy a DVD three to five times faster.
Part One: How to make a Copy of a DVD (unprotected) on Mac OS X Lion/Mountain Lion
What you need: Pavtube DVD Creator for Mac, DVD writer, blank disc (DVD-5/DVD-9)
1. Place the DVD that you want to copy into the Mac.
2. Connect a DVD writer to Mac with blank disc in it.
3. Run the DVD Creator for Mac from Applications. Select "Quick Burn" from drop-down menu of Quick Start button.
 4. In the pop-up window, check "From DVD folder".
 5. Browse to the source DVD, choose it.
6. Press "Burn" button. And the DVD maker software should start copying DVD movie to the blank disc. In this way you can make a 1:1 copy of self-created DVD.
More features of Pavtube DVD Creator for Mac:
5. Browse to the source DVD, choose it.
6. Press "Burn" button. And the DVD maker software should start copying DVD movie to the blank disc. In this way you can make a 1:1 copy of self-created DVD.
More features of Pavtube DVD Creator for Mac:
- Burn DVD folder/ISO image/various video formats to DVD on Mac
- Create high quality DVDs from AVI, MKV, WMV, MXF, MOV, DivX, XviD, MP4, VOB, M2TS, MTS, TIVO and many other video files(Free Burn AVI, MKV, MP4 to DVD on Mac)
- Create Slide Show DVD with photos and music you designed
- Customize DVD with eye-catching DVD menus, edit video effect and clip video to burn DVD movie
- Burn movies and TV shows to DVD for backup or sharing easily and quickly
Keep in mind that these directions are only for copying DVDs that do not have any form of copy protection encoded on them. To make a duplicate of commercial DVD, you'll first need Pavtube DVDAid for Mac software to crack and archive the whole DVD directory to hard drive.
Part Two: How to make a Copy of a commercial DVD on Mac OS X Lion/Mountain Lion
What you need: Pavtube DVD Ripper for Mac, Pavtube DVD Creator for Mac, DVD writer, blank disc (DVD-5/DVD-9)
If you have at hand a great number of DVD movie collections, there's good chance that you wanna backup DVD movies to blank DVD discs so as to still take the copy out even if the original disc is broken or out of use. What frustrated is that copyright protection prevents DVD burning apps from copying the DVD movies. That's where DVD Ripper come in – by cracking CSS+ and region code restriction it turns commercial DVDs into fair-use movies. Follow the guide below to rip a DVD into VIDEO_TS folder without making change of the original files.
1. Place the DVD that you want to copy into the Mac.
2. Run Pavtube DVD Ripper for Mac, click "DVD ROM" to hack protections and load movies.
3. Click the small folder icon in Output field to specify an output location on your hard drive. Make sure there is enough free space for the DVD VIDEO_TS folder.
4. When the movie is loaded, press "Copy" button to start backing up DVD folder onto your Mac hard drive.
Tip: DVDs have a number of copy prevention mechanisms. When you rip the DVD, you strip off those mechanisms but copy the rest of the video unadulterated. This means that the ripped DVD will take up as much space as the files on the DVD itself.
Once the process complete, you can click "Open" to find the free-region VIDEO_TS folder, which contains VOB streams, as well as IFO and BUP files. You can easily import the copied VIDEO_TS folder to Pavtube DVD Creator for Mac and make a duplicate copy.
More features of Pavtube DVD Ripper for Mac:
- Rip DVDs fast and smoothly on Mac with high quality.
- Transfer DVD to the iPad Air, Nexus 7, Asus Tablets, Galaxy Tab S 10.5 and 8.4, Kindle Fire HD, Galaxy Tab 2, Galaxy Note 4, Microsoft Surface, PS Vita, etc.
- Trim, crop, merge videos, add text, image and video watermarks.
- Backup, rip, convert and edit DVD movies and music on Mac.
- Enjoy the wonderful audio-video sync output quality.
Read More:
Putting any old video file - like the DivX/Xvid-encoded videos you've downloaded with BitTorrent - onto a DVD to play on your TV via PS3 can be a daunting task. There's plenty of software that tackles this sort of thing for a price, but as a lover of open source software, user-friendly free's always my first choice. In this post I'm going to show you how to burn those downloaded TV shows to a DVD you can play with PS3 in your living room.
What we use:
Windows PC with Pavtube DVD Creator app and DVD writer installed, plus blank DVD-5/DVD-9 disc. The DVD burning software Pavtube DVD Creator lets you create playable DVD from pictures, music and various video types, including AVI, MKV, WMV, MOV, MTS, M2TS, TiVo, MOD, TOD, etc. This flexible DVD creator also provides you with plenty of editing features to personalize your DVD. You can freely trim videos by setting the start and end times and crop the video screen size to discard needless screen by modifying the frame size. Also you can add text or a picture watermark to brand your output DVD, and adjust video effects like saturation, contrast, hue, etc.
How to make AVI, MKV, WMV, MOV, MTS, MP4 into Video DVD for PS3?
1. Insert a blank DVD-R (DVD+R, DVD+RW, DVD-RW are also available) into the DVD-ROM drive of your computer.
2. Run the DVD-authoring program Pavtube DVD Creator. Import the video files into DVD Creator for the disc project. You can either drag and drop source MTS files to source area or select "Import Files" from the drop-down list of Quick Start menu.
 To make the output file size fit for your disc space, you can choose "Low Quality", "Normal Quality", "High Quality" or Customize the file quality by yourself. The DVD Creator will detect and display the final output file size in real time.
3. Set up a DVD menu that allows users to navigate the DVD contents. Press "Menu" tab to enter DVD Menu interface. There are menu templates for you to use. To use a preset menu template from DVD Creator, simply double-click on the template.
To make the output file size fit for your disc space, you can choose "Low Quality", "Normal Quality", "High Quality" or Customize the file quality by yourself. The DVD Creator will detect and display the final output file size in real time.
3. Set up a DVD menu that allows users to navigate the DVD contents. Press "Menu" tab to enter DVD Menu interface. There are menu templates for you to use. To use a preset menu template from DVD Creator, simply double-click on the template.
 4. Preview the DVD disc's viewing experience. Press "Preview" tab and your DVD video will be played just like on a DVD player. The control buttons here are corresponded with the keys on remote control.
 5. Burn imported video files onto the DVD-R disc. Switch to "Burn" screen when you finished authoring DVD and feel like to burn created DVD-video onto a writable DVD (or ISO image) that will plays on standard DVD player after burning. DVD Creator writes content to single-layer 4.7GB and dual layer 8.5GB DVDs.
 6. Wait till the DVD burning process completed. Now you're done! Just take out the DVD and play it on PS3 ~ Have a good time!
Highlighted features of Pavtube DVD Creator:
6. Wait till the DVD burning process completed. Now you're done! Just take out the DVD and play it on PS3 ~ Have a good time!
Highlighted features of Pavtube DVD Creator:
- Produce DVD disc, DVD ISO and DVD folder
- Create both Video DVD and Slide Show DVD
- Custom DVD menus and titles to what you like
- Preview movie like on a real DVD player
- Convert and write DVD faster than ever
- Burn DVD-Video/ISO image to DVD
The DVD Creator is also available for Mac OS. If you're looking for an alternative of iDVD, click to learn more information about DVD Creator for Mac (OS X10.8, 10.7, 10.6, and 10.5 compatible).
PS. The original from best-tablet-converter.com
Read More: