Thursday, August 22, 2013

Free or Paid MXF Converter for Working with C300 MXF Files on Mac OS X

How to editing Canon C300 MXF files in Final Cut Pro 7 and  Final Cut Pro  X? Follow our tips to get free or paid MXF Converter to make video editing with C300 MXF footage go as smoothly as possible.
Working with Canon C300 footage – which is XDCAM 422 50/Mbs footage in a .MXF wrapper – should ordinarily be quite straight forward. MXF files will work natively in Adobe Premiere and ingest quite happily through a free plugin in Final Cut Pro 7 and FCP X.  You can also bring this footage in through AMA into Avid Media Composer 6. AbelCine has an excellent step by step guide to importing C300 footage to Premiere CS6, FCP X, FCP 7 and Avid Media Composer 6. You can check it out here.

Everything will work seamlessly, that is, if your cards have been copied correctly to the hard drive with their entire folder structure intact. Without that folder structure you are effectively locked out of accessing your footage and an editing application like FCP7 will give you an error message like this one:
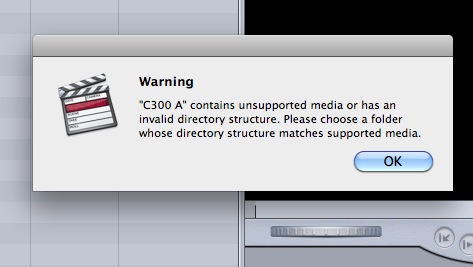
c300 import erroe message

How to Copy MXF Files Correctly

So how do you copy cards correctly?

Well first, and this may go without saying, but if you're going to get an intern or producer to do it make sure they know what they're doing. Essentially you must copy the entire card structure (preferably not through dragging and dropping in the finder).

Sony and Canon both have free browser apps that will let you back up your media. Or you could invest in something like Shotput Pro to duplicate your cards to multiple drives simultaneously. You are backing them up as you go, right?

If that's not enough detail, just watch this great tutorial on a correct tapeless media workflow from Shane Ross. Although the tutorial winds up in Final Cut Pro 7, the initial principles are the same for any system. If you want even more tips, check out this great video from Chase Jarvis on his complete tapeless workflow.


What To Do If Your C300 Card Structure Is Broken

If for whatever reason your card structure doesn't come across intact, what can you do?

Depending on your NLE you have various options. If you're in Adobe Premiere it doesn't matter, as it will read the MXF files just fine.

First, you can try to 'fake it' out by recreating the C300 card structure (which should look like the example below). In the past I'm sure I've gotten lucky with it but its a pretty slim chance of actually working.

FCPX needs a correct card structure so if you have to, transcoding in a 3rd party app is a feasible workaround.
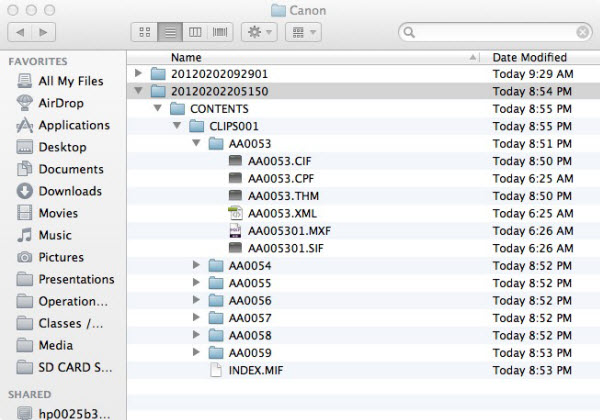
filestructure

Free App For Converting C300 MXF Files

Miro is a great free app (one of the few free apps I found) that actually works and works well. Miro Video Converter will allow you to grab the .MXF files and transcode them into Pro Res 422, DNxHD and AVC Intra 1080p and 720p. You can batch transcode as many of them as you like and it works pretty quickly. The files look great and were a higher quality than files I created using the demo of Pavtube iMedia Converter for Mac Here is a detailed steps. But as Miro is a free app, there are a few catches.
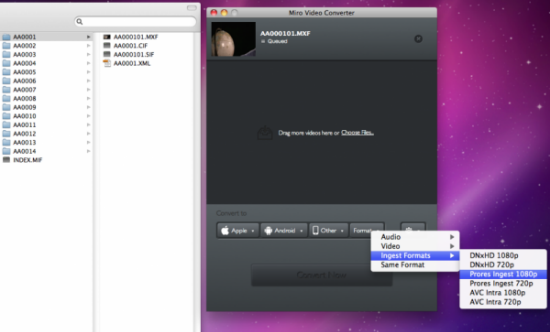
miro video converter


First, you cannot specify the output folder and it defaults to your MacHD > User > Movies folder. So you need to have enough space on your boot drive to transcode the footage too. This is also a problem if you have multiple files with the same name, (which I had on this edit with a two camera shoot) as this means you have to transcode one set at a time and move them out of the folder so as not to overwrite them with the next batch. Annoying.

Also the original camera footage I was working with had two audio tracks in it where as Miro would only export a single mono track. This was not helpful either as I needed to be able to mix each track individually.

Note: If you want to retain multiple audio tracks from Canon C300 MXF videos, you are recommended to get a professinal multi-track MXF Converter for Mac program: Pavtube iMixMXF. The following links are detailed steps:

     
Paid Apps for Working With C300 MXF Files
calibrated q

As I was editing on an FCP7 system I had to find a way to get my C300 MXF files to play nice with Final Cut Pro 7, while getting around the broken file structure. A cry for help on Twitter led to this great recommendation from Andy Mees who saved the day by suggesting I check out both MXF Import from Calibrated {Q} or MXF4Mac from Hamburg Pro Media. Both plugins essentially do the same thing which is to allow Quicktime (and any apps that make use of the Quicktime architecture) to work with MXF files, just like any other file.

Calibrated{Q} MXF Import for OSX is a QuickTime Import component for NATIVE Importing and Editing of MXF Files within Final Cut Pro 6, 7, and X without using Log and Transfer.

And you’re not just limited to Final Cut Pro, you can also natively import and work with MXF files in CatDV, Compressor, Motion, Sound Track Pro, QuickTime Player and Shake.


You can download a free demo of MXF Import from Calibrated {Q} to test that it will work on your system. The demos only restriction is that it only allows you to view the first 30 seconds of the clip, other than that it’s the same as the full app. After installing the plugin I could drop the C300 MXF files directly onto the timeline in FCP7 and get editing – and with the dual audio tracks in the original files! Huzzah.

Hopefully these tips will save you some time, effort and frustration with broken MXF file structures.  And next time you’ll just copy the cards structure correctly…and get to editing!

To learn more about Canon, Panasonic P2, Sony XDCAM MXF videos editing and transcoding on Windows or Mac, the MXF Column from camcordervideoshare.altervista.org is highly recommended.

Read More:

Blu-ray to M2TS: Quick backup intact Blu-ray to M2TS file without any quality loss or conversion

Description: Are you annoying backup Blu-ray main movie to M2TS without any quality loss? Are you looking for an easy but effective way to backup Blu-ray main movie? Here you will find a professional way to do it easily. 
   
Q1: “Because I have a lot of original DVD and Blu-Ray and I need to transport to an external hard disk for backup and access from my computer, iTunes and Smart TV”  -  Benjamin
Q2: “I wanna backup my Blu-ray without keeping the menu and promotional clips etc. My preference for backup is only the Movie or main feature, with all other content not copied”  -  Copperfield

  
There are many demands about going to backup blu-ray main movie to M2TS file with original quality and no conversion. It is known that Blu-ray movies are protected by copyright including AACS, BD+, region code, etc. So we need a tool to remove these copyright protections and then backup the m2ts files from original blu-ray. Moreover, one joint m2ts file should be better for further playback, editing, sharing or burning disc.

You may consider looking for several tools respectively to rip Blu-ray, make full copy of Blu-ray and then merge m2ts files into one. Do not be so complicated. There is a professional way to backup the intact Blu-ray main movie with amazing speedPavtube BDMagic (For Mac users: BDMagic for Mac), one all-in-one Blu-ray to M2TS backup program will help you to get everything done. It is capable of saving a decrypted multi-track m2ts file without encoding, which will completely keep the quality of original blu-ray. (Tested a 27GB Blu-ray disc, only 30 minutes to back up the main movie on Windows 8.)

Free download the best Blu-ray to M2TS backup program (Mac Blu-ray to M2TS backup tool is available for Mac users) to backup the intact Blu-ray main movie in M2TS file and install it.

free blu-ray to m2ts ripper download             free mac blu-ray to m2ts ripper download(only $34.3)


Great news for you now! If you purchase it before Aug 31, 2013, you can get 30% off Blu-ray Ripper for Windows/Mac or more other coupons on Pavtube Summer Holiday Sale. Pay attention to deadline and do not miss it.

Key features of the professional Blu-ray Ripper:
  • Rip the latest Blu-ray/DVD including 3D blu-ray
  • Directly Copy Blu-ray/DVD main movie with multiple audio and subtitle streams
  • Convert Blu-ray/DVD to a variety of video formats
  • Full Disc Copy Blu-ray/DVD’s original file structure to BDMV folder 
   
Guide of how to backup the intact Blu-ray main movie to M2TS file without conversion
  
Step 1: Select Blu-ray source.

When launch the best Blu-ray to M2TS backup software, click “Load files” button on the top left, you will get three options:

Load the disc: Inserted discs are usually recognized and listed automatically, just select the one you desired.

Load from the folder: When you have copy the content of disc to computer or hard device, use this option to select the folder to import.

Load ISO/IFO: If your blu-ray source is ISO file, use this option to load.

pavtube blu-ray to m2ts backup tool

Once imported, you will get a list of titles on the source. The main title with longest duration usually has been selected automatically.

Step 2: Choose Directly Copy for output.

Firstly, go to select the location of output files. Simply click “Browse” button and choose the destination folder.

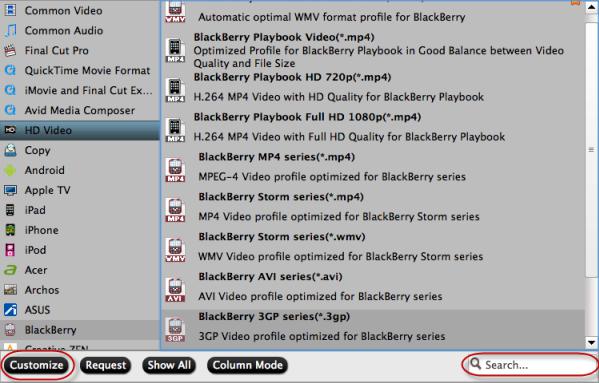
Secondly, click “Format” menu you will find lots of format options in the dropdown list. Here “Directly Copy” is the best choice for you because it will copy the intact main movie without any recoding. In this way, you will get a lossless m2ts file at amazing conversion speed.


Note: Many other video formats are listed there. You can select different output video formats according to your different requirements. If you want to convert blu-ray to various formats for smartphones or edit software, you are free to choose the one you need. 

Step 3: lossless Backup Blu-ray main movie to M2TS.

Now it is time to start backing up Blu-ray to M2TS without encoding by clicking big “Convert” button. Then click “Open” button you will find a quick way to locate the generated files. Once completed, you can get one lossless m2ts file with multiple streams from original Blu-ray.

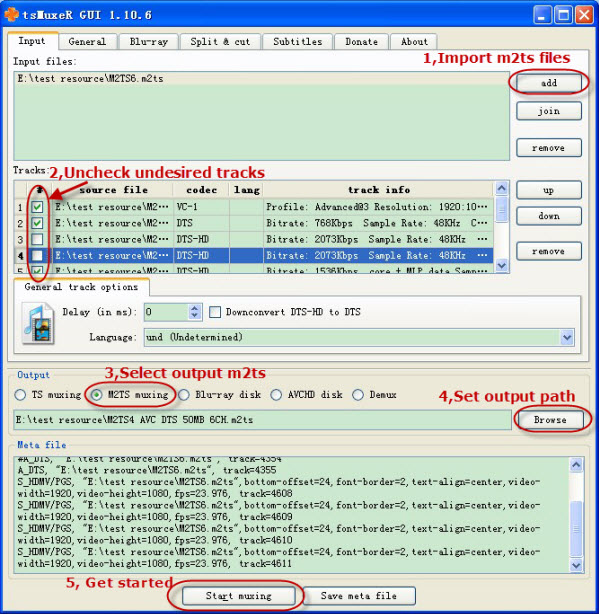
As the generated M2TS file is intact Backup of Blu-ray main movie, so it will retain all the multiple audio and subtitle tracks and it cannot be selected during conversion. If you want to remove some undesired tracks, you can count to tsMuxeR for help.


How to select multiple tracks in m2ts file (optional):

After having downloaded it, unzip the tsMuxeR you will get the command line version and GUI version, which is tsMuxeR.exe and tsMuxeR GUI.exe. Double click tsMuxeR GUI to run the program and then follow below guide.

1. Click “Add” button to import m2ts files and you will find the tracks information listed.
2. Uncheck the undesired tracks in the list.
3. Select “M2TS muxing” option for output.
4. Choose the output folder for generated files by hitting “Browse” button.
5. Click “Start muxing” button to remove the undesired tracks.

remove some undesired tracks with tsMuxeR

Tips: If you have difficulty in playing m2ts files, you are recommended to try free VLC Media Player. It will help you to completely enjoy blu-ray movie.

It works easily and at high efficiency. With it Backup intact Blu-ray main movie is no long the complicated thing. Now take time to enjoy it.
  

Further reading:

Wednesday, August 21, 2013

Rewrap/Convert FCP projects to MKV, MP4, WMV, AVI, MOV, MPG, etc. or Free burn FCP projects to DVD on Mac

Description: If you want to convert projects from FCP to MKV, MP4, WMV, AVI, MOV, MPG, VOB, FLV, etc. for playing, burning, editing, sharing and so on, this article will give you instruction. Follow this article to find the solution.

Final Cut Pro is a professional editing program developed by Macromedia Inc. and later Apple Inc. Many Mac users prefer to use FCP to create individual videos for sharing with family and friends and export videos as Apple ProRes 4444, Apple ProRes 422 (HQ), Apple ProRes 422, Apple ProRes 422 (LT), and Apple ProRes 422 (Proxy).


Do you want to convert FCP projects to MP4 or MKV for playing them in some mobile devices, tend to convert to WMV or AVI for sharing with your friends who use Windows Media Player on PC, or transcode to H264 MOV for more portable devices? When you search a solution in Google, you will find much third-party software can do conversion.

Free software like Handbreak may be your first choice. After trying it, you will be disappointed that the output video looks fine but the audio is out of sync. At this time, Turning to Pavtube HD Video Converter for Mac will bring you good-quality output videos without any video and audio out of sync issue. And easy-to-use workflow and fast conversion speed will provide you great customer experience. Now let me show you how to convert FCP projects.

Note: Trial version before purchase can help you to test all the functions, but there will be Pavtube watermark in the middle of output videos, which is the difference form retail version. Download it according to different Mac OS.


Make preparation: Export videos with Final Cut Pro

When you have finished editing the video with Final Cut Pro, export it to MOV files. Hit “File” option and then go to “Export”, choose QuickTime Movies.


1. Import FCP projects

After you get the FCP output files successfully, launch HD Video Converter for Mac and then choose to locate the projects into the program by clicking “Add video” or “Add from folder”. 

And there is an easier way that is to directly drag the projects into the program, which allows you to load multiple projects at one time. It loads files quickly and the dialogue box of progress will give you timely state of loading.


Tips: If your videos are different segments and you want to joint them into one output file, at this time, you can go to select the desired segment titles and then check Merge into one file button on the interface. In this way, you will get a big combined file.

2. Choose video format for output

This program offers you a variety of video formats in the “Format” dropdown list. Many common portable devices and editing software are listed. If you do not want to choose the devices, “HD Video”, “Common Video” and more options can give you more choices. Just choose the one you need from the list.


Tips: Sometimes you may think too many video formats listed is inconvenient because some options you won’t use at all. Don’t worry; you can remove some formats and customize the list according to your own need. 

3. Adjust the output parameters (Optional)

This step is optional. If you are not good at settings, keep the system built-in settings will as give you great target videos. However, if you want to change codec, bitrate, frame rate, and so on, here is right for you. Click “Settings” to set them.


4. Convert FCP projects.

Before starting conversion, you may need to set the location of output videos in Browse. Now, hit the “Convert” button to get started. Then Open output folder to get the generated videos.

Tips: If you need to convert so many videos with big file size, you can not bear waiting for a long time when you are in a hurry to go out or go to bed. Just one click will solve the problem for you:

Go to check “Shut down the computer after conversion” and then you can go to do everything else. The computer will shut down automatically after completed conversion.


It is an all-in-one program that many other videos besides FCP projects can be converted with this program.

What’s more, you can free burn FCP projects to DVD on Mac by Pavtube Free DVD Creator for Mac. (Here is a guide)

You can have a try when you need. Now please enjoy the output video.

Thursday, August 15, 2013

Best Free DVD Ripper and Free Video DVD Converter Ultimate from Pavtube Studio

August 14. 2013 - To provide better customer experience, Pavtube Studio releases three free software: Free DVD RipperDVD Ripper for MacFree Video DVD Converter Ultimate, for converting various DVDs and videos.

Click here to get free converter: 

https://www.facebook.com/pavtubefans/app_193168050721272

Clients are free to use any of them to rip and convert the favorite DVD collection to many video formats so as to protect DVD from being ruined. And video users need to use Free Video DVD Converter Ultimate to convert a large variety of HD videos and the latest DVD movie to common formats used to playback, sharing, backing up, burning or editing.

Mutual key features:
  • Convert and backup any DVD: Users can rip and convert both common DVD and commercial DVD with copyright protection.
  • Convert and backup DVD to MOV/MKV/AVI/WMV, etc: Users can choose to convert to MOV for sharing it with friends in blog, to MKV for watching in VLC Player, or to WMV for editing with Windows Movie Maker, and so on.
  • Merge/split/trim/crop DVD: Users are able to simply edit the video before conversion including merging multiple videos into one file, cutting off the ads of DVD, adding subtitles to source videos, etc.
  • DVD volume adjusting: Users can adjust video and audio parameters, such as bitrate, size, frame rate, etc, according to different requirement. In this way, users can change the size of target files.

One more feature of Free Video DVD Converter Ultimate:
  • Convert any videos including Tivo conversion: Videos users can choose it to convert different videos.

They are very easy-to-use and will provide you high-quality videos with sync of audio and video. And at the same time, Pavtube studio also announces the upgrade version with more function. Clients can get more great experience of upgrade version.

More highlights in upgrade version:
  • Full Disk Copy: DVD users can 1:1 backup of DVD with original structure and chapter marks preserved and use it to create ISO files or DVD discs.
  • Directly Copy: DVD collectors can backup the intact main movie of DVD removing menu and some promotional clips, which is helpful to save DVD in smaller size and enjoy DVD movies with less time.
  • Output MP4 files: Clients can put it onto many popular portable devices, like iPad, iPhone, Samsung Table, Samsung S4, etc, to carry them anywhere. On the long way to go to work or on boring railway in travel, watching a favorite DVD movie is the best way to kill time.
  • Conversion to various editing software: Clients can choose to output to Sony Vegas, Adobe Premiere, Final Cut Pro, iMovie, etc for editing. With it, Clients can edit some DVD clips for educational activities or corporate videos, or edit some videos for posting to some video sharing website like Youtube or sharing with family.

Clients are free to download free software:

Pricing and Availability for upgrade version:

Upgrade version of Free DVD Ripper and Free DVD Ripper for Mac costs $35(USD), and upgrade version of Free Video DVD Converter Ultimate costs $49(USD). Clients can purchase them by Paypal, credit card, phone and so on. What's more, like us on Facebook can get 20% off upgrade discount.

Clients can try the free trial version only with watermarks in the middle of output video.


About Company:

Founded in the year of 2007, Pavtube is relatively young but it never lacks passion and creativity as well as hard working. They create expert multimedia software applications that help consumers simply access, transfer and share their digital contents across different devices that range from PC, Mac, tablets, smartphones, to HD media players, game consoles, and home theaters.

Official Web:  http://www.multipelife.com/

Original from http://device-camcorder-tips.blogspot.com/2013/08/pavtube-release-free-dvd-ripper-and-free-video-dvd-converter-ultimate.html    

Tuesday, August 13, 2013

Adobe After Effects CS6: Sony XDCAM EX Readability Glitch (Solution: Reboot)

While editing an Adobe Premiere CS6 project based on XDCAM-EX footage (from an EX3), I thought I'd enhance the footage in After Effects (where more sophisticated enhancement effects than in Premiere are available). Should be easy I thought, taking advantage of the CS6 suite's Dynamic Link feature.

In Premiere, I selected the relevant clip and did [RightClick > Replace With After Effects Composition]. As expected, this opened After Effects, with the appropriate dynamic link to Premiere…

…BUT…

All I got on the Preview in After Effects, and indeed back in Premiere,  was Color Bars. I assumed this indicated some kind of failure in After Effects.

Naively, I concluded that, on my system at least, After Effects CS6 could not read XDCAM-EX. A brief web-search (further below) revealed user experiences and video convertor article-adverts implying that I was not alone with this problem. But an Adobe blog entry suggested that no such problem existed in AE CS6 and some and Adobe documentation (pdf) said so explicitly. For the moment then, I was confused…

Then I rebooted and tried again. This time it worked. I succeeded in making AE projects both by directly importing the footage (as mp4 files) in AE and via Dynamic Link from Premier.

The direct import dialog was slightly weird though: it claimed it was listing "All Acceptable Files" but these included not only [.mp4] files but also e.g. [.smi] files, which, when I selected one of these it complained: "…unsupported filetype or extension". Incidentally, the reason I tried it at all was that XDCAM-EX is a spanned format, where a single recording can be spanned/split/spread over multiple [.mp4] files. Furthermore, there can be an overlap of content from one [.mp4] to the next (in a span), so in principle (I haven't tried it), simply placing one [.mp4] after another on the timeline would give rise to a (short) repetition at each transition (from one [.mp4] to the next).

But this is already over-long for a single blog-post, so I'll deal with that issue in a separate post.

Web-research:

1. Google: XDCAM After Effects CS6

http://forums.creativecow.net/thread/2/1026639

Jason Bullock    After Effects CS6 doesn't read EX1 XDCam footage
(by Jason Bullock on Oct 26, 2012 at 12:18:36 am)

Ever since I got CS6, After Effects cannot read my XDCam from my EX1. Premiere sees it just fine. But whether I try to do a direct import or use Dynamic Link, After Effects doesn't display it. All I see are color bars. Has anyone else had this problem and figured it out?

  
2. PavTube is a mediaconvertor (rewrapper/transcoder)

Since XDCAM isn't the greatest thing to use in After Effects, the following guide will show you how to transcode Sony XDCAM HD MXF, IMX files into Adobe After Effects CS4/CS5/CS6 preferred format for editing.

Using Pavtube iMedia Converter for Mac, you can press "Convert" button to start rewrapping Sony XDCAM files to MOV for AE. The Windows version is Video Converter Ultimate.
Good News! Pavtube Release a New Site - multipelife.com with Product Migration and Name Change.
To thanks for your continued support , we are holding a 'New Site Special'. You can get 20% off Video Converter Ultimate on Windows/Mac platform now.

Read more: http://mediaconverting.blogspot.com/2014/05/pavtube-new-official-website.html

Once the conversion process is done, click "Open" button to get the generated MOV files for using in Adobe After Effects CS4/CS5/CS6.


3. Can't import the MXF files from your Sony XDCAM, Canon XF or Panasonic P2 professional camcorder to AE? The reason is that the MXF container format contains data encoded using various compression and encodingschemes.

After Effects can only import some kinds ofdata contained within MXF files. Therefore, to successfully import MXF to Adobe AfterEffects, it is essential for you to convert Sony XDCAM/XDCAM HD/XDCAM EX, Canon XF, Panasonic P2 MXF to AE CS4/CS5/CS6 supported formats and codecs as follows:

DV (in MOV or AVI container, or as containerless DVstream)

FLV, F4V(encoded On2 VP6 video codec)

Media eXchange Format (MXF):
  • Panasonic P2 using the AVC-Intra 50, AVC-Intra 100, DV, DVCPRO,DVCPRO50, and DVCPRO HD codecs.
  • XDCAM HD files in MXF format with OP1format with MPEG-2compression codec.

MPEG-1, MPEG-2, and MPEG-4 formats: MPEG, MPE, MPG, M2V, MPA, MP2, M2A, MPV, M2P, M2T, M2TS (AVCHD), AC3, MP4, M4V, M4AQuickTime (MOV; 16 bpc, requires QuickTime)

Video for Windows (AVI, WAV; requires QuickTime onMac OS)

Windows Media File (WMV, WMA, ASF; Windows only)

XDCAM HD and XDCAM EX (Sony XDCAM HD assets record to MXF files and Sony XDCAM EX assets stored as essence files with the .mp4 filename extension in aBPAV directory).
  (…but that last one is what the EX3 records ok but that AE would not accept… so I was expecting here a format to rewrap or transcode it to…)

  
4. http://blogs.adobe.com/aftereffects/2012/06/codecs-and-the-render-engine-in-after-effects-cs6.html

In After Effects CS6, you can now run aerender or use the watch folder functionality in a non-royalty-bearing mode, without activating the render-only instances of the application.

In this non-royalty-bearing mode, the following codec-specific features are disabled:

decoding and encoding (import and export) of MPEG-2 video, including formats that are based on MPEG-2 video: XDCAM EX, XDCAM HD and other formats in MXF OP1a containers, and HDV
decoding of AC3 / Dolby Digital audio, which is used in AVCHD media

If you want to enable these royalty-bearing codecs, you need to activate After Effects on each rendering computer, meaning that you need to enter a serial number after installation.

{Huh? My After Effects is activated, and being used directly, not as a render-service. So presumably it ought to understand XDCAM-EX?}

5. Google: XDCAM After Effects CS6 Spanned

http://www.adobe.com/content/dam/Adobe/en/products/premiere/cs6/pdfs/adobe-premiere-pro-cs6-sony-xd-cam.pdf

Adobe After Effects supports the same XDCAM formats as Adobe Premiere Pro.


Source: blog.davidesp.com


Read More:

MP4 to VirtualDub
Best solution for solving “MP4 to Premiere Pro CC 2017” issue
Import MP4 to Final Cut Pro/Export FCP to MP4
Transcode MP4 to Sony Vegas Pro friendly format for editing
Problems when importing MP4 files into WMM
No Audio Channels - Import Sony A7s MP4 to Resolve 10/11
How to Put MP4 Footage into Avid Media Composer?
Workflow on MPEG-4/H.264 Footage to Final Cut Pro X

Wednesday, August 7, 2013

Converting Sony Alpha A57 AVCHD MTS to iMovie compatible codec on Mac OS X

Summary: If you meet the incompatibility while importing Sony Alpha A57 AVCHD 1080p MTS footage to iMovie, I recommend a solution for you. With the professional AVCHD to iMovie Converter for Mac, you can easily transcode Sony A57 AVCHD MTS files to iMovie compatible AIC MOV fotmat.

Q: "I recently bought a new Sony Alpha 57 camera. I use an iMac with iMovie for my videos. I shot some video on the AVCHD 60p format and cannot open in iMovie. 
I am trying to convert the file to iMovie compatible format. But seems no software can read my videos, I am using the Mac OS X Mounta, it’s that the problem?"


The Sony Alpha A57 SLR Digital AVCHD Camera with innovative Translucent Mirror Technology. With a 16.1MP APS-C Exmor HD CMOS sensor, directs incoming light to the CMOS image sensor and the AF sensor at the same time, allowing full-time continuous AF during both still and video shooting. Thus, you can sharpness when recording full HD 1080p video or photographing at up to 12 fps.

If you want import and edit Sony Alpha A57 1080p AVCHD MTS footage in iMovie and solve some trouble about incompatible format on your Mac, the professional Pavtube MTS to iMovie Converter for Mac is the best choice for you, which is also proved to be compatible with Mac OS X Mountain Lion and Mavericks. It can not only transcode Sony Alpha A57 AVCHD MTS files to iMovie compatible format(like AIC codec MOV format), but also provide you with some simple editing features, such as merging several videos into one file, deinterlacing the original footages, cropping video size, trimming video clips, adding special effects, text/image/video watermarks and add srt/ass/ssa subtitles to output videos, thus it will be on the top of your list.


The best MTS/M2TS to iMovie Converter review from a User: I have been very satisfied with the conversion performance. I usually just get it set up with a large batch and let it run over night. The next day all of my files are ready to go. Bellow is the user steps sharing, please follow it.

First Free Download AVCHD to iMovie Converter for Mac


Step 1. Load 1080p MTS/M2TS files from Sony A57 to the professional AVCHD to iMovie Converter for Mac.

Connect the Sony Alpha SLT-A57 to your Apple with USB 2.0. Launch AVCHD to iMovie Converter for Mac and then click the "Add video" button to import your Sony A57 1080p MTS/M2TS files. You can tick the box in front of the file you want to convert. If your MTS/M2TS files have already been transferred to your Apple hard drive, you can easily drag them to the best Mac AVCHD to iMovie Converter.


Tips: 

1. If you have multiple 1080p MTS/M2TS files, you can select the "Merge into one file" box to merge them into one single file for iMovie so that you can play these files without interruption.

2. Double click the selected file and you cam preview it. 

Step 2: Select an output format for iMovie and set the output folder.

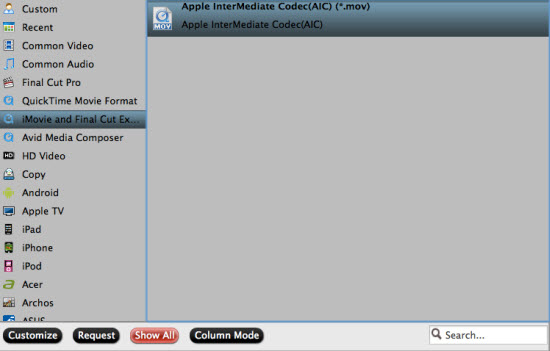
Click on the "Format" and you will get a dropdown menu. Move you pointer to "iMovie and Final Cut Express > Apple Intermediate Codec(AIC) (*.mov)". The Apple Intermediate Codec(AIC) is the compatible format for iMovie and FCE. Then you can set the output folder by clicking "Browse" icon as you need.


Step 3: Click on the "Settings" icon to adjust audio and video parameters.

Click the "Settings" icon and you will go into a new interface named "Profile Settings". You can adjust codec, bit rate, frame rate, sample rate and audio channel in the interface according to your needs and optimize the output file quality. 

Tips: 

1. 1920*1080 as video size and 30fps/29.97fps as video bitrate are the most suitable video parameters for editing in iMovie. 

2. If you want to reduce the video size, you can change video size from 1920*1080 to 1440*1080 or 1280*720. 

Step 4. Transcode Sony A57 AVCHD MTS files to AIC MOV for iMovie with 30fps and 5.1 channels on Mac.

Click the "Convert" button, start converting Sony A57 1080p MTS files to AIC MOV for iMovie on Mac immediately. You can find the process in the "Conversion" interface.

Step 5: When the Mac AVCHD to iMovie conversion is 100% completed, open "iMovie" and click "File > Import" to transfer the converted Sony A57 MTS footages to iMovie. 

The best AVCHD to iMovie Converter for Mac is not only helpful to get MTS footages from Sony A55 into iMovie on Mac, but also does a great job in converting AVCHD to ProRes 422 for FCP, MPEG-2 for Adobe Premiere Pro, DNxHD forAvid Media Composer, AIC MOV for FCE, etc.

Read More:

Monday, August 5, 2013

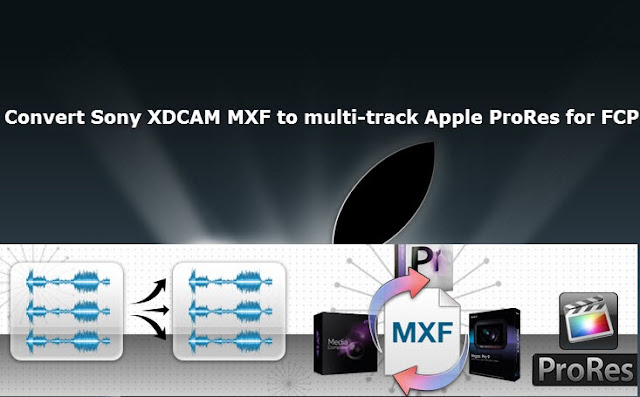
Convert Sony XDCAM MXF to Multi-track Apple ProRes for Final Cut Pro 6/7, FCP X

Description: An easy and step-by-step workflow to convert Sony XDCAM MXF to Apple ProRes with multiple audio tracks for FCP 6/7/X editing.

"Hi, I got some XACAM HD 422 MXF files from my Sony PMW200 and want to edit some in FCP 7. But it seems to be hard to keep all my audio channels saved separately during conversion. Is there any simple work flow for this?"

For many photography enthusiasts, shooting videos with full Omni bearing audios is very important in further editing or playback. And many people used to do audio track based editing in FCP 7, hence here comes the problem: how to keep multiple audio tracks saved when converting Sony XDCAM MXF to Apple ProRes for FCP?


Follow this step-by-step guide; you can easily accomplish it within a few clicks.

Required program: Best Mac multi-track MXF Converter - Pavtube iMixMXF 

Step 1. Get this Mac multi-track XDCAM MXF Converter installed, click "Add video"  to load individual mxf videos; or click "Add from folder"  to load the entire folder. It will recognize all the audio channels.


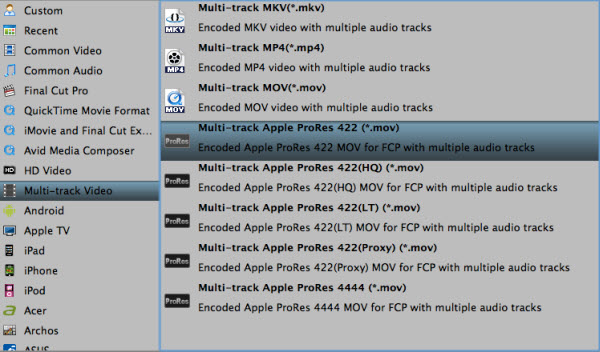
Step 2. Click "Format" and choose Multi-track Video>Multi-track Apple ProRes 422(*.mov)


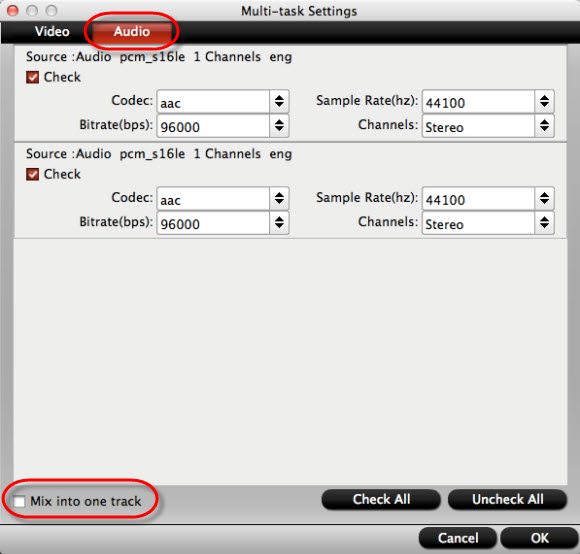
Step 3. Click "Settings" to customize your video size, bitrate, frame rate and other specs; and check video channels that you want to convert.

Follow the bottom left icon to let the selected audio tracks "mix into one channel"; or that it will keep all the audio tracks apart.


For non-multi-track converting, it's also supported to add .srt/.ass soft subtitles as you like; click Edit and switch to "Subtitles" tab, and click Browse to locate your prepared subtitles.

Step 4. Click "Convert" to start converting Sony XDCAM MXF to Apple ProRes keeping multi audio channels for FCP 6/7/X.

For users don't need to deal with multi-track thing, just simple want to convert MXF to other formats, the MXF Converter for Mac (only $29) is highly recommended.