Summary: Follow this article you will know how to solve Panasonic HVX200 MXF editing problems with Final Cut Pro X on Mac as well as how to work out the "no audio issues".
To start, the HVX200 becomes only the second camera in Panasonic’s lineup to employ true variable frame rates! While, when you want to import Panasonic HVX200 P2 MXF files in FCP X on Mac for editing, you will get frustrated due to the video codec incompatibility problem as below.
I would like ton convert MXF files from my Panasonic P2 AG-HVX200, to ProRes 422 for FCP X. As the files have proved to be not so well-suited when they are about to be edited in my Final Cut Pro X. I have converted many files from this same camera with no problem but for some reason now it has no audio.
I try the Free HD Video Converter For Mac, and it work well. So I bought and register HD VIDEO CONVERTER FOR MAC, but when I convert MXF files to Prores422, I have no audio. So I bought MXF CONVERTER FOR MAC and I have the same problem, no audio. What's the problem? Is there a way someone can help walk me through this?
To edit Panasonic HVX200 P2 video footage with Final Cut Pro, you have to convert P2 MXF to FCP natively supported video format like MOV with Apple ProRes Codec. Here we recommend you the best P2 MXF to FCP X Converter for Mac which can help you to transcode Panasonic P2 MXF to Apple ProRes .mov format for FCP on Mac OS X quickly and easily. Here comes the detailed guide.
Note before converting:
1. Please ensure that the computer you are using to do P2 MXF conversion has Final Cut Pro installed, otherwise, the converted files will have audio only without image.
2. If you are using FCP X, please make sure you have installed ProApps QuickTime Codecs, or you may get files with sound only without video. The FCP X does not install the ProApps QuickTime Codecs automatically, so you need download and install the codec manually.
While importing MXF clips to Pavtube MXF to ProRes converter for conversion, please make sure you have the entire MXF file structure as it saved on your camcorder’s P2 card. If you only have some loose .MXF clips, your files will have image only without audio. See MXF file structure on Panasonic’s P2 card as below.

The above screenshot clearly shows .MXF clips are all saved in ‘VIDEO’ folder, while audio files are all stored in ‘AUDIO’ folder. When you importing .MXF clips from the correct file structure, Pavtube MXF to FCP Converter is able to recognize audio tracks from ‘AUDIO’ folder automatically, which ensures the generated ProRes 422 MOV files have both image and sound correctly.
Guide: Convert Panasonic HVX200 MXF files to FCP X on Mac
Step 1: Add MXF video files.
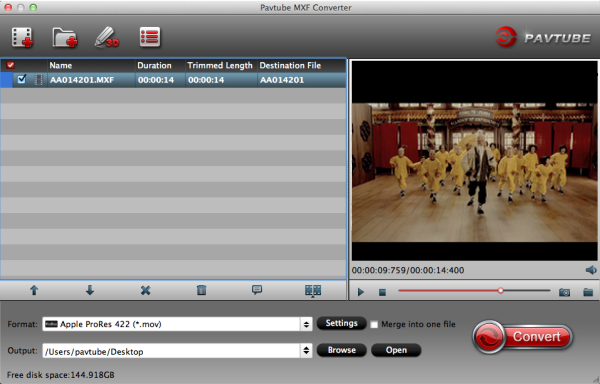
Download and run Pavtube MXF Converter for Mac. Click the button "Add video" or "Add from folder" to add Panasonic HVX200 MXF files, or directly drag and drop your P2 MXF files.

Step 2: Select an output format for FCP X and set the output folder.
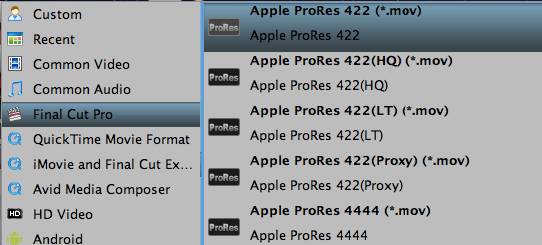
Click on the "Format" and get the dropdown menu, then move you pointer to Final Cut Pro -> Apple ProRes 422 (*.mov), it’s the best format for editing in FCP X.

Step 3: Click "Settings" icon to adjust audio and video parameters.
Click the "Settings" icon and you will go into a new interface named "Profile Settings". You can adjust codec, bit rate, frame rate, sample rate and audio channel in the interface according to your needs and optimize the output file quality.
Tips: If your default audio track is in mute when recording, you may get only video without audio. So you can switch to the audio stream ID option to choose the right audio track.

Step 4: Start Converting.
Click the "Convert" button; it will convert Panasonic HVX200 P2 MXF files to Apple ProRes for FCP X on Mac immediately.
After the MXF to ProRes conversion, you will be able to get the output files for FCP X via clicking on "Open" button effortlessly. Afterwards, you can import the converted videos to FCP X freely for further editing without any trouble.
Futhermore, if your MXF files have 2 audio tracks or more, here is a new program named iMixMXF with multi-track preserving and mixing features. You can download the trial version for evaluation! (Read the multi-track MXF Converter guide)
To start, the HVX200 becomes only the second camera in Panasonic’s lineup to employ true variable frame rates! While, when you want to import Panasonic HVX200 P2 MXF files in FCP X on Mac for editing, you will get frustrated due to the video codec incompatibility problem as below.
I would like ton convert MXF files from my Panasonic P2 AG-HVX200, to ProRes 422 for FCP X. As the files have proved to be not so well-suited when they are about to be edited in my Final Cut Pro X. I have converted many files from this same camera with no problem but for some reason now it has no audio.
I try the Free HD Video Converter For Mac, and it work well. So I bought and register HD VIDEO CONVERTER FOR MAC, but when I convert MXF files to Prores422, I have no audio. So I bought MXF CONVERTER FOR MAC and I have the same problem, no audio. What's the problem? Is there a way someone can help walk me through this?
To edit Panasonic HVX200 P2 video footage with Final Cut Pro, you have to convert P2 MXF to FCP natively supported video format like MOV with Apple ProRes Codec. Here we recommend you the best P2 MXF to FCP X Converter for Mac which can help you to transcode Panasonic P2 MXF to Apple ProRes .mov format for FCP on Mac OS X quickly and easily. Here comes the detailed guide.
Note before converting:
1. Please ensure that the computer you are using to do P2 MXF conversion has Final Cut Pro installed, otherwise, the converted files will have audio only without image.
2. If you are using FCP X, please make sure you have installed ProApps QuickTime Codecs, or you may get files with sound only without video. The FCP X does not install the ProApps QuickTime Codecs automatically, so you need download and install the codec manually.
While importing MXF clips to Pavtube MXF to ProRes converter for conversion, please make sure you have the entire MXF file structure as it saved on your camcorder’s P2 card. If you only have some loose .MXF clips, your files will have image only without audio. See MXF file structure on Panasonic’s P2 card as below.
The above screenshot clearly shows .MXF clips are all saved in ‘VIDEO’ folder, while audio files are all stored in ‘AUDIO’ folder. When you importing .MXF clips from the correct file structure, Pavtube MXF to FCP Converter is able to recognize audio tracks from ‘AUDIO’ folder automatically, which ensures the generated ProRes 422 MOV files have both image and sound correctly.
Guide: Convert Panasonic HVX200 MXF files to FCP X on Mac
Step 1: Add MXF video files.
Download and run Pavtube MXF Converter for Mac. Click the button "Add video" or "Add from folder" to add Panasonic HVX200 MXF files, or directly drag and drop your P2 MXF files.

Step 2: Select an output format for FCP X and set the output folder.
Click on the "Format" and get the dropdown menu, then move you pointer to Final Cut Pro -> Apple ProRes 422 (*.mov), it’s the best format for editing in FCP X.

Step 3: Click "Settings" icon to adjust audio and video parameters.
Click the "Settings" icon and you will go into a new interface named "Profile Settings". You can adjust codec, bit rate, frame rate, sample rate and audio channel in the interface according to your needs and optimize the output file quality.
Tips: If your default audio track is in mute when recording, you may get only video without audio. So you can switch to the audio stream ID option to choose the right audio track.
Step 4: Start Converting.
Click the "Convert" button; it will convert Panasonic HVX200 P2 MXF files to Apple ProRes for FCP X on Mac immediately.
After the MXF to ProRes conversion, you will be able to get the output files for FCP X via clicking on "Open" button effortlessly. Afterwards, you can import the converted videos to FCP X freely for further editing without any trouble.
Futhermore, if your MXF files have 2 audio tracks or more, here is a new program named iMixMXF with multi-track preserving and mixing features. You can download the trial version for evaluation! (Read the multi-track MXF Converter guide)
Read more:
MP4 to FCP ǀ AVCHD to FCP ǀ MOV to FCP ǀ H.265 to FCP
- MXF & FCP X Workflow: Help Importing MXF into FCP X
- Importing Typhoon-H 4K videos to FCP X for editing
- Tapeless MTS Workflow with Final Cut Pro 7
- Canon XC15 4K & FCP X - Edit Canon XC15 4K Footage with FCP X
- Change Canon EOS 80D HD videos to FCP X friendly Apple ProRres
- GoPro Hero 5 4K to FCP X - Importing GoPro Hero 5 4K footages to FCP X
- Load Sony DSC-RX100 V 4K XAVC S video to Final Cut Pro on Mac
- Edit Sony Alpha a99 II 4K recordings with FCP on macOS Sierra
- Best FCP (FCP X/7/6) Video Converter for Mac - Solve FCP importing/editing video issues