AVI, is a multimedia container format introduced by Microsoft in November 1992 as part of its Video for Windows technology. It was widely used in the last century. But everything changed since the MPEG-4 file format come into being. Maybe you've got some torrent movies or TV shows in AVI format, or some family AVI footages from your digital camcorders, like Cannon camcorder or mobile phone saved on your Mac's hard drive. But you may soon notice that you are not able to play AVI on macOS Sierra, because the Mac native player - QuickTime can't recognize your AVI files at all! And you are unable to organize AVI in iTunes, sync to iOS devices for playback on the move, and edit AVI in iMovie etc.
All these happen because that AVI is not the compatible format with macOS Sierra. So if you want to use AVI which requires you to convert AVI to MP4 or other macOS Sierra compatible formats for a change.

Then how to convert the most commonly used AVI to MP4 on macOS Sierra for enjoying video on portable devices or editing with popular editors? Many video converters seem be able to solve this problem. Pavtube offers two converters which can convert AVI to MP4 on macOS Sierra with the best high quality.
Best macOS Sierra AVI to MP4 Converter - Pavtube Video Converter for Mac
Pavtube Video Converter for Mac is the top AVI to MP4 video converter for macOS Sierra. WIth it, you can convert any AVI including SD AVI, HD AVI, 4K AVI, 3D AVI to MP4 including common MP4, HD MP4, 3D MP4 etc for nice playing on macOS Sierra, QuickTime, Apple TV, iPhone/iPad/iPod etc without any problems.
Besides AVI to MP4 conversion, Pavtube Video Converter for Mac also can support more video conversion like MKV to MP4, MKV to AVI, MP4 to AVI and more. And it also provide video editing: clip, crop, merge, split, watermark, add soundtrack and subtitles. (read review)


Other Download:
- Pavtube old official address: http://www.pavtube.com/video-converter-mac/
- Cnet Download: http://download.cnet.com/Pavtube-Video-Converter/3000-2194_4-76179460.html
3 Steps to Convert AVI to MP4 Converter on macOS Sierra quickly
Step 1. Add AVI videos
Install and run the Converter on your computer, then click "Add Video" button to browse and load your rvideos which you've transferred to your Windows PC.

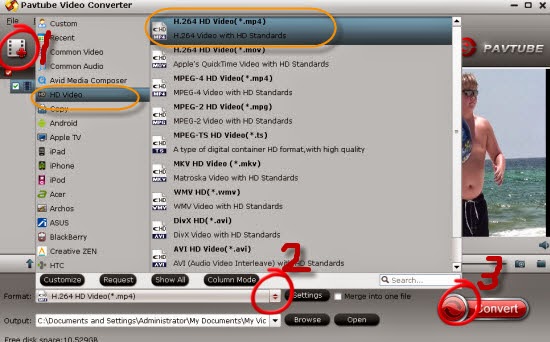
Step 2. Set right output format. Click "Format" bar, and select .mp4 from "Common video" or "HD video" or "3D Video". Here you can also select MP4 fromat from iPhone, iPad, Samsung, TV etc according to your needs.

Tips: The default settings may not satisfy you, and you can click the "Settings" button to change the settings by yourself including video resolution, bit rate, audio sample rate, audio channel etc. for full screen playback smoothly. Or keep no changes, which is also a good choice.
Step 3. Click the "Convert" button on the main interface and the software will start to convert AVI to MP4 format immediately. When the conversion finishes, click "Open" to find the converted video files. Then you can effortless transfer the video files to your Apple devices playback on the go.
Best macOS Sierra AVI to MP4 Converter - Pavtube HD Video Converter for Mac
Pavtube HD Video Converter for Mac is the top AVI to MP4 video converter for macOS Sierra. You can use it to transcode your AVI video to MP4 on macOS Sierra easily for editing/playing/sharing. And if you have any issues in importing and editing video (AVI, MP4, MOV, H.265, VOB, Tivo, MTS/M2TS, MXF etc) in editing software like FCP X, FCP 6/7, iMovie, Premiere Pro, Avid Media Composer, DaVinci Resolve, etc), you can adopt it to help solve the issues quickly. (read review)
Other Download:
Only 3 Steps to Convert AVI to MP4 Converter on macOS Sierra
1.Launch the AVI to MP4 video converter, drag & drop AVI files to the program. Or you can go to the "File" menu, choose "Load Files" to locate the AVI files you want to add.

2. Click "Format" bar, and select .mp4 from "Common video" or "HD video" or "3D Video", or select the MP4 format from FCP/iMovie, Premiere Pro etc as you want.

The default settings may not satisfy you, and you can click the "Settings" button to change the settings by yourself including video resolution, bit rate, audio sample rate, audio channel etc. for full screen playback smoothly. Or keep no changes, which is also a good choice.
3.Hit the "Convert" button and let this smart Converter do the rest for you! This app is specifically designed for Mac users. It works quite well on all Apple products like iMac, MacBook Pro, MacBook, MacBook Pro, MacBook Air running macOS Sierra, Mac OS X 10.6 and above (Mac OS X El Capitan, Yosemite, Mavericks and Mountain Lion included). What's more, for your convenience, the Mac application offers some useful edit functions.
Note: This two AVI to MP4 video converter for Mac is compatible with all Mac opening systems
Windows Version: (compatible with Windows 10, Windows 8.1, Windows 8, Windows 7, Windows XP)
Read More:
All these happen because that AVI is not the compatible format with macOS Sierra. So if you want to use AVI which requires you to convert AVI to MP4 or other macOS Sierra compatible formats for a change.
Then how to convert the most commonly used AVI to MP4 on macOS Sierra for enjoying video on portable devices or editing with popular editors? Many video converters seem be able to solve this problem. Pavtube offers two converters which can convert AVI to MP4 on macOS Sierra with the best high quality.
Best macOS Sierra AVI to MP4 Converter - Pavtube Video Converter for Mac
Pavtube Video Converter for Mac is the top AVI to MP4 video converter for macOS Sierra. WIth it, you can convert any AVI including SD AVI, HD AVI, 4K AVI, 3D AVI to MP4 including common MP4, HD MP4, 3D MP4 etc for nice playing on macOS Sierra, QuickTime, Apple TV, iPhone/iPad/iPod etc without any problems.
Besides AVI to MP4 conversion, Pavtube Video Converter for Mac also can support more video conversion like MKV to MP4, MKV to AVI, MP4 to AVI and more. And it also provide video editing: clip, crop, merge, split, watermark, add soundtrack and subtitles. (read review)
Other Download:
- Pavtube old official address: http://www.pavtube.com/video-converter-mac/
- Cnet Download: http://download.cnet.com/Pavtube-Video-Converter/3000-2194_4-76179460.html
3 Steps to Convert AVI to MP4 Converter on macOS Sierra quickly
Step 1. Add AVI videos
Install and run the Converter on your computer, then click "Add Video" button to browse and load your rvideos which you've transferred to your Windows PC.
Step 2. Set right output format. Click "Format" bar, and select .mp4 from "Common video" or "HD video" or "3D Video". Here you can also select MP4 fromat from iPhone, iPad, Samsung, TV etc according to your needs.
Tips: The default settings may not satisfy you, and you can click the "Settings" button to change the settings by yourself including video resolution, bit rate, audio sample rate, audio channel etc. for full screen playback smoothly. Or keep no changes, which is also a good choice.
Step 3. Click the "Convert" button on the main interface and the software will start to convert AVI to MP4 format immediately. When the conversion finishes, click "Open" to find the converted video files. Then you can effortless transfer the video files to your Apple devices playback on the go.
Best macOS Sierra AVI to MP4 Converter - Pavtube HD Video Converter for Mac
Pavtube HD Video Converter for Mac is the top AVI to MP4 video converter for macOS Sierra. You can use it to transcode your AVI video to MP4 on macOS Sierra easily for editing/playing/sharing. And if you have any issues in importing and editing video (AVI, MP4, MOV, H.265, VOB, Tivo, MTS/M2TS, MXF etc) in editing software like FCP X, FCP 6/7, iMovie, Premiere Pro, Avid Media Composer, DaVinci Resolve, etc), you can adopt it to help solve the issues quickly. (read review)
Other Download:
- Pavtube old official address: http://www.pavtube.com/hd-video-converter-mac/
- AppStore Download: https://itunes.apple.com/de/app/pavtube-hd-video-converter/id502792488?mt=12
- Cnet Download: http://download.cnet.com/Pavtube-HD-Video-Converter/3000-2194_4-76177786.html
Only 3 Steps to Convert AVI to MP4 Converter on macOS Sierra
1.Launch the AVI to MP4 video converter, drag & drop AVI files to the program. Or you can go to the "File" menu, choose "Load Files" to locate the AVI files you want to add.
2. Click "Format" bar, and select .mp4 from "Common video" or "HD video" or "3D Video", or select the MP4 format from FCP/iMovie, Premiere Pro etc as you want.
The default settings may not satisfy you, and you can click the "Settings" button to change the settings by yourself including video resolution, bit rate, audio sample rate, audio channel etc. for full screen playback smoothly. Or keep no changes, which is also a good choice.
3.Hit the "Convert" button and let this smart Converter do the rest for you! This app is specifically designed for Mac users. It works quite well on all Apple products like iMac, MacBook Pro, MacBook, MacBook Pro, MacBook Air running macOS Sierra, Mac OS X 10.6 and above (Mac OS X El Capitan, Yosemite, Mavericks and Mountain Lion included). What's more, for your convenience, the Mac application offers some useful edit functions.
Note: This two AVI to MP4 video converter for Mac is compatible with all Mac opening systems
Windows Version: (compatible with Windows 10, Windows 8.1, Windows 8, Windows 7, Windows XP)
Read More: