AVCHD (Advanced Video Coding High Definition) is a file-based format for the digital recording and playback of high-definition video. Developed jointly by Sony and Panasonic, the format was introduced in 2006 primarily for use in high definition consumer camcorders. And AVCHD files generally use extensions like MTS and M2TS, and can not be accepted by many meida players and devices.

By using AVCHD format, you can burn high definition video to a standard DVD disc. Later you can play that DVD disc in a Blu-ray disc player. Thus you don't have to own a Blu-ray disc burner to enjoy high definition video on Blu-ray disc player. AVCHD video can also be outputted to TV via an HDMI cable or components outputs. It can also be transferred and viewed to computer. Whereas, most people prefer editing the AVCHD before sharing or uploading to the social network. So the best way to get full use of the AVCHD is to convert the file to other format like: MPEG, MP4, MOV, MKV, AVI, etc. After that you are able to play the AVCHD file on iPhone X, iPad, Galaxy S9, Xbox One, and editing in iMovie, Final Cut Pro, Premiere, etc.
The Best AVCHD Video Converter for Windows/Mac
Pavtube Video Converter Ultimate is an application that you can use to encode AVCHD media files to multiple formats, including MPEG-1, MPEG-2, MPEG-4, H.264, H.265, DNxHD, ProRes in MP4, MKV, AVI, WMV, MOV formats. The interface of the program is clean and pretty intuitive. AVCHD files can be imported into the list by using the file browser, by the way the "drag and drop" method is also supported. Batch processing is allowed so that you can add multiple AVCHD files to batch convert AVCHD to any video format you desired with this software. To edit AVCHD effortlessly, you can convert AVCHD to MPEG for Premiere, Sony Vegas editing. If you are Mac users, you also can choose to output "Apple InterMediate Codec(AIC)(*.mov)", "Apple ProRes 422 (*.mov)" for iMovie/FCP postproduction.
Since you can adjust the video bitrate and resolution, you can make the output AVCHD video more compatible with your devices. With the built-in video editor, you can merge multiple AVCHD files into a single one file and you also can trim the AVCHD file to cut off the unwanted part. You also can add external subtitles to the AVCHD file to make the file easier to understand.
Steps to Convert AVCHD to Premiere/Sony Vegas/FCP/iMovie Compatible Video Formats for Further Editing
Step 1: Load protected AVCHD files into the program.
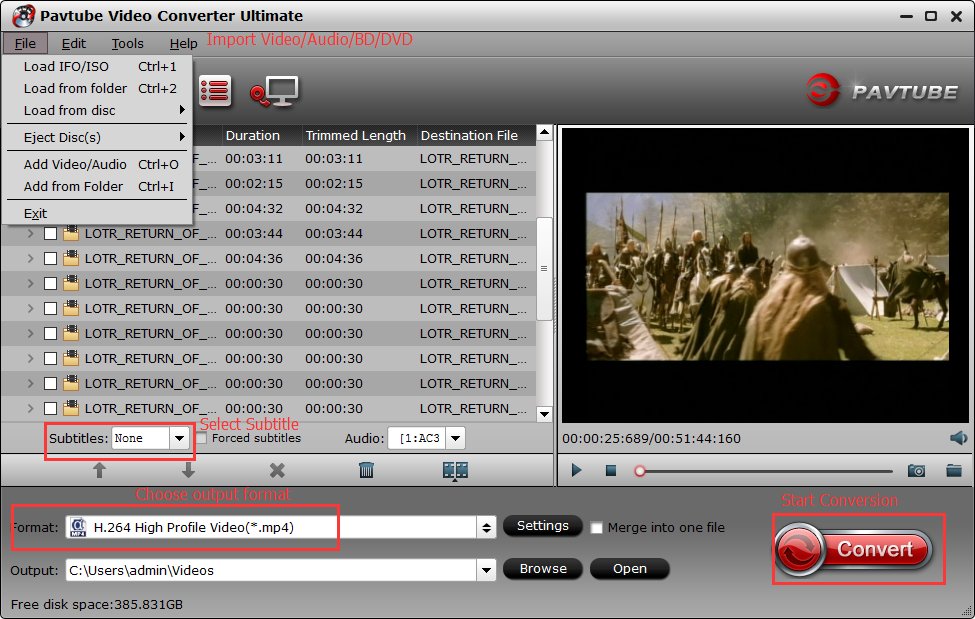
Install and launch AVCHD video converter program on your computer, click "File" > "Add Video/Audio" or "Add from Folder" to load AVCHD files into the program. You also can directly drag and drop the AVCHD files into the software. Batch conversion is supported here.

Step 2: Choose output file formats.
Click "Format", from its drop-down option, you can choose MOV, AVI, M4V, MKV, H.264/H.265 MP4, etc. If you want to edit AVCHD with NLE software, you can choose the MPEG-2 preset for NLE software from "Adobe Premiere/Sony Vegas" category.

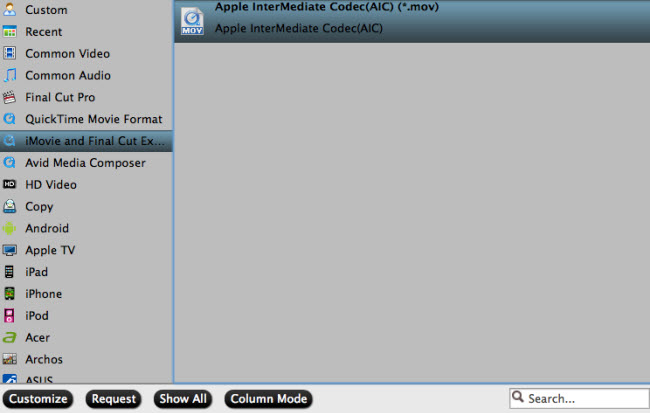
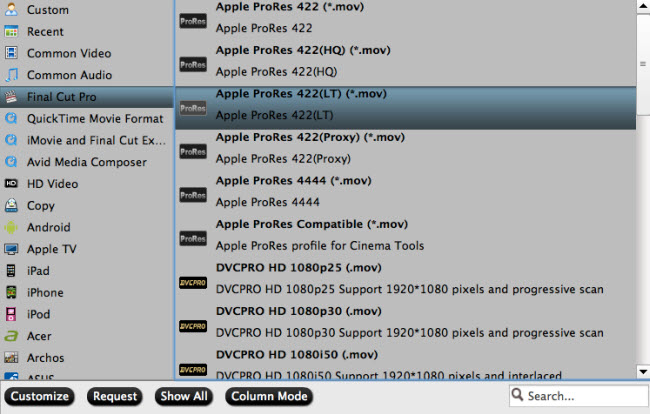
Choose the "Apple InterMediate Codec(AIC)(*.mov)", "Apple ProRes 422 (*.mov)" for iMovie/FCP postproduction from "iMovie and Final Cut Ex..." and "Final Cut Pro" category respectively on Mac version software.
Option 1.

Option 2.

Click "Settings" on the main interface to open "Profile Settings" window to tweak the output video codec, bit rate, sample rate, resolution, audio codec, bit rate, sample rate and channels to make the output video more fit with your devices or programs.
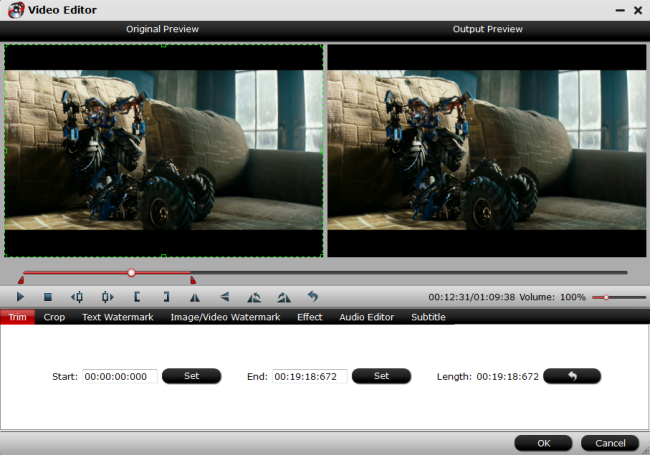
Check an item to active the "Video Editor" function, then click the pencil like icon on the top tool bar to open the "Video Editor" window, you can trim the AVCHD file length, crop video black bars, add external subtitles to AVCHD files, apply sepcial rendering effect, remove/replace audio in video, etc.

Step 4: Start the conversion process.
After all setting is compelted, press the "Convert" button in the right-bottom and the AVCHD video conversion process will start automatically. When the covnersion stops, please go to the output folder to get the covnerted files.
Related Articles
Any Product-related questions?support@pavtube.com