Wanna enjoy our Divx or Xvid movies on Apple devices via iTunes? I have to admit that’s a cool idea but according to the iTunes best supported video formats, have you ever got any issues when importing Divx/Xvid files to iTunes? If you did meet such problems, how did you get rid of the trouble well? Whether or not, in the following article we can take a further learning of Divx/Xvid codec and know how to smoothly make Divx/Xvid supported by iTunes.

Further knowledge of Divx and Xvid codec:
If you are fond of playing videos on Apple devices, no matter for tablets or phones, you must know the MP4, MOV and M4V could be the typical ones that supported by iTunes, right? So in this way, DivX and Xvid files are usually compressed long video files that retain a high level of detail, but the problem is that they often aren't compatible for playing on other media software programs like iTunes, or Android New Kindle Fire. On the other way, they may not available for FCP, etc.
What should we need for importing Divx/Xvid files to iTunes?
In order to enjoy those nice movies with DivX or Xvid encoded on iTunes library and play them well on Apple devices, we have to ask some third-party tools to help us a lot. Pavtube Video Converter for Mac is such an easy to use assistant to convert all different videos to the supported ones for iTunes such as MP4, MOV or M4V etc. Some tips are also allowed below:
Step 1. Load our Divx or Vixd files in. In the main interface of this app, there are the ‘Add videos’ or ‘Add from folder’ buttons available for you to import your DivX files or Xvid. If your DivX or Xvid files are at hand, directly drag and drop the target files to this program. At once, you'll see all your wanted files are added to the left pane of this app.

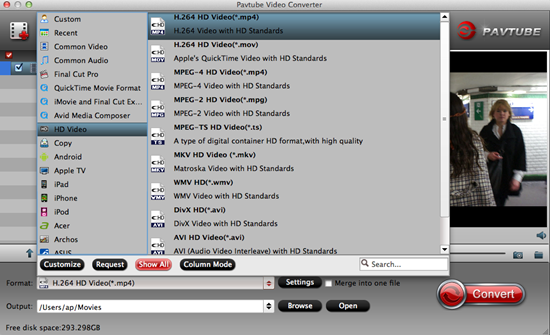
Step 2. Choose the supported output formats for iTunes. Click the format image on the right side of the interface to pop up the "Format" window. Here we suggest you to choose the ‘HD Video’>>’H.264 HD Video (*.mp4)’ as the best one.

Optional Step 3. Come to the ‘Settings’ button to adjust your output videos with your own style? Such as the ‘Video size’, ‘Bitrates’ or ‘Frame rates’, etc. In order to enjoy the movies on Apple devices with a better effect, you won’t miss this step.

When everything is ok, on the bottom-right corner of the Divx/Xvid to iTunes Video Converter's interface, you can hit the "Convert" button to start video conversion. Now, you can see the conversion progress bar with the Percent Complete and remaining time showing. Then after transferring the files to iTunes as go to "File">"Add File to Library" to navigate to the output folder to import all the output file, it’s time to enjoy ourselves!
See Also: