Tuesday, September 26, 2017

Fix AVCHD No Audio Issue

AVCHD no audio problems

AVCHD no audio issues often occur when people try to play AVCHD files with media player on computer or loading into editing software:

"When I play the AVCHD files on my laptop only the video works but I can't hear no audio."

"Please help, I import AVCHD/mts from any files on my PC but there is no audio/sound, not even the audio 1 track has anything in it, the sound is simply not there?? I know FCPX needs my Sony files converting is this the case with CS6 now as cs5.5 works ok."

Why no audio when playing or editing AVCHD files?

The AVCHD Audio can be recorded in 5.1-channel surround sound with Dolby Digital (AC-3) compression or up to 7.1-channel surround sound (uncompressed). When there is no audio when playing AVCHD with media player software or video editing software, it's very likely that the 5.1 AC3 audio or 7.1 such as PCM or LPCM is not supported by your player or editing software.

Fix AVCHD no audio issue

To solve AVCHD no audio issues, the best solution is to perform a audio codec transcoding process. Here, you can get the job easily done with our best Mac AVCHD MTS/M2TS Converter - Pavtube Video Converter for Mac. The program can assist you to batch convert multiple AVCHD files with unsupported audio codec such as AC3 or PCM/LPCM to some common audio codec like AAC, MP3 for viewing on computer with media player software or loading into editing software.

For Windows users, please go to download Pavtube Video Converter to solve AVCHD no sound problems on Windows 10/8.1/8/7.

Step by Step to Solve AVCHD No Audio Problems

Step 1: Load AVCHD files into the program.

Start the program on your Mac computer, click "File" > "Add Video/Audio" or "Add from folder" to load AVCHD video files with multiple audio tracks into the program.

Load AVCHD files into the program

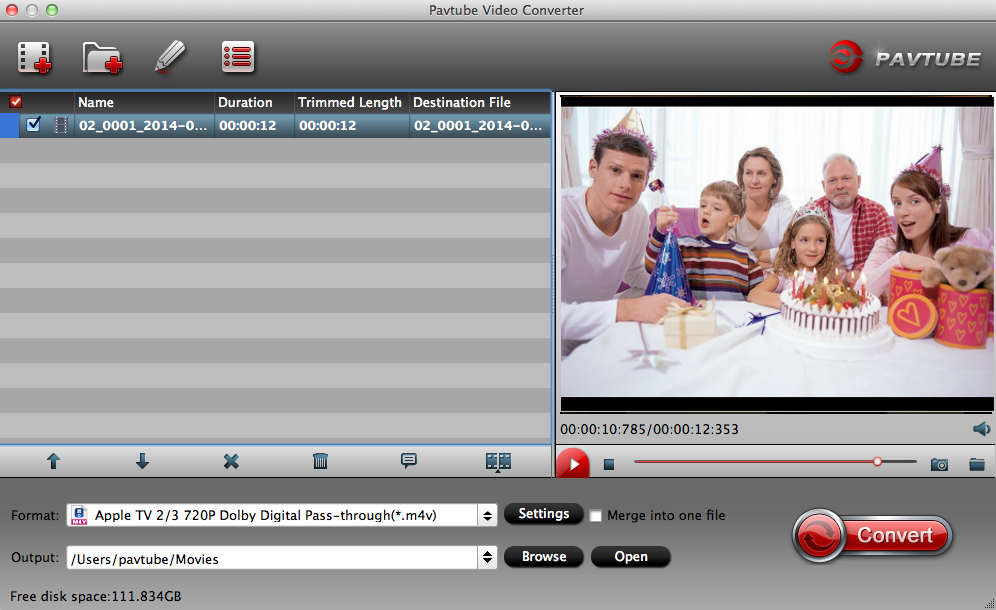
Step 2: Specify output file format.

Click "Format" bar, from its drop-down list, select your media player or editing software compatible digital file formats to output. Then click "Settings", in audio section, from "Codec" drop-down list, select your media player or video editing software compatible audio codec such as "AAC" or "MP3".

Output compatible audio codec

Step 3: Begin the conversion process.

After all setting is completed, hit the "Convert" button at the right bottom of the main interface to begin the conversion process.

When the conversion is finished, click "Open Output Folder" icon on the main interface to open the folder with generated files.

Tuesday, September 19, 2017

Compress Canon 5D Mark IV 4K to 1080p

The EOS 5D Mark IV captures incredible still and 4K video clips suitable for significant post-processing, retouching and cropping. When the shooting is complete, a lot of people find that it is not convenient to play the Canon 5D Mark IV 4K video on computer, smartphone, HD TV, etc or edit with professional NLE editing on slow computer. In addition, due to the large file size of 4K video, 4K video sharing on popular video sharing sites is still very time consuming. The good news is that all those head-scratching issues can be easily fixed by compressing Canon 5D Mark IV 4K to 1080p. The following article will show you how to make this job easily completed.

Best tool to downscale 4K to 1080p

Although there are many tools on the market can do the job for you. However, if you are looking for a powerful yet simple to use program to compress Canon 5D Mark IV to 1080p on Mac, you can's miss Pavtube Video Converter for Mac. The program has perfect importing support for the M-JPEG 4K video recorded with Canon 5D Mark IV and also other 4K format and codec like 4K Prores, 4K H.264, 4K H.265 or 4K AVI/WMV/MP4/MOV/MKV/MXF/XAVC/XAVC S, etc. Thanks to its batch conversion mode, you can load multiple Canon 5D Mark IV 4K video into the program at one time to save your precious time.

Then let's talking about the core compression function. With the program, you can efficiently  compress Canon 5D Mark IV 4K M-JPEG to 1080p or 720p in various different HD file formats including H.264 HD MP4, H.264 HD MOV, H.265 HD MP4, MPEG-4 HD MP4, MPEG-2 HD, MPEG-TS HD, MKV HD, WMV HD, Divx HD, AVI HD and BDAV HD for smoothly playing and viewing on computer, smartphones, tablets, HDTVs, etc. Besides that, you can also choose devices or applications preset HD profile formats with the optimal playback settings.

For Windows users, you can download Pavtube Video Converter to compress 5D Mark IV 4K to 1080p on Windows 10/8.1/8/7 with best output quality.

Split/Trim/Crop Canon 5D Mark IV

Don't want to suffer any quality loss when compressing Canon 5D Mark IV 4K video. Never mind, you can make that by using the program's built-in trimming function to cut off unwanted parts or segments, split large 4K video into small parts by file size, count or length or crop the 4K video to remove the unwanted black bars or areas from the 4K video.

How to Compress Canon 5D Mark IV 4K to 1080p on Mac?

Step 1: Load Canon 5D Mark IV 4K video.

Download the free trial version of the program. Launch it on your computer. Click "File" menu and select "Add Video/Audio" or click the "Add Video" button on the top tool bar to import Canon 5D Mark IV 4K video into the program.

Load Canon 5D Mark IV 4K video

Step 2: Choose output file format.

To compress 5D Mark IV 4K to 1080p, it would be ideal for you to choose one of your desired HD file format under "HD Video" main category.

Compress 4K to HD file formats

Tips: Click "Settings" on the main interface to open the "Profile Settings" window, to compress 4K to 1080p, make sure to change the output file resolution as "1920*1080" or "1080*720" from "Size(pix)" drop-down list. You can also do other tweaking according to your own needs.

Step 3: Trim/Split/Crop Canon 5D Mark IV video.

Trim video length

In the video editor window, choose the "Trim" tab and this tab is selected by default when the editing window appears. You can use the trim function to cut off unwanted parts from start and end. You can either drag pointers on the process bar or set exact time point in Start and End boxes to set.

Trim video length

Split large video

Click the split button on the file list to launch the Video Split window. Ticking "Enable" option, you can split the file by file count, time length, or file size.

Split large video

Crop video area

The "Crop" facility enables users to get rid of the black edges and unwanted area of the image. In the video editor window, navigate to the "Crop" tab. Follow the below methods to crop selected video:
A: Crop video by dragging and dropping the crop frame. Simply move your mouse cursor to drag and adjust the green frame to desired position.
B: Crop video by setting values. There are "Simple Mode" and "Advanced Mode" under Crop feature.

Crop video area

Step 4: Begin the conversion process.

After all setting is completed, hit the "Convert" button at the right bottom of the main interface to begin the compression or downscaling process from Canon 5D Mark IV to 1080p or 720p resolution with your desired HD file formats.

When the conversion is finished, click "Open Output Folder" icon on the main interface to open the folder with generated files. Then you can smoothly view, play the compressed files on Mac with video players, transfer to iPhone, iPad, stream to HD TV or load into Mac editin

Tuesday, September 12, 2017

Import Mavic Pro 4K to Premiere Pro CC

As the best Drone of 2017, the DJI Mavic Pro is the perfect marriage of unparalleled flying ability, a high quality camera, and a low profile design. With this great drone, you can shoot both DCI 4K and UHD 4K in MOV wrapper with MPEG-4 AVC/H.264 compression standard. When the shooting is done, you may wish to do some professional post editing work with the DJI Mavic Pro 4K video with Premiere Pro CC. The following article will show you how to achieve a high quality and high performance workflow of Mavic Pro 4K video with Premiere Pro CC.

Work Mavic Pro 4K with PPC on slow computer

Although Premiere Pro CC can handle 4K resolution video editing very well, in addition, the H.264 MOV formats shot with Mavic Pro is also included in Premiere Pro CC supported file formats. However, it is well known that 4K video editing is very processor intensive, if your computer doesn't meet the minimum standards to edit 4K video, you will inevitably suffer video stuttering or lagging issues when playback the 4K video on the timeline of Premiere Pro CC. To fix this issue, you can use the following 2 solutions:

Solution 1: Create Proxy Media with Premiere Pro CC
Solution 2: Compress DJI Mavic Pro 4K to 1080p

Solution 1: Create Proxy Media with Premiere Pro CC

You can create proxies directly from items in the project panel. Choose Create Proxis from the project panel context menu to open the Create Proxies dialog. The menu item is enabled when one or more items in the panel are selected that can be proxied. Premiere Pro can create proxies for master clip project items if they have video, have no captions, and are not growing files. The media must also be online.

In the Create Proxies dialog you can choose one of several built-in presets to use when transcoding high-resolution originals to create proxies. You can also add presets created in Adobe Media Encoder by clicking the Add Ingest Preset button. You can also choose to create proxies in a "Proxies" directory next to the original media, or in a custom location.

If you allow the progress dialog box to complete, a proxy job is created in Adobe Media Encoder for each of the project items chosen that can be proxied, and an offline proxy is attached to each project item. You can monitor the progress of these jobs in the Premiere Pro Progress panel, or in Adobe Media Encoder.

While the jobs are processed, you can continue to work with the corresponding high-resolution project items in Premiere Pro. When the proxy jobs complete, Premiere Pro automatically switches to displaying the proxy video in the Timeline if Enable Proxies is enabled in the Media preferences panel.

Solution 2: Compress DJI Mavic Pro 4K to 1080p

If you wish to export the 4K footage from Premiere Pro CC to 1080p for smooth playback on HD TV, smartphones, tablets, etc. Then it would be much ideal for you to choose the 2 solution: compress 4K to 1080p. Here, you can easily downscale DJI Mavic Pro 4K to 1080p by downloading Pavtube Video Converter, which can assist you to efficiently compress Mavic Pro 4K to 1080p or 720p in various file formats including H.264 HD MP4, H.264 HD MOV, H.265 HD, MPEG-4 HD MP4, MPEG-2 HD, MPEG-TS HD, MKV HD, WMV HD, Divx HD, AVI HD, BDAV HD, etc. Here, you can choose any of Premiere Pro CC supported HD file formats as the final output file format according to your own preference.

For Mac users, you can download Pavtube Video Converter for Mac to complete the conversion on macOS High Sierra, macOS Sierra, Mac OS X El Capitan, Mac OS X Yosemite, Mac OS X Mavericks.

How to Compress DJI Mavic Pro 4K Video to 1080p for Smooth Post Editing Workflow?

Step 1: Load 4K video into the program.

Open the program, click "File" menu, from its drop-down option, select "Add Video/Audio" to load DJI Mavic Pro 4K Video to the program.

Load DJI Mavic Pro 4K video

Step 2: Choose output file format.

To downscale DJI Mavic Pro 4K to 1080p, first chose to output DJI 4K H.264 to HD H.264 from the "Format" drop-down list below.

Output DJI Mavic Pro HD H.264

Then click "Settings" icon on the main interface to open the "Profile Settings" window, from "Size(pix)" drop-down options, select "1920*1080" or "1080*720" to compress 4K to 1080p.

Compress 4K to 1080p

Step 3: Start the conversion process.

After all settings are done, click right-bottom "Convert" button to begin to convert and compress DJI Mavic Pro 4K video to Premiere Pro compatible editing codec or resolution.

When the conversion is completed, you will have no problem to import video to Premiere Pro CC for smooth post video editing workflow.

Tuesday, September 5, 2017

Compress Mavic Pro 4K to 1080p

Why compress Mavic Pro 4K to 1080p

The Mavic Pro camera shoots both DCI 4K at 24p and UHD 4K at 24/25/30p. When the shooting is completed, you may come the need to compress Mavic Pro 4K to 1080p for the following reasons:
- 4K video is too large in size, it will eat a lot of space of your computer hard drive or mobile devices internal memory
- 4K video playback and editing on computer has strict requirements for the computer processor and graphic cards, you may be disappointed find that your old computer may not powerful enough to handle 4K resolution video
- Even if your computer meet the minimum requirements to play or edit 4K video, you may find that 4K video plays back choppy. This is due to the immense processing power required to play 4K.
- Many editing software or media player software still lack the ability to handle 4K resolution video
- The maximum file size resolution for some popular video share sites is just limited to 1080p

Due to the limitation of 4K video, then it is essential for you to compress 4K to 1080p to make maximum usage of Mavic Pro 4K video.

How to compress DJI Mavic Pro 4K video to 1080p?

To downscale Mavic Pro 4K to 1080p, what you need is simply a 4K video compressor. Here, you can get the job easily done with our powerful yet simple to use application - Pavtube Video Converter. The program has perfect support for both DJI Mavic Pro DCI 4K and UHD 4K, thanks to its batch conversion mode, you can load multiple Mavic Pro 4K video into the program for compression at one time. To let you get full entertainment of the DJI Mavic Pro 4K video, the program allows you to compress Mavic Pro 4K to 1080p or 720p in various different file formats including H.264 HD MP4, H.264 HD MOV, H.265 HD, MPEG-4 HD MP4, MPEG-2 HD, MPEG-TS HD, MKV HD, WMV HD, Divx HD, AVI HD, BDAV HD, etc. Besides common file formats, you can also choose to directly output hot devices or editing application preset HD profile formats with the optimal playback or editing settings.

For Mac users, please download Pavtube Video Converter for Mac to do Mavic Pro 4K to 1080p compression on macOS High Sierra, macOS Sierra, Mac OS X El Capitan, Mac OS X Yosemite, etc.

How to Compress DJI Mavic Pro 4K to 1080p with Best Quality?

Step 1: Load DJI Mavic Pro 4K video.

Download the free trial version of the program. Launch it on your computer. Click "File" menu and select "Add Video/Audio" or click the "Add Video" button on the top tool bar to import DJI Mavic Pro 4K video files into the program.

Load DJI Mavic Pro 4K video

Step 2: Define the output format.

Clicking the Format bar, from its drop-down list, select one of your desire HD file format to compress Mavic Pro 4K to 1080p, here, we choose one of the popular HD file formats "H.264 HD Video(*.mp4)" under "HD Video" main category.

Output popular HD file formats

Step 3: Compress 4K to 1080p.

Click "Settings" on the main interface to open "Profile Settings" window, in video section, from "Size(pix)" drop-down list, select "1980*1020" or "1080*720" to compress 4K to 1080p.

Compress 4K to 1080p

Step 4: Begin the final conversion process.

After all setting is completed, hit the "Convert" button at the right bottom of the main interface to begin DJI Mavic Pro 4K to 1080p compression and conversion process.

When the conversion is finished, click "Open Output Folder" icon on the main interface to open the folder with generated files. Then feel free to play, edit and share the DJI Mavic Pro 1080p video anywhere as you like with ease.

Tuesday, August 29, 2017

The LUMIX GH5 records silky smooth 4K 60p/50p (QFHD 4K: 3840 x 2160 / MOV or MP4) video. For Mac users, after shooting many beautiful videos, you may wish to load the Panasonic GH5 4K video into FCP X, the professional NLE editing software on Mac platform for some post editing workflow. The problem is that a lot of people they have encounter incompatible issue when working LUMIX GH5 4K video with FCP X. The following article will show you how to get a smooth workflow of Lumix GH5 4K video with FCP X.

Best editing codec for FCP X

To get a smooth workflow of Panasonic GH5 4K with FCP X, we highly recommend you to use the Apple Prores codec, which is specially designed by Apple for high quality and high performance editing workflow of 4K video in FCP X.

Transcode Panasonic GH5 4K to Prores codec for FCP X

To generate Apple Prores coded, you can download our best Mac Prores Converter - Pavtube Video Converter for Mac, which Which has perfect support for both the 4K H.264 MP4 and MOV container file format recorded by Panasonic GH5. The program can facilitate you to directly output FCP 7/X most favorable Apple Prores codec in various different file types including Apple Prores 422, Apple Prores 422 HQ, Apple Prores 422 Proxy and Apple Prores 422 LT. If your computer are powerful enough to handle multicam and high-resolution video and you are going to do many effects editing work with FCP X, you'd better choose to output "Apple Prores 422(*.mov)"or "Apple Prores 422(HQ)(*.mov)"for better performance. If your computer are not fast enough, just choose Apple Prores 422 Proxy and Apple Prores 422 LT format, which helps to create small file resolution video for smooth post editing workflow.

How to Transcode Panasonic GH5 4K to Prores Codec for FCP X Best Editing Workflow?

Step 1:Load Panasonic GH5 4K video.

Open the program, click "File" menu, from its drop-down option, select "Add Video/Audio" to load GH5 4K video to the program.

Load Panasonic GH5 4K video

Step 2: Define the output format.

Clicking the Format bar, from its drop-down list, you can choose one of Final Cut Pro X best compatible Apple Prores editing format. If your computer is powerful enough to handle 4K video, it would be much ideal for you to choose "Apple Prores 422(*.mov)" or ""Apple Prores 422(HQ)(*.mov)" for high quality performance on Final Cut Pro X.

Output Apple Prores 422 or 422 HQ format

If you have a underpowered computer, it is ideal for you to output "Apple Prores 422(Proxy)(*.mov)" or "Apple Prores 422(LT)(*.mov)" format.

Output Apple Prores LT or Proxy format

Step 3: Start the conversion process.

Go back to the main interface, hit right-bottom "Convert" button to start to convert and compress GH5 4K video to Final Cut Pro X best favorable Apple Prores format with compatible file resolution.

When the conversion is completed, feel free to import video to Final Cut Pro X for professional post-production workflow on either powerful or slow computer.

Tuesday, August 22, 2017

Import Canon 5D Mark IV 4K to FCP X

Canon 5D Mark IV 4K Video issues in FCP X

"Hi guys. I have Canon 5D mark 4 and it can shoot 4K videos in MJPEG format. When i tried to edit this videos in FCPX video seems laggy and not smooth. I think it's about for MJPEG format because it's normal in the camera screen. And 1080P ALL-I & IPB videos are seems normal and ok too. Do you have any suggestions to solve for this issue?"

Can FCP X handle Canon 5D Mark IV 4K video?

The Canon 5D Mark IV shots DCI 4K (4096 x2160) resolution recording in MJPEG format, which is unfortunately excluded from FCP X supported file formats. To successfully load Canon 5D Mark IV 4K to FCP X, you will need to perform a format transcoding process.

Best workflow of Canon 5D Mark IV 4K with FCP X

You can easily convert Canon 5D Mark IV 4K MJPEG to one of FCP X editable file formats with any of the Mac video conversion tool on the market , however, if you are looking for a high quality and high performance workflow, we highly recommend you to use the Apple Prores codec, which retains higher quality during editing while requiring much less expensive disk systems.

To generate Apple Prores codec, you can download this professional program - Pavtube Video Converter for Mac, which can swiftly transcode Canon 5D Mark IV 4K MJPEG to Apple Prores codec in various types, you can choose a proper codec according to your computer hardware system condition.

If you computer is old or slow, or you just want to do some rough editing, you can select to output "Apple Prores Proxy)(*.mov)"or "Apple Prores (LT)(*.mov)"format to save more space and bandwidth. However, if your computer are powerful enough to handle multicam and high-resolution video and you are going to do many effects editing work with FCP X, you'd better choose to output "Apple Prores 422(*.mov)"or "Apple Prores 422(HQ)(*.mov)" for better performance.

Notes:
1.When converting video to Final Cut Pro oriented format templates(e.g. Apple Prores), please ensure that your computer has Final Cut Pro installed, otherwise the converted files will have audio only without image.
2.If you are using FCP X, please make sure you have installed ProApps QuickTime Codecs, or you may get files with sound only without video.

Step by Step to Convert Canon 5D Mark IV 4K to Apple Prores for FCP X

Step 1: Load Canon 5D Mark IV 4K footage.

After transferring the footage from the camera to your Mac local drive, launch the program on your Mac computer, from "File" drop-down option, select "add Video/Audio" to add Canon 5D Mark IV 4K files to the program.

Load Canon 5D Mark IV 4K video

Step 2: Select output file format.

Click "Format"bar, from its drop-down list, select "Final Cut Pro"> "Apple Prores 422(*.mov)"as your desired output file formats for working with high performance computer, for slow computer, just choose "Apple Prores Proxy)(*.mov)"or "Apple Prores (LT)(*.mov)"format.

Output Apple Prores format

Step 3: Begin the conversion process.

Go back to the main interface and press the "Convert" icon on the right-bottom to start Canon 5D Mark IV 4K to Final Cut Pro X Apple Prores codec encoding process.

When the conversion is done, you can easily import converted video to FCP X for furthering professional editing.

Tuesday, August 15, 2017

Upload 4K Video to Instagram

Have some personal 4K video shot with your camera, camcorder, smartphone, tablets or downloaded from online sites and wish to upload and share the 4K video on Instagram, but have no ideal how to get the best uploading settings such as file format, video length, file size, etc. The following article will give you the full answer for all those questions.

Best video settings for Instagram uploading

Size: maximum width 1080 pixels (any height)
Frame Rate: 29.96 frames per second
Codec: H.264 codec / MP4
Bit rate: 3,500 kbps video bitrate
Audio: AAC audio codec at 44.1 kHz mono

From above lists, we can see that the maximum uploading resolution for Instagram is 1080p, therefore, it is essential for you to compress 4K to 1080p to get a fast and smooth uploading process. In addition, the video format should be MP4 file format compressed with H.264 video codec and AAC audio codec. If the 4K video that you try to post to Instagram are wrapped in other incompatible container file formats such as AVI/WMV/MOV/MKV/FLV/TS/XAVC/XAVC S/MXF or unsupported codec like H.265, Prores, etc. You will need to perform a format and codec transcoding process. What's more, the best video frame rate should be 29.96, therefore, make sure that the video are encoded with that compatible frame rate.

Best tool for converting and compressing 4K video for Instagram

To get above listed best uploading settings for Instagram, you can easily achieve that with our best Instagram video converter program called Pavtube Video Converter, the program not only assists you to encode 4K video to Instagram compatible H.264 codec with MP4 container, but also allows you to output Instagram best compatible uploading settings listed above in the program's profile parameters window.

Trim video for Instagram uploading

Since Instagram only allows you to post video from 3 to 60 seconds, therefore, if your 4K video is longer than 60 seconds, you can take good advantage of the program's built-in video trimming function to cut off video to remove unwanted parts or segments to shorten the video length to less than 60 seconds.

For Mac users, please download Pavtube Video Converter for Mac to produce Instagram best compatible uploading settings.

Step by Step to Convert and Compress DJI 4K for Instagram Uploading

Step 1: Load DJI 4K video into the program.

Start the program on your computer, click "File" menu and select "Add Video/Audio" or "Add from folder" to import DJI 4K video.

Load DJI 4K video

Step 2: Choose output file format.

To downscale DJI 4K to 1080p, you can output Instagram compatible "H.264 HD Video(*.mp4)" under "HD Video" main category.

Output Instagram compatible HD H.264 format

Step 3: Output Instagram best uploading profile settings.

Click "Settings" icon on the main interface to open the "Profile Settings" window, under video section, set the output resolution as"1920*1080 or"1080*720, frame rate as 29.96fps, bit rate as 3500Kbps, audio codec as aac, sample rate as 44100, channels as mono.

Output Instagram compatible uploading profile settings

Step 3: Trim or cut DJI 4K video to less than 60 seconds.

Open "Video Editor" window and switch to the "Trim" tab, you can drag the slider bars to include the segment you want to remain, click the left square bracket to set start point, and click the right square bracket to set end point when previewing the video or directly input specific values to "Start" and "End" box.

Trim DJI 4K video

Step 4: Start the conversion process.

After all settings are done, click right-bottom "Convert" button to begin to convert and compress DJI 4K video to the best formats and settings for Instagram.

When the conversion is completed, you can smoothly upload and share DJI 4K video on Instagram.