Friday, September 13, 2013

GoPro MP4 to iMovie: Editing native GoPro MP4 files in iMovie

Facing problems when you try to import native GoPro MP4 files to iMovie? This article will provide you an easy way to transcode GoPro MP4 to iMovie (iMovie 11/9/8 included) on Mac OS X.

Known for being lightweight, rugged, wearable, or mountable in unusual place such as outside planes, cars, bicycle or boats, GoPro HD camcorder, as a brand of high-definition personal cameras, is often used in extreme action video photography. When you go skiing, surfing, diving or biking outside, it is a great companion to record every wonderful moment. Being an “always-on” type of camera worn on your helmet, attached to your bike, surfboard or other, it usually record long sequences of footage and then you need to edit down. And GoPro HD camera captures footage in MPEG-4 and outputs its files as .MP4 files which are compressed using the h.264 codec.

iMovie is a powerful video edit software and free for Mac users, so many people Mac users use iMovie to edit videos. However, when they import GoPro HD MP4 files to iMovie, MP4 files cannot be recognized by iMovie. MP4 codec is not compatible to iMovie. Here Apple Intermediate Codec is natively supported by iMovie. To resolve the problem, the quick workaround is to convert native GoPro MP4 files to iMovie supported AIC MOV format.

Along with the help of third party software, it will be done effortlessly. Here I share a simple guide on how to transcode native GoPro HD MP4 files for editing smoothly with iMovie. If you're facing the issues, read on to find the answer.

Download Pavtube iMedia Converter for Mac and install it.

It is easy-to-use yet all-in-one ultimate converter. With it, you can effortlessly transcode GoPro MP4 as well as your Blu-ray and DVD movies to Apple Intermediate Codec, which is an iMovie friendly file format keeping the Gopro HD original quality. Besides iMovie, this software can also output DNxHD for Avid, MPEG-2 for Sony Vegas, Premiere Element, AVI for Pinnacle Studio, ProRes for FCP, more NLE systems for native editing.

How to convert MP4 files from GoPro HD cameras to iMovie for editing?

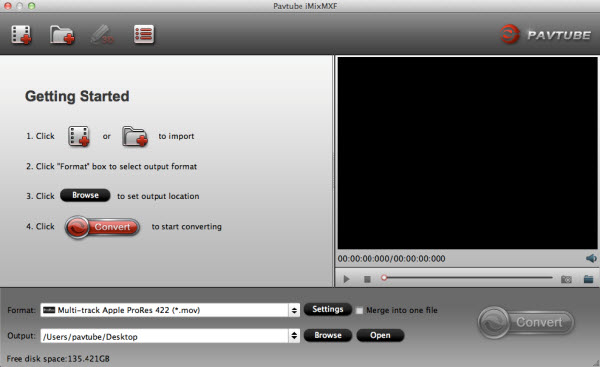
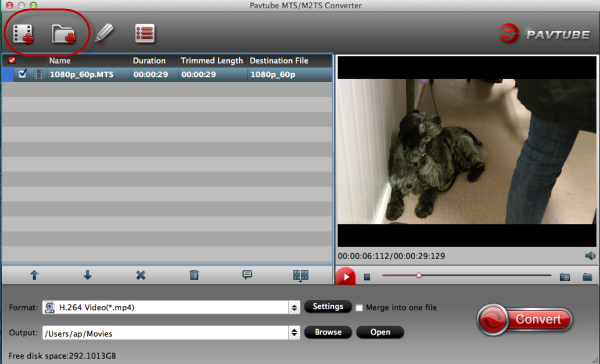
Step 1. Load MP4 files to the Best GoPro MP4 to iMovie Converter for Mac.

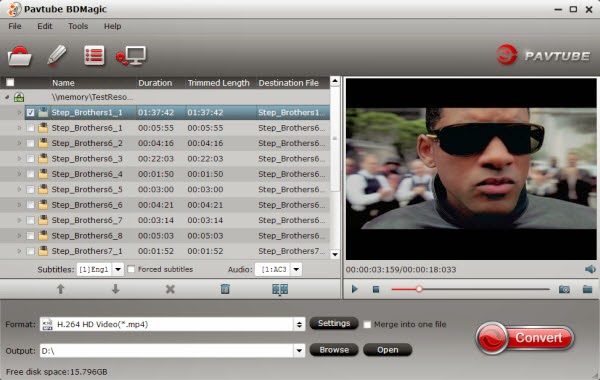
Launch the GoPro MP4 to iMovie Converter for Mac and add MP4 files to it. Click “Add video” or “Add from folder” button to load single MP4 video file or the entire folder. Or directly drag and drop the source MP4 file you want to the software. Then you can preview the whole videos in the preview window on the right.


Notes: If you need to join multiple source MP4 file into one output file, you can go to select the desired tasks and check “Merge into one file” for conversion.

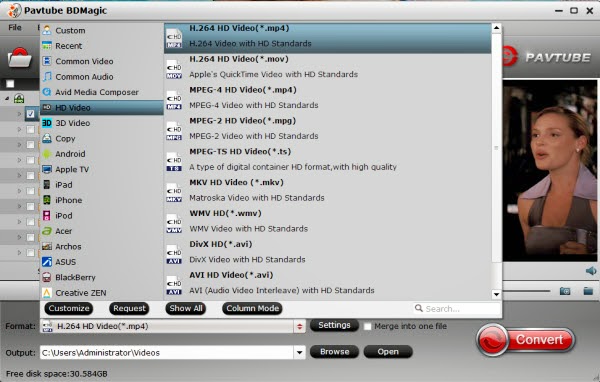
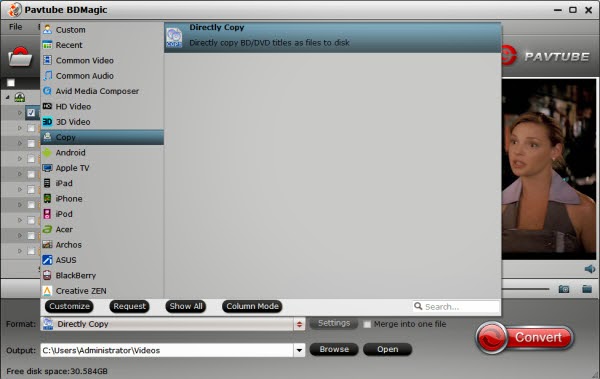
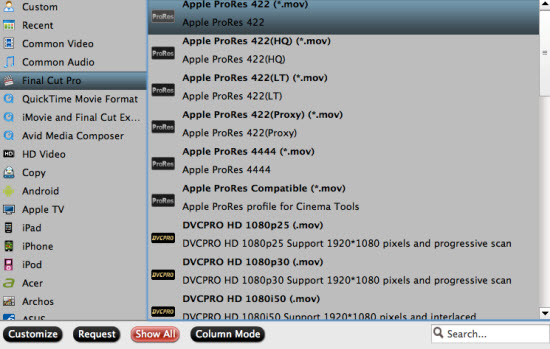
Step 2. Choose AIC MOV for iMovie.

Click “Format” option to choose the output format for iMovie. Choose the moset compatible “Apple InterMediate Codec (AIC) (*.mov)” under “iMovie and Final Cut Express” option as output format. 


Notes: If the default settings do not fit your needs, you can click “Settings” button to customize output video parameters like bitrate, channels, frame rate, etc, such as to set higher bitrate to get much better image quality. In general, the higher video bit rate, the larger output file size, and vice versa.

3. Convert GoPro MP4 to iMovie AIC.
  
Hit the big “Convert” button to start converting GoPro MP4 to iMovie AIC. Once finished, hit “Open” button to get the generated files for iMovie.

Now you can import GoPro HD MP4 file into iMovie and then further edit it without any problems. Try it right now.

Read More:

Thursday, September 12, 2013

Top MXF Converter for Mac Review: Pavtube iMixMXF vs Tipard MXF Converter for Mac

Which MXF Converter for Mac is the best MXF Converter software in 2016 or future? If you want to get a top MXF Converter for Mac to convert Panasonic P2 MXF, Canon MXF, Avid MXF and Sony XAVC MXF/XDCAM MXF preserving multiple audio channels and original timecode, etc., this Mac MXF Converter Review will be helpful. We give you top MXF Converter for Mac software reviews for you here. You can according the review to choose a best multi-tracks MXF Converter for you. 

A Brief Review on top MXF Converter for Mac: Pavtube iMixMXF vs Tipard MXF Converter for Mac

Note: If you are running on Windows, please refer to the review Best Multi-track MXF Converter Review

Main interface


Import

Pavtube iMixMXF offers two icons on the top left for "add videos" and "add from folder"; Tipard MXF Converter for Mac integrates them into one, the same place on the top left.

We load three mxf clips in different Camera models.

Source video properties

In Pavtube iMixMXF, we can find a bubble under the three titles. Click it to check the input video/audio properties including video/audio stream, format, resolution, frame rate, bitrate and duration.


Tipard MXF Converter for Mac also has an icon to show source file properties as following. But it seems it didn't show all the info of audio stream. If you want to check/switch them, you'll need to click and select in "Audio Track".


Output Presets:

As a beginner, the output presets (or profiles) are very important to give you conversion guidance with no need to change the bitrate, framerate, size or other figures. Both Pavtube and Tipard have various presets for different devices, and NLEs. Both of them support customize outputting preset if it's needed.


Video Edition:

Let's move on to edit videos before conversion.

Click the 3D icon on top of Pavtube iMixMXF, it pops up a windows to let you trim, crop, add text/image/video watermark, remove/replace audio, add subtitles and add 3D effect. Well organized.


In Tipard MXF Converter for Mac, the Trim feature is listed separately. The rest crop, effect, edit audio and add 3D effect work the same with Pavtube iMixMXF, except the preview window is difficult to see. Besides, the Tipard MXF Converter for Mac is not able to add video watermark as the former.


Now let do a test to convert mxf to prores on both the converters.

Test: workflow of converting MXF to ProRes 422 for FCP X

We test with one MXF clip from Canon XF100 with two audio tracks.

1. We choose "Multi-track video -> Multi-track Apple Prores 422(*.mov)" in Pavtube iMixMXF and "Final Cut Pro -> Apple ProRes 422(*.mov)" in Tipard MXF Converter for Mac.


2. Choose audio tracks in Settings.

Pavtube iMixMXF offers settings for Video and Audio; all the audio streams are showed here. We check both the audio track as apparently we want to save all the sound we recorded. Also it offers a mix into one track option; we keep it unchecked.


In Tipard MXF Converter for Mac main interface, we found the options for Audio Track; but there's no way to select all of them. So we just check the first stream.


3. Start conversion.

Click the Convert icon at nearly the same time. We can see Pavtube iMixMXF (right) shows the percentage while Tipard MXF Converter for Mac (left) doesn't, the preview window changes with the process, but it's stuttering all the time.


4. Import to Final Cut Pro X.

Both the two converted completes at the same time. Now click Open output folder to locate the converted video and import them into FPCX.

We can see both the audio tracks saved separately as original in Pavtube converted video, and the timecode is kept.


While in converted video from Tipard MXF Converter for Mac, it only includes one audio track—the first one we selected. And the original timecode is removed; it's really confusing us as we thought it's basic and should be not difficult to realize.


All the steps done; thanks to Pavtube and Tipard for bringing us the great MXF converting programs despite that we have made a decision
FYI: during our research online, there's another MXF Converter for Mac from Pavtube but it seems to be the lite version of Pavtube iMixMXF. For users who only records one audio track, the former is recommended and it costs less than the latter Pro version. 

Read More:

Apple's iPhone 5C and 5S debut: We live in boring times

Marketers will do their best to convince you otherwise, but smartphones now belong to a maturing industry with little sizzle.

Apple iPhone 5C

Apple is a tough act to follow, especially when you're Apple. And especially when almost every detail of your big unveiling had already been picked apart and reported on by the press.

After announcing on Tuesday what arguably was one of the most significant product refreshes in years, Apple shares still sagged a little more than 2 percent -- the equivalent of a Wall Street shrug. Besides, the stock had been running up, playing to the saying, buy on the rumor, sell on the news. None of that means that the new products and technologies Apple showed off were necessarily wanting or somehow disappointing.

But everything is context and for the past year, Apple has battled the perception that its technology edge over Samsung was narrowing. Apple now also faces a clutch of scrappy overseas rivals such as Huawei, ZTE, and Xiaomi that make competitive, low-cost smartphones.

So as Apple's senior executives took their respective turns on stage talking about the iPhone 5C and iPhone 5S, the hyperbole was, expectedly, as thick as San Francisco's late-summer fog. At one point, CEO Tim Cook extolled the "incredible" interaction between Apple's design and engineering teams. At another point vice president of worldwide marketing Phil Schiller described 5C as "absolutely beautiful."

That over-the-top stuff is always part of what's essentially a big marketing show. But there were no big surprises out of Apple this time around. No surprises because the news leaks were spot-on. And if you were waiting for pyrotechnics, you went home disappointed because Apple had nothing about possible wearable computing devices or televisions in the offing. The only unexpected news came when Apple said that iWork, iPhoto, and iMovie for the iPhone and iPad would be free for download. However, with tech addicts always looking for the next big breakthrough, would this provide a big-enough fix?

Another question: When it comes to price, it's far from clear how the low-end iPhone 5C will sell, considering that it's not exactly a 3 bargain. The 5C will list for $549 and $649, for 16GB and 32GB versions, respectively. The price falls to $99 and $199, with a two-year contract. The unsubsidized pricing offers just a $100 discount from the iPhone 5S contract-free pricing. You'll pay $649 off contract the 16GB version of that device. Also, watch how this unfolds in China. The Tech In Asia blog noted that Apple's online store in China lists the price of the 5C for the equivalent of a hefty $733.
 
Many consumers -- especially the loyalists -- will still hand over their credit cards, convinced that Apple builds better devices. And these are measurably better smartphones than their predecessors. Among the myriad announcements, three caught my eye:

  • Apple unveiled a Touch ID fingerprint scanner for its more expensive iPhone, the 5S. Something like this had been widely expected since Apple spent $356 million last year to buy AuthenTec, a company that makes sensor chips for use both in personal computers and smartphones. For anyone who has ever forgotten a password or worried about security -- um, like most of us -- that's a nice selling point. The end of passwords? We can only hope. (The Motorola Atrix 4G offered a biometric fingerprint smart sensor when it debuted in 2011.
  • The announcement of the A7 processor, the first-ever 64-bit chip in a smartphone, is significant. Given something with that kind of speed and a tool kit, there should be amazing stuff coming out from developers.
  • The iPhone 5S comes with an much improved camera that includes burst mode, better glare reduction, a bigger aperture, and a larger sensor. "You can't underestimate the quality of the new camera, especially when those who understand imaging get a chance to put it through its paces," said technology analyst Tim Bajarin.

"I don't think there was anything fundamentally disappointing out of Apple despite the fact that there was lot of anticipation," said IDC's Will Stofega. "What we've seen with Apple and other vendors is they're incrementally changing and improving things."

Hardly the end of the world, but let's not kid ourselves: Elvis has left the building and the magic's gone out of the smartphone business, leaving companies and their advocates to argue about slightly faster processors, more megapixels, or slightly improved battery life. That's progress, but it's the equivalent of three yards and a cloud of dust.

When Apple came out with the original iPhone in 2007, that was the real game-changer. Before then, the phone carriers were able to dangle access to their networks to dictate what got built into handsets and how much the devices would cost. Handset makers complied or they got frozen out. The result: crappy phones. Then Steve Jobs upset the rules and the rest we know.

The journey part of the story is over. Smartphones, which are so baked into our lives, belong a maturing industry, which means that it's going to get harder and harder for any company -- Apple, Samsung, or any other would-be challenger -- to make a splash. One smartphone isn't all that different from the next. The devices do what we need them to do. It doesn't mean there aren't other delightful applications waiting to get invented. But as Stofega noted correctly, "There's only so much you can do with a device." We're talking about a communications tool, not a talisman.

So here's what's important to remember: The media often gets it wrong, as does Wall Street. The truly critical days are the weeks and months ahead when consumers vote with their wallets. And if the rumors are true, an October surprise may be in the offing from Apple. That one still hasn't leaked though the buzz is feeding a groundswell. Is Apple planning some sort of wearable device or is it the rumored television? Or maybe it will be some sort of big screen that integrates all your home devices into iOS.
 
Apple has time to get this right, and the instant it introduces a new platform, the excitement will be back. I can't wait because the status quo is boring me to tears.


Tuesday, September 10, 2013

Rip/Copy Blu-ray collections to external hard disc for a safe storage

“I have quite a good collection of Blu-ray movies which I felt I should save on my ext hard disc for a safe storage and I recently got an external Blueray drive ASUS. I want to rip them for storage - I prefer digital versions that last longer and are more portable, than physical disks”

Have you ever had the same need as above? With the advent of the era of high definition videos, blu-ray, as the representative of high definition movies, spreads widely. It is a big deal to take care of such an enormous blu-ray collection. So a lot of collectors may consider the digital copy of blu-ray as the optimal way for safe storage. That is exactly a good idea. Let’s see some benefits of digital copy:

Safe: The physical disk is easier to being scratched or ruined especially when you have little lovely child at home. Every time when you play it in your player, a little damage will happen to the disk. However, the digital copy will last longer and can be played again and again without being ruined. 

More accessible: The blu-ray disks will need more physical space for storage and maybe you should have a store room for it. When you want to watch one of them, you need to rummage through all the blu-ray collection for the desired one. In this case, you can make a digital copy of them and arrange them by certain rule such as by listed by years, so you can enjoy the blu-ray movies even in your bedroom and easily find out what you want.

More portable: The digital copy occupies little physical space and you can put then on your hard drive or take them with you in your smartphones or tablet anywhere. So you can watch them whenever you want to.

Now take action to get the digital copy of blu-ray. What you need is a powerful tool for ripping Blu-ray movies.Pavtube BDMagic is a professional program in making digital copy of Blu-ray. It can rip the latest 3D/2D Blu-ray and DVD and convert to various video formats for some popular smartphones and tablets as well as editing software. Simple interface and CUDA acceleration will bring you an easy but effective conversion. The following guide will show you detailed steps.

You can have the trial versionto try all the functions firstly, and then download the retail version to install it. (Mac users go to get BDMagic for Mac). What’s more, you can get 30% off for Blu-ray Ripper both for Windows and Mac. Go to “Back to School Promotion” to get the discount and find more surprise.

How to convert/copy Blu-ray movies for a safe storage:

1. Import blu-ray source.

Click “Load file” button to import the inserted blu-ray. After few second, it will be imported successfully and you can preview the whole movie in the preview window.

Then, you need to select the subtitle and audio track for output. As blu-ray movie contains multiple audio and subtitle tracks, you could choose your favorite one for output.


Note: Force subtitle can be checked for output so as to help you to read the unknown language and fully enjoy the blu-ray.

2. Choose output format.

Now go to “Format” menu to select output format there. A variety of options are listed such as many portable devices, video editing software, various HD video formats, etc. Choose the one you desired.


Note: You can find the “Directly Copy” option there. It will support to backup 100% intact the blu-ray main movie with all multiple tracks preserved. And you will get one M2TS file for output. If you want to backup blu-ray, it is a good choice for you.


By the way, if you want, you can adjust output video and audio parameters according to your own needs. You can change bitrate, frame rate, channels, etc. Click “Settings” button to set output profiles.

3. Convert Blu-ray.

Now it’s time to start conversion. Click big Convert button on the interface and then you will get a conversion dialogue box to show the exact progress, like time left, estimated size, state and so on.

Note: If you are bothered about waiting for conversion to finish, you can choose to check “shut down computer after conversion”. Then just let it alone, you are free to go out to do anything you like. 

With it you can take your favorite blu-ray anywhere and enjoy them whenever you want to. Just try it now!

Meanwhile, there are many Money Saving Software Bundles, such as BDMagic + DVD Creator for rip blu-ray and burn to DVD. You will get 35% off for bundled software. Go to find the one you need.

Read More:
     

Friday, September 6, 2013

How to Get MTS/M2TS into FCP X for Editing?

How to import your M2T files into FCP (X) if you've already copied the individual files to your Mac. Also a how to use M2T to FCP Converter to rewrap M2T files into FCP X friendly ProRes 422 mov files smoothly. The article is showing you.


What is M2T files?

M2T is High-definition video recording format used by many HD camcorders; commonly referred to as "HDV"; uses MPEG-2 compression to store HD video data on DV or MiniDV tapes; supports resolutions of 720p and 1080i.

There are many different digital video file types available out there, which can make file conversion difficult for the inexperienced. M2T files and MPG files are actually not completely dissimilar, as both are different types of MPEG2 video files. As a result, this is a much less complicated conversion than many other possible video conversions. If a quick file renaming trick doesn't work, there are many conversion programs available on the Internet. I'd like Pavtube Mac M2T to ProRes Converter

Hot Search: MTS to Smart TV | 3D MTS Movies | MTS to MP4

The native format of HDV isn't QuickTime, its .M2T. 

Anyway, while working on my latest book, I needed to batch convert .M2T files to FCP (X) compatible Formats. Apple Final Cut likes lots and lots of different files – but not .M2T.

This means that if someone captures an HDV file in another application, such as Adobe OnLocation or HDVSplit , then sends it to you, you'll need to batch transcode M2T to ProRes MOV before importing M2T to Final Cut Pro (X) for editing.

Note: You can not use QuickTime Player to preview an M2T file. The Finder displays it as a generic document icon.

Step 1. Load M2T files to Mac M2T to ProRes Converter.

Install and run Pavtube Mac M2T to ProRes Converter. Copy your M2T footages to Mac, Click "+" button to load your M2T file.

Tip: If you merge or combine various .m2t files into one file, click "Merge into one file".


Step 2: Choose Apple ProRes 422 MOV as output format for FCP.

When you'd like to specify an output format, you can choose "Format > Final Cut Pro > Apple ProRes 422 (*.mov)" as the best video format for FCP 6/7 and FCP X on Mac 10.8.


Step 3. Set best video and audio for FCP.

Click "Settings" if you want to further customize video and audio parameters such as video codec, audio codec, frame rate, bit rate, video size, audio channels etc. Do not forget to click on "OK" to confirm your settings. In Export to box you could specify destination for the converted file.

Tips: You can click "Edit" button to perform edit functions such as crop, trim, flip, effect, watermark and audio replace. To eliminate interlacing effect, simply check Deinterlacing box under Effect tab.

If you don't want "3D effect", please click on the pull down menu, choose "none".

Step 4: Start converting M2T to ProRes 422 MOV.

Click on "Convert" button to start Conversion. The converter will generate MOV file with admirable video quality. The M2T files are HD video with huge file size, so the conversion of M2T to ProRes MOV may cost lots of time. You can set auto shutdown before conversion starts.

After conversion you can click the "Open" button to locate converted files and load the ProRes MOV files to FCP (X), then you are able to edit M2T footage in FCP 6/7 or FCP X freely.

Read More:

Thursday, September 5, 2013

Convert DVD VOB to new Nexus 7 Android 4.3 tablet on Windwos and Mac

You may always have the problem in playing VOB files with new Nexus 7. That is because of the bad compatibility to new Nexus 7. Want to watch DVD VOB files on your new Nexus 7? The article will show you different solutions. 

Nexus 7 2nd Gen, developed by Google and Asus, is powered by Android 4.1 and features  7 inches IPS LCD, 1280*800 px, LED backlit, scratch-resistant glass and16 GB flash memory. Besides surfing the Internet, playing games and reading E-books, watching HD movies on the HD display of Nexus 7 may be one of the most wonderful ways to rich your leisure life. However, when you come to play DVD movie files in VOB format, you may find that new Nexus 7 cannot play VOB files well.

In fact, VOB is the container format in DVD-Video media. VOB can contain digital video, digital audio, subtitles, DVD menus and navigation contents multiplexed together into a stream form. And Nexus 7 supports H.263, H.264 AVC, MPEG-4, VP8. VOB format is not included. If you want to play VOB files well on new Nexus 7, there are two different ways.

Method 1. Install a powerful video player for new Nexus 7: MX Player
  
You can choose to install a powerful video player like MX Player, supports almost all video file types, from Google Play or Amazon Apps. It will use it its own internals to play the video and relies on the main processor of the Nexus 7 for playing the video. 

It will take more battery power and playback greatly depends on the file size of videos, especially for HD video files. The processor of Nexus 7 has to do a mass of works for larger videos. In this way, you will probably brought into the issue like stuttering video, freezing video, audio sync issues or even playback in slow-motion.

Method 2. Convert VOB to MP4 for new Nexus 7

It is the quick and effective way, but you need to find third-party software to help you. Pavtube Video Converter Ultimate is recommended because it is the easy-to-use and user-friendly software with powerful functions. It is the all-in-one software: the superfast conversion speed, high quality of output videos, powerful conversion for various videos, DVD and blu-ray, powerful editing and so on. Download it and experience what it can do for you. Now let’s move to how to convert VOB to MP4 for Nexus 7.

Note: If you are running Mac OS, iMedia Converter for Mac is made for you.

Good new for new Nexus 7 users: Pavtube Back to School Promotion is coming! You can get 20% off Video Converter Ultimate, 20% iMedia Converter for Mac, 30% off Blu-ray Ripper for Windows/Mac, 50% off DVD Creator for Windows/Mac, Free DVD Ripper for Windows/Mac and Free Video DVD Converter Ultimate.

1. Import DVD VOB source file.
  
Click “Add video” button to locate and import it to the software. Or you can browse your computer to find the DVD VOB files and drag and drop it directly, in this way, you can import multiple files at one time. And you can preview the whole videos once imported.


2. Choose MP4 format for new Nexus 7.

Click “Format” menu and go through the dropdown list, press Android option to choose “Google Nexus 7 H.264 Video (*.mp4)” for output. It is the best video format for Nexus 7 playback.


Tips: Parameters for output video and audio can be adjusted. If you want to optimize the parameters like codec, resolution, bitrate, channels, etc, you can click “Settings” button on the interface to check and change them.

3. Convert DVD VOB to new Nexus 7.

Finally you can “Browse” your computer to locate the folder for output videos. When everything is ready, you can click “Convert” button to start conversion. It converts using all cores and supports CUDA acceleration. So it won’t take much time for converting VOB to new Nexus 7. “Open” button will help you to locate the output files quickly.

Once it is done, copy the generated MP4 file to your Nexus 7 and then you can watch it anywhere.

Tips for new Nexus 7 file transfer:

Get the USB cable to connect your new Nexus 7 to PC computer. When the connection is set up and the driver installations are over, you can drag and drop or copy the generated iTuens files to connected Nexus 7. After it is done, go to enjoy iTunes videos with new Nexus 7 freely.
   
Read More:

Monday, September 2, 2013

Best Multi-track MXF Converter Review: Which one is the best multitracks MXF Converter?

Summary: If you want to convert multi audio channels P2 MXF/MXF to MOV, MP4 or MKV format and want to keep multi audio channels, a professional multitracks MXF Converter is needed. Which one is the best multitracks MXF Converter? Pavtube, Bigasoft, Wondershare or Aiseesoft? The article will help you.

Material Exchange Format, commonly abbreviated to MXF, is a container file format for the exchange of program material between servers, tape streamers and to digital archives. It is an uncompressed format that can bundle together multiple video, audio and program data, which makes a lossless file format with large size. So it is widely used in high definition camcorders like Panasonic P2 Pro AG-HPX600, AG-HPX500, AG-HPX170, AG-HPX171, AG-HVX200, AG-HVX201, AG-HPX300, AG-HPX370/371, AJ-HPX3700, AJ-HPX3000, AJ-HPX3100, AJ-HPX2700, AJ-HPX2000, AJ-HPX2100, etc.

“I have an .MXF video that was recorded with two microphones that play on different channels. I had 2 mics hooked up to my camera. At the beginning of the video {at 4 seconds}, while the person in the video is standing there, a person behind the scenes is asking him a question. Then, when you see the person in the video talking {at 9 seconds} you should hear his voice. 

If convert the .MXF file to MP4 and play, you can hear the person behind the scenes ask the question, but not hear the person in the video talking. See my MP4 example. If convert the .MXF file to .MOV and play, you CAN NOT hear the question being asked and can hear the person in the video talking. See my MOV example. If I try to import either video into video editing programs like Pinnalce Studio 15, Sony Vegas, Magix, I only get the one side of the conversation. 

So, something seems the conversion process is dropping the other audio. Make more sense now?”

Suppose that you have shot an interview with movie star, sport star or CEO of corporation for television program, but when you convert these P2 MXF files to other formats for further playback or editing, you always encounter some problems like no audio in output files, only one channel of audio in output files. It is so annoying! To find the proper MXF converter for help is the key. When you search it in google, you may find lots of software, like Bigasoft, Wondershare, Aiseesoft. However, when you try them, you may always have the problem of no audio in output files and they cannot support to output all the channels of audio. 

Here Pavtube MXF MultiMixer (For Mac: iMixMXF) is the best choice for you. It will help to import MXF files and convert to various video formats compatible to playback or editing. And what’s more, it also supports to convert to MKV, MP4, MOV with multiple audio channels and mix multiple audio channels into one for output. Now let me show you how it works.

Go to download powerful multitracks MXF Converter and get it installed.

1. Import P2 MXF files to MXF Converter.

As all the P2 MXF recordings will be stored in P2 card with a special folder structure. The video and audio are stored in two different folders separately. You will get the video in video folder while all the audio channels in audio folder. So please make sure to keep the video and audio folder structure intact when loading.

p2 mxf folder

Then drag and drop the video into the software directly. Or you can choose to click “Add video” or “Add from folder” button to browse your computer and select the MXF source to import.

 pavtube multi-track mxf converter

Note: When you import the MXF files in video folder, the software will automatically recognize and load all the corresponding audio channels. Do not need to manually load multiple audio channels, which avoid the problem of no audio in output files. Click “Show selected task properties” you are able to see the detailed properties of video and audio.

But some other software like Bigasoft, the audio cannot be recognized and imported automatically, and the same to Wondershare, Aiseesoft.

bigasoft mxf converter 

2. Choose Multi-track output format.

In Format dropdown list, there is a Multi-track Video catalogue. You can choose Multi-track MKVMulti-track MP4 orMulti-track MOV according to your need. Any of them will keep all the multiple audio channels separate in output video so that you can select any desired audio channel when playing or editing it.

convert multi audio channels mxf to mov, mp4, mkv

3. Adjust output settings and Mix into one channel.

Click “Settings” button to change the video and audio parameters and uncheck the audio channel for output. And every audio channel is checked by default.

If you want to merge all the multiple audio channels or some selected audio channels into one channel for output video, just go to check “Mix into one track” on the left bottom.

choose audio files you want

4. Start multi audio channels MXF conversion.

Before conversion, you should “Borwse” the path for output files. Now click “Convert” button to start converting multi audio channels P2 MXF to MOV, MP4, MKV and keeping multi audio channels.

Note: If you have imported several MXF file and want to merge them into one big output file, check “Merge into one file” on the main interface before conversion.

Besides converting to multi-track videos, it still supports to convert MXF to other many other video formats with one desired audio channel. And that is exactly what Pavtube MXF Converter can do for you as well. If you have no need for preserving multiple audio channels and mixing multiple audio channels into one channel, you just want to convert MXF files to other formats with proper audio. Choosing MXF Converter will meet all your need, especially you won’t suffer the problem with no audio. And you can learn more information about how to convert P2 MXF/MXF files on Win/Mac

Don’t worry about the problem about converting MXF files. No matter you wan to select keep all the audio channels separate for output or want to mix them into one channel, the software can help to get all of them done. Go to have a try now!

Read More: