Thursday, September 22, 2016

Downscale Canon XC15 4K to 1080p for easier playback and editing on Mac


The need of downscaling 4K resolution videos from Canon XC15 happens quite often to many of us, for example to import Canon XC15 4K videos to FCP X, edit 4K footage in Premiere Elements, open 4K files in VLC or QuickTime player, watch 4K movies on iPhone 7, Galaxy Note 7, iPad Pro, etc. If you are in need of compressing and converting Canon XC15 4K to 1080P/720P, no matter what the purpose is, you can find the best answer here.


How to solve Canon XC15 4K UHD incompatibility issues

It probably goes without saying that 4K Ultra HD video delivers superior viewing experience compared with 1080p video. However, most mobiles and players fail to play 4K UHD videos. Plus, the large file size of 4K videos and the video format would be the problem for 4K video playback. Thus, compressing 4K 4096x2160 or 3840x2160 to HD 1080P/720P with a proper 4K converter is a must-have option.

Top Best Canon XC15 4K Video Converter Tool

To get the work done, Pavtube HD Video Converter for Mac is believed to compress Canon XC15 4K to 1080p HD. Just like the way it is dealing with 4K to 1080p HD videos, it is surely in the support of converting Canon XC15 4K 4K UHD videos in any formats faultlessly in a flash. Besides, this powerful 4K video converter also can upscale 1080p to 4K easily.

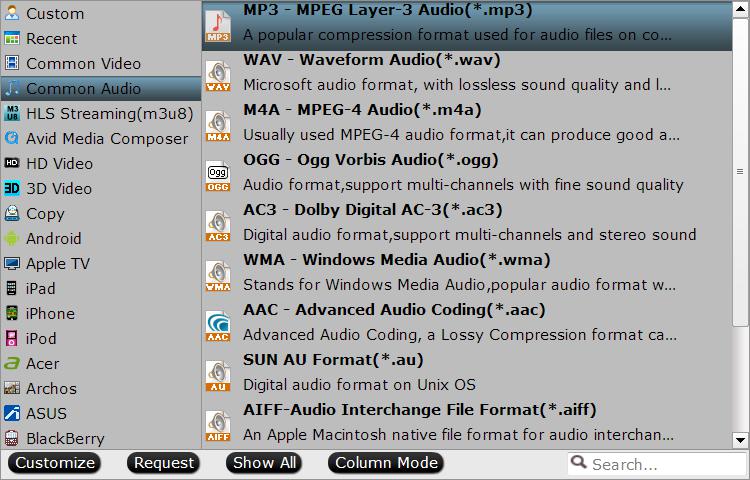
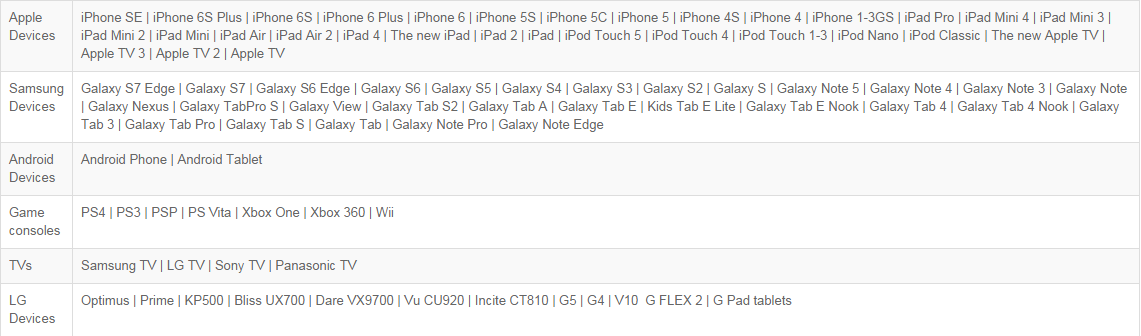
Besides, It provides hundreds of output format presets for Canon XC15 4K videos, such as DNxHD for Avid MC, MPEG-2 for Premiere Pro, MP4, WMV, AVI for any mobile or PC video players, MKV for Samsung Smart TV, Sony Bravia TV, Panasonic Viera TV, 4K/LED/LCD TV and more formats for better editing, playing, and sharing. This Ultra HD Video Converter is also available to customize the output resolutions to any size (4K, 2K, 1080p, 720p) the users want. For those who want to convert/downscale 4K videos on Windows (Windows 10 included), please turn to Pavtube HD Video Converter. Here is an easy-to-follow tutorial and to downsize your 4K footage to 1080p/720p video effortlessly.

Hot search: Canon XC15 4K to Premiere Pro CC ǀ Canon XC15 4K & FCP X ǀ Canon XC15 4K to Windows Movie Maker, Sony Vegas Pro 

Free download the Canon XC15 4K to 1080p compressor


Other Download:
How to Downscale Canon XC15 4K to 1080p with only 3 clicks on Mac?

Step 1. Import Canon XC15 4K files

Click "Add video" and load your Canon XC15 4K videos. This program supports batch conversion, so you can add multiple files into it at a time.


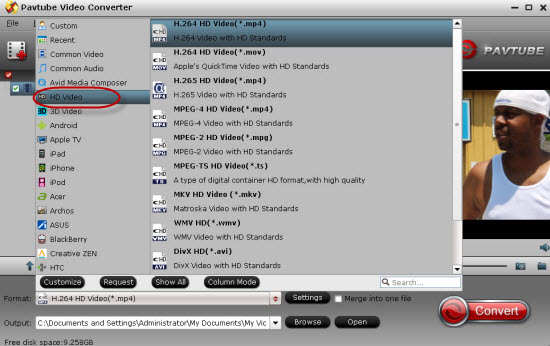
Step 2. Choose any formats

Click the "Format" drop down list to select a proper video foramt as you want. Since this video converter also provides optimal profiles for kinds of editing programs (FCP/iMovie/Premiere Pro etc) /media devices/iPhone/iPad/Apple TV/PSP/PS3/PS4/TV etc.


Step 3. Adjust Canon XC15 4K Video Resolution to 1080p 

Click "Settings" button and adjust the Canon 4K video size to 1920*1080 for downscaling ultra HD Canon XC15 4K to 1080p/720p. You can also adjust Canon XC15 4K video and audio settings, including codec, aspect ratio, bit rate, frame rate, sample rate, and audio channel.


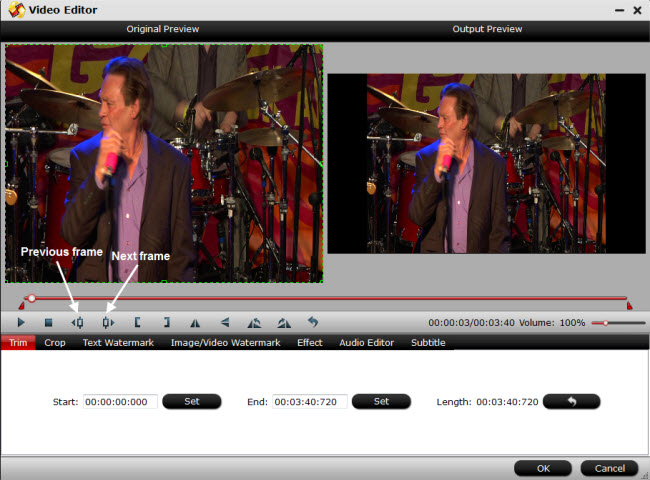
Tips: Edit the Canon 4K videos (Optional)

By clicking "Edit selected task" button, you can trim, crop the video, or add watermark, adjust effect, attaching subtitles for pre-editing your video files.
  • Trim – Choose to reserve the part you need. Just choose the chapter which you need to trim, to set "start time" or "end time", type the portion which you want to save. 
  • Crop – Remove black edges of your video or just get the scale of this video you want. 
  • Effect – Adjust the effects by adjusting the parameters. 
  • Audio Editor – You can replace/remove original audio, and set audio fade in/out effects.
  • Subtitle – You can add *.srt or *.ass/*.ssa subtitles to the video as hard subtitles.
Step 4. Start 4K to 1080p Conversion

At last, hit "Convert" button to start downscaling 4K to 1080p. It would take several minutes due to the file size. You can set "Shutdown converter after conversion" to do your other work. After the conversion, click Open to locate the generated 1080p/720p video.

Read More: 

Monday, September 19, 2016

Best VirtualDub Alternative: Pavtube Video Converter for Windows/Mac

VirtualDub is a free and powerful video capture and processing software for Windows platform. Other than being able to accomplish the basic video editing tasks such as compress, trim, remove audio, you can also apply special effects like adding subtitles and more. However, if you have transferred to the Mac platform, you may need a VirtualDub alternative for Mac because VirtualDub only supports Windows OS natively. And some other reasons like supporting few codec/format for you need a VirtualDub alternative.


Why we need one VirtualDub Alternative?

Using VirtualDub on Windows 10 is usually very simple and users won't need to worry about errors of any kind. However, there are certain cases when errors do make using it a nightmare and we'll be talking about some of them in the following paragraphs.

1. One of the many errors users will experience while using VirtualDub regard the lack of codecs. So if someone wants to render a video and he doesn't have the right codecs for it, VirtualDub won't be able to render/process it. In this case, it seems that installing a codec pack will usually fix the problem, but if the .dll or specific missing codecs aren't featured in these codec packs, then one needs to look for it and download it separately. As expected, this can be pretty annoying and time consuming.

2. Another issue with VirtualDub is that it doesn't support too many video and audio formats, leaving users with just a few of them to work with. In this case, fixing the issue is easy, but time consuming and regards converting the video or audio to a format VirtualDub recognizes.

3. Some other requirements to look for the VirtualDub Alternative.................................

Best VirtualDub Alternative for Windows/Mac

Pavtube Video Converter/Pavtube Video Converter for Mac support the processing and conversion of almost all of the popular file types that’s currently used. It has less editing options provided by VirtualDub, but the built-in video editor also provides several basic video editing functions such as crop, trim, rotate, add filters and more.

Check out the main features of the best VirtualDub Alternative:
  • Drag and drop video files to combine them as a big video 
  • Cut video files to capture your favorite clips 
  • Crop video files to remove the black edges around your movie video 
  • Rotate video files 90 Degrees, 180 Degrees, etc 
  • Adjust video image in brightness, contrast and saturation 
  • Add watermark/subtitle to video files 
  • Remove/Replace audio from video clips 
  • Convert any video: H.265, MOV, MKV, MXF, MTS, M2TS, XAVC etc to any formats you need 
  • SupportWindows all systems and Mac all systems. 
Editing video screenshot:


Converting video screenshot:


Free download the best VirtualDub Alternative:

VirtualDub Alternative for Windows:


Other Download:
- Pavtube old official address: http://www.pavtube.com/video_converter/
- Cnet Download: http://download.cnet.com/Pavtube-Video-Converter/3000-2194_4-75734821.html
- Softonic Download: http://pavtube-video-converter.en.softonic.com/

VirtualDub Alternative for Mac:


Other Download:
- Pavtube old official address: http://www.pavtube.com/video-converter-mac/
- Cnet Download: http://download.cnet.com/Pavtube-Video-Converter/3000-2194_4-76179460.html
- Top4download.com: http://www.top4download.com/pavtube-video-converter-for-mac/iujpttsg.html

Read More Alternatives: 

Monday, September 12, 2016

Upload Canon 5D Mark IV 4K/HD Videos to Youtube/Vimeo/Instagram

The Canon 5D Mark IV is the world's most universally useful DSLR. It is competitive for both sports and action as well as for wedding, nature, portrait, landscape and product photography. With it, you can easily record 4096×2160 Digital Cinema Initiative 4K video or HD videos. After recording, you can upload the HD/4K video to some websites like YouTube/Vimeo/Instagram etc for sharing with the world. But sometimes you will failed. Why?

Though Youtube/Vimeo/Instagram now support 4K video uploading, but they all have some limitations, here we take Youtube as an example:


Youtube has some limitations like video size, time, codec, format etc, Vimeo and Instagram are same with it. Canon 5D Mark IV recording 4K Video is MOV format, HD Video is MP4 or MOV format. MP4 and MOV are all complicated formats which have different codecs. Some of them are not supported by Youtube/Vimeo/Instagram. And the 4K high resolution is not friendly with Youtube/Vimeo/Instagram.

So we provide you a solution for cannot upload Canon 5D Mark IV 4K/HD Videos to Youtube/Vimeo/Instagram successfully. Pavtube Video Converter (Pavtube Video Converter for Mac) is a professional 4K/HD video converter to settle the matter at one go. It supports you to convert 4K video to MP4, MOV, FLV, WebM, 3GP etc., and compress 4K UHD video to 4K of 3840x2160 pixel or 4K to 1080P/720P as well easily. Meanwhile, it will not take too much of your time since it delivers a super fast speed for video conversion. Besides, it also can convert Canon 5D Mark IV 4K/HD video to popular editor like FCP, Avid Media Composer, iMovie, Premiere Pro, Sony Vegas Pro/Movie Studio etc supported formats for smooth editing.

Hot search: SD/HD/4K Video for uploading to Instagram ǀ DJI Phantom 3/4 videos to YouTube ǀ MP4 to YouTube ǀ H.265 to YouTube/Vimeo ǀ MP4 to Instagram

Free download the converter for Youtube/Vimeo/Instagram:


Other Download:
- Pavtube old official address: http://www.pavtube.com/video_converter/
- Cnet Download: http://download.cnet.com/Pavtube-Video-Converter/3000-2194_4-75734821.html
- Softonic Download: http://pavtube-video-converter.en.softonic.com/

How to Adjust Canon 5D Mark IV 4K/HD Videos to Youtube/Vimeo/Instagram for uploading?

Step 1: Import Canon 5D Mark IV 4K/HD files

Install and launch the 4K file converter. Then you can add the Canon 5D Mark IV 4K/HD videos to the program by clicking Add button or directly drag and drop.


Step 2: Select output format

Click Format bar to select an output format. To share your 4K movies on YouTube, .mov, .mpeg4, .avi, .3gp format from Common Video are all the proper formats.


Tip: Adjust the video, audio settings

After several attempts, we get know Youtube's maximum 4K bitrate is 45Mbps and it doesn't work with 60fps 4k video well. You can set the video frame rate like 24fps. If you don't want to spend long time uploading a 4k video to YouTube, you can downsize your 4K to 1080p if you need.


Step 4: Edit/Split your Canon 5D Mark IV 4K/HD video

Click Edit button and you can trim, crop or adjust the video with the built-in video editor to get the very part and effect of the movie you want.

Tip: If the video clips you've trimmed are still longer than 15 minutes, you can choose to split the 4K/HD movie into smaller parts so as to share on YouTube without limit. Click the Split icon in the main interface, and you can cut your files according to time length and file size.

Step 5: Start the conversion

Finally, click Convert to start the Canon 5D Mark IV 4K/HD to Youtube/Vimeo/Instagram conversion. When the conversion ends, you can tap the Open button to locate the converted files and then upload the Canon 5D Mark IV 4K/HD video to Youtube/Vimeo/Instagram simply.

Read More: 

Wednesday, September 7, 2016

Can't Post MP4 video to Instagram? Solved!

If you are a fan of Instagram, you might have seen an influx of Instagram videos showing up in your newsfeed which are short but interesting. More and more people would like to upload their videos like MP4 to Instagram to share with friends and the world. Some of them did, but some failed and found Instagram video not playing. How to solve it? Read on to learn the reason and solution.

Why sometimes Can’t Post MP4 to Instagram?

Reason 1. You MP4 video size, Frame Rate, Resolution, Bit Rate, Audio codec etc are not supported by Instagram

Reason 2. Instagram video limits. MP4 has a lot of different codecs, some of which are not supported by Instagram.

Instagram Supported Video Detailed Specifications

  • Formats: H.264 codec / MP4
  • Resolution: maximum width 1080 pixels (1080P)
  • Frame Rate: 29.96 frames per second
  • Bit Rate: 3,500 kbps video bitrate
  • Audio codec: AAC audio codec at 44.1 kHz monov
  • Duration: 3 to 60 seconds

Solution for Import and Post all MP4 video to Instagram

So if your MP4 videos are not imported and posted on Instagram, you can transcode MP4 or edit MP4 video for smooth posting and uploading with best codec and parameter. You can use
Pavtube Video Converter to adjust MP4 and transcode MP4 to Instagram best format/codec - H.264 codec / MP4. Besides, The instagram video converter software is able to convert audio video media files from any SD/HD/4K format (including AVI, H.265, MP4, MOV, MKV, WMV, 3GP, MPEG, SWF, FLV, MPG, ASF AVCHD H264) to instagram format, you can also convert instagram video to format such as mp4 so that you can add video to iPod, iPad, iPhone, PSP, android phones, Amazon Kindle Fire, or upload video to Facebook, youTube. This best MP4 video converter can mostly solve all MP4 uploading issue/playback slow issue/edit MP4 issue etc.

Popular search: MP4 to DVD player ǀ MP4 to VLC ǀ MP4 to PS4 ǀ MP4 to Samsung TV ǀ MP4 to Plex

The media converter program works on Windows 10, Windows 8.1, Windows 8, Windows 7, Windows XP. (Mac version - Pavtube Video Converter for Mac)


Other Download:
- Pavtube old official address: http://www.pavtube.com/video_converter/
- Cnet Download: http://download.cnet.com/Pavtube-Video-Converter/3000-2194_4-75734821.html
- Softonic Download: http://pavtube-video-converter.en.softonic.com/

How to Transcode MP4 to Instagram format/codec for nice posting

Step 1: Add MP4 video(s)

Click "Add files" on the top tool bar, or simply drag and drop to import the videos.


Step 2: Select Output Profile

Click on the output format selector on the lower part. There are many built-in profiles for popular devices. Click "Format" bar, and select .mp4 from "Common video" or "HD video" to fit Instagram.


Tips: Edit the MP4 videos (Optional)
  • By clicking "Edit selected task" button, you can trim, crop the video, or add watermark, adjust effect, attaching subtitles for pre-editing your video files. 
  • Trim – Choose to reserve the part you need. Just choose the chapter which you need to trim, to set "start time" or "end time", type the portion which you want to save. 
  • Crop – Remove black edges of your video or just get the scale of this video you want. 
  • Effect – Adjust the effects by adjusting the parameters.
Step 3: Convert MP4 to H.264 MP4 for Instagram

Click the "Convert" button on the main interface and the software will start to convert MP4 to Instagram friendly video formats immediately. When the conversion finishes, click "Open" to find the converted video files.

Best Video Converter for Windows (10). 
Convert AVI H.265 XAVC MP4 WMV MTS MKV AVCHD

Pavtube Video Converter is a totally free SD/HD video converter software for Windows 10/8/7/Vista/XP. No matter you need a MP4/AVI video converter,  MTS/AVC/3PG/MKV video converter, converter for iPhone/iPad/Android or free video to MP3 converter, Pavtube video converter is always your first choice.

There are a wide variety of video converter freeware. Why choose Pavtube Video Converter?

  • Safety comes first! Unlike other free video converters, Pavtube is not bundled with any suspicious plugins nor toolbar. 
  • Convert video free between H.265, AVI, MP4, H.264, WMV, MPEG, FLV, MOV, 3GP, QT, TS, MOD, TOD, etc. 
  • Unique! Built with High Quality Engine and De-interlacing Engine to optimize image quality. 
  • Unlike other software, our free video converter allows you to add external subtitles without extra fee! 
  • Support merging, croping, trimming and adjusting parameters to control output size & quality. 
  • Pavtube Video Converter is all-around yet super easy to handle. Download now to experience it yourself!


Read More:
Best solution to Play all MP4 on PS3/PS4
Two ways to Solve can’t Play MP4 on Windows Media Player 12/11/10/9
Why can't Insert MP4 videos in PowerPoint 2016, 2013, 2011, 2010 On macOS Sierra
How to Solve can't Play MP4 files on Panasonic Viera TV ?
Play SD/HD/4K MP4 videos on Sony XBR-X930D/Sony XBR-X940D TV
4K MP4 to LG 4K TV - Convert 4K MP4 to LG 4K TV friendly format
TV MP4 Solution - Convert MP4 to Watch on Samsung/LG/Sony/Panasonic TV
3 Tools to Convert MP4 to MP3 on Mac
Transcode MP4 to iPhone series (iPhone 7/7P/6s/6s Plus/5s/5) for playing
How to Play all MP4 movies on Projector?
Play MP4 videos/footages/movies on QuickTime
Plex Server Not finding a MP4 video- Solved!
Best Program to Convert FFmpeg Files to MP4
Best 2D to 3D MP4 Video Converter – for viewing with VR headset/3D TV etc
Upload MP4 videos from iPhone/iPad to Youtube

Monday, September 5, 2016

Play Lossless FLAC Music on iPhone 7/7 Plus or other iOS devices

Let’s talk about a rather common situation today. You decided to give up and get yourself that latest gorgeous Apple iPhone 7 as a birthday present? You certainly did. But did you realize that it will not be able to play your collection of FLAC files? No, you did not. In order to save you from a headache of what to do with your FLAC files and for those music lovers are just about to make that step (in favour of iPhone 7), we decided to write this article about how to play FLAC on your iPhone 7/iPhone 7 Plus.


Although FLAC is on the list of native support media format of iPhone 7/7 plus , there are times when you can’t play FLAC on iPhone 7/7 plus . You can’t even add or transfer FLAC files to your playlists; FLAC files are played without metadata; or only half of the FLAC can be played.

To solve iPhone 7/7 plus won’t play FLAC files, iPhone 6s/6s plus won’t play FLAC files issue, iPhone 5/iPhone 5s won’t play FLAC files etc, you can try other music players from Google play or use the stand way to convert FLAC to iPhone 7 supported MP3 format.

Solution 1: Install FLAC Players for iPhone 7/7 Plus to Play FLAC on iPhone 7/7P

Third-party apps is the easiest way to make FLAC played on iPhone available, like Tuneshee(FREE), FLAC Player+ etc, the original audiophile-quality music players designed for lossless and gapless playback. Yet iPhone storage is limited, you may resort to solution 2.

Solution 2: Convert FLAC to MP3 to Play FLAC on iPhone 7/7 Plus

Though there are several FLAC players for iPhone 7/7 Plus that helps play FLAC, many people still choose to convert FLAC to MP3 or convert FLAC to 320kbps MP3 (which gives higher quality than normal 128kbps MP3) for successfully play FLAC on iPhone 7/7 Plus. Follow the step-by-step guide to convert FLAC to MP3/320Kpbs MP3 for easy play FLAC on iPhone 7/7 Plus with Pavtube Video Converter for Mac/Pavtube Video Converter. (read review)

See also: FLAC to PS4MP4 to MP3

Free download the best iPhone 7 converter for Mac:

 
Free download the best iPhone 7 converter for Windows:


Guide: Convert FLAC auido files to iPhone frinedly MP3/M4A format

Step 1: After the installation of this top iPhone 7 converter, run it to import your FLAC files to the program clicking the add file button. Check Merge into one box and the converter will extract audio from all the selected files in file list and combined the audio as one file.


Step 2: Click Format bar, point to Common Audio group and then select the audio format you like. In this situation, you have two options: convert FLAC to M4A or to MP3. M4A is newer than MP3, higher quality, and designed to replace it. With M4A, you can get higher quality with lower bitrates and file size. Also, you can select the iPhone format from iPhone to play on iPhone 7/7 Plus.


Tip 1: You can reduce the audio to exactly what you want by clicking Edit ->Trim. And you can also import another FLAC file and replace its original audio track by utilizing Audio Replace function under Edit Menu.

Tip 2: Tap the Settings icon to modify audio codec, sample rate, bitrate, channel. Do not forget to type in output path in Output bar to set a destination folder.

Step 3: Hit the “Convert” button to start the FLAC to iPhone 7/7 Plus conversion. After conversion you can play them whenever and wherever you like.

When the conversion ends, click the Open button on the main interface to find the converted MP3/M4A auido files. Afterwards, sync and listen to FLAC audio on your iPhone 7/7Plus and iPhone 6/6 Plus/5S/5/4S anytime anywhere.

Conclusion: Whether you decide to convert your FLAC files to ALAC or install FLAC player – it is your choice and we will be happy to know that we helped you make it. Enjoy.

Read More: 


Wednesday, August 31, 2016

Why Camtasia does not recognize or import .mov files? - Solved!

Camtasia Studio gives you the tools to record your computer screen and then turn those recordings into professional-grade videos. And once you've edited and polished your creation, you can share it directly from the app to YouTube, Google Drive, and Screencast.com. However, you may occur some probelms when you import MOV files to Camtasia.

“Your website says Camtasia Studio should be able to import/edit .mov files. The only type of file my Kodak video camera produces is .mov but Camtasia won't recognize those files when I try to import them and I get a "No available codec" error.”

In regards to the latest development with QuickTime, we recommend people uninstall their QuickTime software to avoid the security vulnerabilities with that software.


Camtasia Studio will continue to operate and run as normal without the QuickTime software. However, this will have an impact on those who are producing videos to the MOV video file format. In this case, we recommend you produce to MP4 instead.

Or, this can impact some MOV videos being imported into Camtasia. In this case, please try to change the file extension on the MOV video file from .mov to .mp4 and they might work just fine.

Newer hardware systems that output MOV files usually do not need the Quicktime software or the file extension changed in order for other software programs (like Camtasia) to use the MOV files. However, the older ones do need Quicktime. In this case, we recommend you run the videos through a file convertor - Pavtube HD Video Converter for Mac(read review), to convert them to MP4, AVI, WMV etc. The support article linked to below shows you how to do this.

Download the MOV to Camtasia (8) converter:


Other Download:
Hot search: MKV to Camtasia Studio ǀ AVCHD MTS/M2TS to Camtasia 2 ǀ TS  to Camtasia Studio ǀ OBS MP4 to Camtasia Studio ǀ MXF to Camtasia Studio

How to Convert MOV to Camtasia Studio format for smooth importing and editing?

Step 1. Add MOV videos

Install and run the MOV to Camtasia Studio Converter on your computer, then click "Add Video" button to browse and load your videos.


Step 2. Set right output format. Click "Format" bar, and select .mp4 from "Common video" or "HD video". Or choose QuickTime MOV fromat for Camtasia Studio.


Tips: The default settings may not satisfy you, and you can click the "Settings" button to change the settings by yourself including video resolution, bit rate, audio sample rate, audio channel etc. for full screen playback smoothly. Or keep no changes, which is also a good choice.

Step 3. Click the "Convert" button on the main interface and the software will start to convert MOV to Camtasia Studio friendly video formats immediately. When the conversion finishes, click "Open" to find the converted video files. Then you can effortless transfer the video files to Camtasia for editing.

PS: What formats Camtasia Studio supports?

1. Camtasia Studio Mac Supported Formats:

MOV (QuickTime movie), DV, MPEG-1
MP4
AIFF
MP3
WAV
AAC (m4a)
JPEG
PNG
TIFF and single-page PDF (multi-page PDF will not work properly)

2. Camtasia Studio Windows supported Formats:

AVI.
WMV.
MPEG-1.
MP3.
WAV.
WMA.
MP4 (AVC/h.264 at no more than 30 frames per second)
MOV (QuickTime for Windows must be installed for MOV import.)

Read More: 

Sunday, August 28, 2016

Top 5 Free Audio converters for Win/Mac

With great power comes great responsibility and with fast development of media technologies comes a wide variety of media formats. Each audio format has its own significant features. To enjoy music that is stored in exotic formats that you don’t deal with on a regular basis, you can either install dozens of audio players that promise to open this file’s extension or simply convert your audio track to a more commonly used format.


So for some compatibility reasons, sometimes it’s necessary to convert a music file into other audio formats. Below, we have tested and reviewed the best free audio converters that can flawlessly work with all sorts of audio files and formats.

1. Switch Sound File Converter (Win/Mac) 

Another free audio converter is called Switch Sound File Converter. It supports batch conversions and whole folder imports, as well as drag and drop and lots of advanced settings.

Input Formats: 3GA, AAC, ACT, AIF, AIFC, AIFF, AMR, APE, ASF, AU, CAF, CDA, DART, DCT, DS2, DSS, DVF, FLAC, GSM, M4A, M4R, MID, MOH, MP2 ,MP3, MPC, MPGA, MSV, OGA, OGG, QCP, RA, RAM, RAW, RCD, REC, RM, RMJ, SHN, SMF, SPX, VOC, VOX, WAV, WMA, and WV
Output Formats: AAC, AC3, AIFC, AIF, AIFF, AMR, APE, AU, CAF, CDA, FLAC, GSM, M3U, M4A, M4R, MP3, MPC, OGG, PLS, RAW, SPX, VOX, WAV, WMA, and WPL

Note: This program is listed as "Trial" but the non-pro features remain free for personal use after the 14-day trial is over.

Support : Mac OS X (10.4 and above) and Windows (XP and newer) users can install Switch Sound File Converter

2. Free Studio (Win) 

Free Studio is actually a group of several programs. Just click Convert from the main menu, and then choose the Free Audio Converter option to open the audio converter tool.

Input Formats: AAC, AC3, AIF, AIFF, ALAC, AMR, APE, ASF, AU, CAF, CUE, FLAC, M4B, MKA, MP2, MP3, MPC, OGG, RA, RAM, RM, RMM, RMVB, SHN, SPX, TTA, WAV, and WMA
Output Formats: AAC, ALAC, AMR, FLAC, OGG, M4B, M4R, MP3, WAV, and WMA

Free Studio also lets you extract audio from YouTube, audio CDs, and most video formats.
Free Studio works with Windows 10, 8, 7, Vista, and XP

3. SUPER (Win) 

SUPER is very much a superior free audio converter. The best thing about SUPER is the long list of audio formats it supports.

If you have a rare audio file you want to convert to something more common (or vice versa), you should try the SUPER audio converter.

Input Formats: AAC, AC3, AMR, APE, FLAC, MMF, M4A, MP2, MP3, MPC, MPP, OGG, RA, RAM, RM, TTA, WV, WAV, and WMA
Output Formats: AAC, AC3, AMR, APE, FLAC, MMF, MP2, MP3, MPC, OGG, TTA, WV, WAV, and WMA

You can also extract the audio from most common video formats with SUPER and save as any of the above Output Formats.

Support Windows.

4. FileZigZag (Mac) 

FileZigZag is an online audio converter service that will convert most common audio formats.

All you do is upload the original audio file, choose the desired output format, and then wait for an email with a link to the converted file.

Input Formats: 3GA, AAC, AC3, AIF, AIFC, AIFF, AMR, AU, CAF, FLAC, M4A, M4P, M4R, MID, MIDI, MMF, MP2, MP3, MPGA, OGA, OGG, OMA, OPUS, QCP, RA, RAM, WAV, and WMA
Output Formats: AAC, AC3, AIF, AIFF, AIFC, AU, FLAC, M4A, M4R, MP3, MMF, OPUS, OGG, RA, WAV, and WMA

FileZigZag should work with all operating systems that support a web browser, like Mac OS X, Windows, and Linux.

5. Zamzar (Win/mac) 

Zamzar is another online audio converter service that supports most common music and audio formats.

Input Formats: 3GA, AAC, AC3, AIFF, AIFC, CAF, FLAC, M4A, M4B, M4R, MIDI, MP3, OGA, OGG, RA, RAM, WAV, and WMA

Output Formats: AAC, AC3, FLAC, M4A, M4R, MP3, OGG, WAV, and WMA

Zamzar Review and Link

The biggest disadvantage with Zamzar is their 50 MB limit for source files. While many audio files are smaller than this, some low compression formats can exceed this small limit.

Zamzar can be used with pretty much any modern web browser on any OS, such as Windows, Mac, and Linux.

Other Recommend: Best Professional Audio/Video Converter

1. Pavtube Video Converter (only $35)

Support converting all audio formats: AAC, AC3, AIF, AIFF, ALAC, AMR, APE, ASF, AU, CAF, CUE, FLAC, M4B, MKA, MP2, MP3, MPC, OGG, RA, RAM, RM, RMM, RMVB, SHN, SPX, TTA, WAV, and WMA etc

Support converting all videoformats: H.265/HEVC, XAVC, H.264, MP4, MOV, MKV, VOB, WMV, MPG, Tivo, AVI, Divx, M4V, QT, FLV, F4V, ASF, 3GP, TS, MTS, M2TS, FLV, F4V, SWF, M3U8, TP, TRP, MOV, MOD, TOD, MXF(partial), DV, M2V, 3G2, RM, RMVB, DAT, NUT, NSV, etc.

Operating System: Windows XP/2003/Vista/Windows 7/Windows 8/Windows 8.1/Windows 10


2. Pavtube Video Converter for Mac (only $35)

Support converting all audio formats: AAC, AC3, AIF, AIFF, ALAC, AMR, APE, ASF, AU, CAF, CUE, FLAC, M4B, MKA, MP2, MP3, MPC, OGG, RA, RAM, RM, RMM, RMVB, SHN, SPX, TTA, WAV, and WMA etc

Support converting all videoformats: H.265/HEVC, XAVC, H.264, MP4, MOV, MKV, VOB, WMV, MPG, Tivo, AVI, Divx, M4V, QT, FLV, F4V, ASF, 3GP, TS, MTS, M2TS, FLV, F4V, SWF, M3U8, TP, TRP, MOV, MOD, TOD, MXF(partial), DV, M2V, 3G2, RM, RMVB, DAT, NUT, NSV, etc.

Operating System: Mac macOS Sierra, Mac OS X 10.11 El Capitan, 10.10 Yosemite, OS X 10.9 Mavericks, OS X 10.8 Mountain Lion, OS X 10.7 Lion, OS X 10.6 Snow Leopard, OS X 10.5 Leopard on Mac, MacBook, MacBook Air, MacBook Pro


Why Choose Pavtube Video Converter? 


And it also can ouput formats for suitable formats for popular editing softwares:

Output Video Editing Programs:

FCP X, FCP 6/7, FCE, iMovie, Apple Aperture 3, Avid Media Composer, Adobe Premiere Pro CC, Premiere Pro CS6/5/4/3, Adobe After Effects CC, After Effects CS6, Adobe Premiere Elements 13/12, Adobe Creative Suite, DaVinci Resolve, iPhoto, Kdenlive, Keynote, Avid Media Composer, Adobe Premiere Pro CC, Adobe After Effects CC, After Effects CS6, Pinnacle Studio 17/16/15/14, Windows Movie Maker, Sony Vegas Pro 13 Edit, Sony Vegas Pro, Sony Movie Studio 13, Cyberlink PowerDirector etc.

.............................

Read Guides: 
Read Reviews: