Wednesday, November 18, 2015

Solve Canon XA30 AVCHD files in Premiere Pro CC no Sound problem

Are you still suffering no audio problem when loading Canon XA30 AVCHD in Premiere Pro CC? In this article, we will give you the best solution to import and edit Canon XA30 AVCHD files in PPro CC without problems.

I've had Canon XA30 camcorder for about 2 weeks now. It does its primary job (recording videos) outstandingly and i can highly recommend this product if your primary concern is video capabilities. While it has some flaws that annoy me, if I drop a AVCHD .mp4 file from my sony camera into Premiere Pro CC, it shows video but no sound? If I drop it into CS5.5 the sound works. I don't know why it happens.

People who are using AVCHD files with Adobe Premiere Pro(especially CC7) often have the similar problems Premiere Pro missing audio tracks for AVCHD .mp4 files. As far as I know, there are 3 ways that might help you resolve your work- Premiere Pro CC, Canon XA30 files, metadata and no audio:

1. Install an earlier version of premiere pro like 4 – 5 depending what version fits what you do……(DO NOT UPDATE!!!)

2. Import the ENTIRE CARD, very important, all the files from your card to your PC/Mac, the metadata should be located somewhere in a folder within the card, it’s not on the AVCHD .mp4 file.

3. Convert AVCHD .mp4 clips from Canon XA30 into another format for Adobe Premiere Pro CC and relink against the transcoded version. It will get the audio back into Premiere. Might be a bit time consuming but it works.

In terms of the third method, we have made some searches ,and found that the Adobe Premiere Pro CC can edit the file formats of .mpeg2, .mov, etc. So, converting Sony HDR-PJ430V AVCHD .mp4 file to MPEG-2 for Adobe Premiere Pro CC editing is a best choice.

Hot SearchH.265 video in Premiere | MXF to Premiere | AVCHD .mts in Premiere

Steps to convert Canon XA30 AVCHD videos to Premiere Pro CC acceptable format for correctly importing

Here we recommend the easy-to-use yet professional application Pavtube HD Video Converter for Mac(read thereview). Just download it and follow the simple steps below to transcode Canon XA30 AVCHD for Premiere Pro CC editable format. With it, you can also convert any video shooting with AVCHD camcorders to popular video format likeMKVM4V, MOV, AVI, WMV, MP4, FLV, etc. The conversion is easy to handle and only with a few simple clicks, you can finish the conversion without facing any glitches.


Other Download:

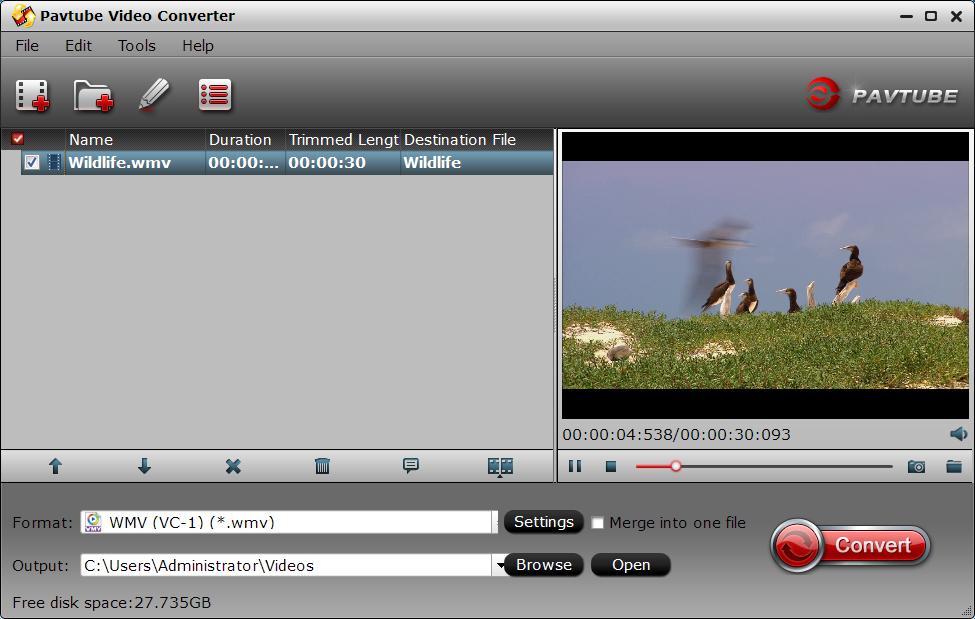
1. Import Canon XA30 AVCHD to the converter

Click the Add Video or Add from folder button to import the AVCHD videos from Canon XA30 to be converted. The converter supports converting multiple files at a time.


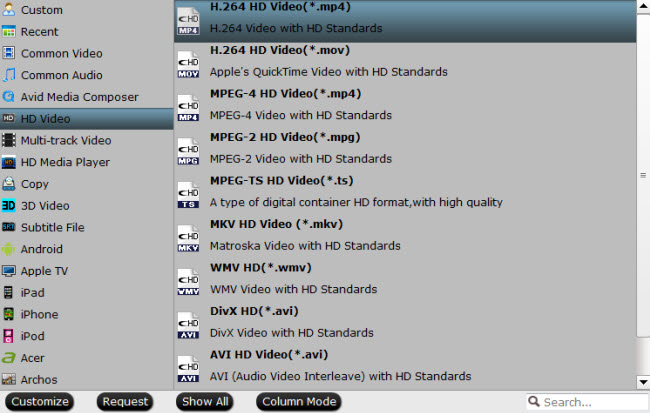
2. Choose MPEG-2 as the output format

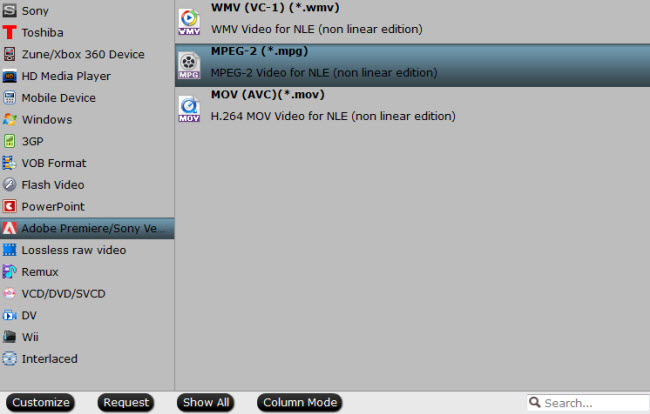
Click "Format" drop-down bar to select a proper video format. To edit Canon XA30 AVCHD videos in Premiere Pro CC, then HD Video > MPEG-2 HD Video(*.mpg) or Adobe Premiere/Sony Vegas > MPEG-2 (*.mpg) is the suitable one.


Of course, you can also solve AVCHD importing Problem into FCP by selecting FCP native format: "Final Cut Pro > Apple Prores 422 (*.mov)"

3. Start Canon XA30 AVCHD conversion with a click

Hit the big Convert button and the conversion from Canon XA30 AVCHD to Premiere Pro CC will begin immediately.

After the conversion is complete, get the resulted files via clicking the Open button and then you can transfer and import Canon XA30 AVCHD to Premiere Pro CC for further editing without any hassle.

Related program

Pavtube MXF Converter / Mac Version: can handle MXF/MXF footage produced by Canon, Sony and Panasonic camcorders and convert MXF video files to various video format supported by popular devices such as iPad Air/4/3, iPhone 5S/5C/5/4S/4, Apple TV 3, Google Nexus, Samsung Galaxy Tab S/3/2, Samsung Galaxy S5/S4/S3, Surface RT/Pro, PS4/PS3, WDTV, etc.

Pavtube MTS/M2TS Converter / Mac Version:The best MTS converter on the market, which can convert MTS videos and other HD formats to FCP X Apple ProRes codec MOV format, or convert MTS to Avid Media Composer/Adobe Premiere Pro/iMovie native supported video format.

Pavtube Media Magician / Mac Version: A nice camcorder assistant manager, lossless camcorder video joiner, MTS/ M2TS/ MXF/ MOV/ MKV/ TiVo/ WMV/ AVI/ MPG converter and editor. Meamwhile it supported upload edited video to YouTube directly.

Read More:

Friday, November 13, 2015

Play DVR Video on PC or Mac with H.264 Smoothly

Summary: Follow this post to know how to convert DVR to H.264 MP4 for watching on Mac OS X El Capitan or Windows 10, hope it can solve you DVR video footage problems.

DVR, also known as Digital Video Recorder, is a consumer electronics which lets you record any TV program and watch it at a later time. The DVR files are created by Digital Video Recording Devices. This DVR file format is similar to the ASF file format and is a container file format, but the DVR file format allows for added features and functionality such as simultaneous record and playback, time-shifting and live pause. Have recorded tons of videos/episodes/TV programs on your DVR? You may find the unprotected DVR can not be played by most media player and can't be edited by some editing apps.

To make DVR file widely accepted by QuickTime on Mac or Media Player on Windows, we had better convert the original or extended DVR to more popular video formats like H.264 MP4 format. And the following article just aims to provide a step by step guide on how to convert DVR to H.264 for watching.

Hot SearchMP4 to KMPlayer | Add MP4 to EDIUS | Play MP4 on Home Media Server

You need a Pavtube Video Converter which is an all-in-one program integrating conversion and editing 4K videos, 1080p/720p MKV, MXF, M2TS, etc. it enables you to convert DVR to H.264 swiftly. It supports high conversion quality. Pls follow the guide below. If you are a mac user, please turn to Pavtube Video Converter for Mac(here is review).


Other Download:
- Pavtube old official address: http://www.pavtube.com/video_converter/
- Amazon Download: http://download.cnet.com/Pavtube-Video-Converter/3000-2194_4-75734821.html
- Cnet Download: http://download.cnet.com/Pavtube-Video-Converter/3000-2194_4-75734821.html
1.Download the right version(here we choose windows version as example), then load your DVR footage into this app by clicking "File">"Add Video/Audio". 

Tips: Highlight and double click clips can allow you to preview your video.


2.After loading successfully, go to the Format bar then choose "HD Video">"H.264 HD Video (*.mp4)". Any options encoded by H.264 under "HD Video" will output as H.264 High Profile, which will totally maintain the sharp quality of the original files.


3.If you want to customize the output parameters, you can click settings button. Adjust the resolution and others as you need.


4.Click convert button to start the DVR to H.264 MP4 conversion.

After converting, you can watch the converted DVR recorded footages on Macs or PCs.

Related program

Pavtube HD Video Converter / Mac Version: It is designed for converting HD videos from HD camcorders or DVs (like JVC, Panasonic, Sony and Cannon), non-protected HD or movies, DVR files (*.tivo) to other file types for playback on popular media devices like Apple TV, PS3, Xobx, Xobx360, WD TV HD Player.

Pavtube Media Magician / Mac Version: A nice camcorder assistant manager, lossless camcorder video joiner, MTS/ M2TS/ MXF/ MOV/ MKV/ TiVo/ WMV/ AVI/ MPG converter and editor. Meamwhile it supported upload edited video to YouTube directly.

Pavtube Video Converter Ultimate /iMedia Converter(Mac Version): An all-inclusive converter to complete 2D/3D Blu-ray, DVD, ISO, SD/HD/4K Video to m3u8, H.265 MP4, do H.265 to non-H.265 conversion on Mac OS X El Capitan.

Read More:

Wednesday, November 11, 2015

Gopro Hero 4K videos enable in Windows Live Movie maker

Windows Movie Maker can work friendly with Windows system. A number of editors would like to choose it for a professional editing about their recordings, including the latest 4K MP4 footage. 4K, has already got a big effect in digital or television area. Such as Gopro Hero4 4K camera.

GoPro HERO4 Black action camera can capture stunning 4K footage in extreme settings(30fps). Of course 2.7K50, 1440p80, 1080p120, 960p120 and 720p120 fps for crisp, smooth footage are supported as well. If you record some 4K videos, things would be a little more complicated when you work with the 4K MP4 files in Windows Movie Maker.

Movie Maker have good at editing videos but they can’t accept the 4k MP4 videos recorded by GoPro Hero4.  As a matter of fact, many will admit to having found 4K video difficult to import into many editors for purposes of editing.If you need to import Gopro 4K video Windows Movie Maker, it’s suggested to to convert Gopro HD 4K video Windows Movie Maker supported format 1080P AVI, 1080P WMV, 1080P MPG. To smoothly edit 4k MP4 files from GoPro Hero 4 in Windows Movie Maker, the best bet would be to convert them to .wmv, which is the best codecs with best results when working with WMM .

Here is a professional Pavtube Video Converter for you. Overall, the program is the best Video Converter for GoPro Hero4 footage, which will create an Windows Movie Maker friendly file format- WMV keeping the original quality in Windows XP/Vista/Windows 7/Windows 8. 

Besides Movie Maker, this software can also export professional encoders like DNxHD for Avid, ProRes for Final Cut Pro, AIC MOV for iMovie, MPEG-2 for Premiere Pro and more. For Mac users,Pavtube Video Converter for Mac is the alternative choice(read the review).


Other Download:
- Pavtube old official address: http://www.pavtube.com/video_converter/
- Amazon Download: http://download.cnet.com/Pavtube-Video-Converter/3000-2194_4-75734821.html
- Cnet Download: http://download.cnet.com/Pavtube-Video-Converter/3000-2194_4-75734821.html

Convert GoPro 4K Video to WMV for Editing in Windows Movie Maker 

Step 1: Load GH4 4K MP4 files

Click "Add Video" button or "Add from folder" button to load your GoPro 4K mp4 files.


Step 2: Select output format for WMV and set destination folder

Click the pull down menu of "Format", then you will be able to select a Windows Movie Maker supported format from the output format profile, choose "HD Video">"WMV HD (*.wmv)" as your output format.


Meanwhile, click the "Browse" icon at the end of "Output" to specify where to save the output files for your WMV, if not, this program will export them to the default save path automatically.

Tips:

If you want to combine multiple MTS and M2TS files into a single file, you can tick off the checkbox "Merge into one file" to realize this goal.

Step 3: Adjust video and audio settings to optimize output file quality

Click "Settings" button, then you will be able to adjust audio and video parameters on the popup window to customize the output file quality, these adjustable parameters include codec name, aspect ratio, bit rate, frame rate, sample rate, and audio channel.


Tips:

In the "Audio">"Channels" drop-down menu, you can select 7.1 audio channels to keep the original audio tracks.

Step 4: Click "Convert" button to convert MTS to Windows Movie Maker

Once the conversion is finished by Gopro 4k MP4 to WMM Converter, you can click "Open" button to get the output files effortlessly, and now you are ready to import and edit 4K MTS files with Windows Movie Maker. Just import the converted files to WMV for editing via its "Import video" option.

Read More:

Monday, November 9, 2015

Red One 4K videos to After Effects CC/CS6

Summary: In this article, we will give you the easy way import and edit Red One 4K RAW video files in After Effects CS6 on PC and Mac without problems.

Two generation Red One

The first Red Ones were outfitted with the 12 megapixel Mysterium sensor, capable of capturing up to 120 frames per second at 2K resolution and 30 frames per second at 4K resolution

The second generation, Red One Mysterium-X has a 14 megapixel Mysterium-X sensor. It captures up to 120 frames per second at 2K resolution and up to 30 frames per second at 4K resolution. With the upgraded sensor, the Red One Mysterium-X offers more dynamic range, higher sensitivity and enhanced color management tools than the Red One Mysterium.

Why you guys cannot handle the original 4k video in After Effects CC/CS6

There are many, many flavors of 4K files, and more to come. RED camera for example can be setup to shoot uncompressed RAW 4K, 3X compression, 5X compression, 8X compression, and 10X compression.

With an iMac, or even with the new Mac Pro, to handle 4K workflows effectively, you would have to add-on a Thunderbolt expansion chassis with a RED Rocket card or RED Rocket X card, at least one or two powerful graphics cards such a the GTX 680 Mac Edition, and a beefy Thunderbolt RAID like a Promise Pegasus 6-drive model. All the costs over $18800 totally.

That is to say, there is unfortunately no way you will be able to edit native 4K files at any of the higher quality, lower compression rates. The only alternative on a Mac would be to transcode to a lighter codec, such as Pro Res. Well...yes, if you convert to ProRes and scale to 2K for editing. 

Solution Here

Working with raw 4K videos could be tedious and time-consuming in many situations. The best workaround is to have the flexibility and efficiency of working with a professional and edit-friendly codec such as MPEG-2 with a powerful 4K to After Effects converter-Pavtube HD Video Converter for MacWith it, you can effortlessly encode/re-encode 4K H.264(MP4), RAW, etc footage for smoothly importing and editing in various non-linear editing systems (NLE), including After Effects, Avid Media Composer, Final Cut Pro, iMovie, FCE and more. Besides, this 4K Video Converter is also available to customize the output resolutions to any size like 1080p, 2K, 4K as users want.  


Other Download:
- Pavtube old official address: http://www.pavtube.com/hd-video-converter-mac/
- Amazon Store Download: http://www.amazon.com/Pavtube-Video-Converter-Mac-Download/dp/B00QI9GNZS
- AppStore Download: https://itunes.apple.com/de/app/pavtube-hd-video-converter/id502792488?mt=12
- Cnet Download: http://download.cnet.com/Pavtube-HD-Video-Converter/3000-2194_4-76177786.html

How to Downscale the 4K Red One RAW Video to MPEG-2 for Editing in Adobe After Effect CC/CS6 

1.Add raw files

Run the program you just set up. Drag and drop the 4K video files to the converter. You can also hit Add files button to import videos to the app. If you wanna combine several videos into one file, you can click the "Merge into one" box.


2.Choose output format

Click "Format" bar and choose Adobe Premiere/Sony Vegas -> MPEG-2(*.mpg) as output format for editing raw 4K in AE with natively supported video codec.


3.Advanced V/A settings

Click "Settings" button if you'd like to customize advanced audio and video parameters like Video Codec, aspect ratio, bit rate, frame rate, Audio codec, sample rate, audio channels. Note: If you want to get original 4K resolution, just keep the video size as original.


4.Start converting 4K footage

Hit the convert button of the best 4K Video Converter. It will start converting 4K for importing to Adobe After Effect CC/CS6 immediately. Soon after the conversion, just click "Open" button to get the generated files for natively editing in Adobe After Effect CC/CS6 perfectly.

Read More:

Friday, November 6, 2015

Edit iPhone/iPad/iPod recorded video in Avid on Win 10

Summary: You may encounter the problem like this:have no idea about importing the iPhone/iPad/iPod video you recorded on your journey in the Avid on Windows 10. Here this article give you a ultimate methods.

In order to edit your iPhone/iPad/iPod recorded video in Avid on Win 10, first of all, you should figure out the two things before get starts. The first is transfer the iPhone/iPad/iPod recorded video to your PC, the second, ensure all of the video can be import into Avid success. Okay, first task begin:

Import iPhone/iPad/iPod videos to your Windows PC

Before you import your photos and videos:
  • Unlock your iOS device using your passcode.
  • Make sure that your iOS device trusts the computer that you're using to import your media to.
To play videos on your computer at the correct orientation, use iTunes for Windows to sync all of your iPhone/iPad/iPod recorded video to PC hard storage.

The second next, as we all know that some of your iPhone/iPad/iPod recorded videos in 4k resolution, some are encode by h.265 which Avid has no ability to read and recognize. So, you should exchange all the different codec videos recorded by your iPhone/iPad/iPod into a Avid supported format such as the MPEG-2 format which regarded as it’s most compatible format. Here I would recommend you a professional video converter named Pavtube Video Converter. With it, you can convert any formats video into the Avid easy-supported format for editing. You can also realize your movie director dream with the built-in video editor. Make your personal video by trimming, cropping, adding text/image/video images, inserting SRT/ASS/SSA subtitle into source video, etc.

Tips: If you are a Mac user, Pavtube Video Converter for Mac also available for you to import iPhone/iPad/iPod recorded videos into FCP for further editing.


Other Download:
- Pavtube old official address: http://www.pavtube.com/video_converter/
- Amazon Download: http://download.cnet.com/Pavtube-Video-Converter/3000-2194_4-75734821.html
- Cnet Download: http://download.cnet.com/Pavtube-Video-Converter/3000-2194_4-75734821.html


Other Download:
- Pavtube old official address: http://www.pavtube.com/video-converter-mac/
- Amazon Store Download: http://www.amazon.com/Pavtube-Video-Converter-Mac-Download/dp/B00QIBK0TQ
- Cnet Download: http://download.cnet.com/Pavtube-Video-Converter/3000-2194_4-76179460.html

How to Rip All the iPhone/iPad/iPod Recorded Videos to Avid Supported Format Video 

Step 1: Load iPhone/iPad/iPod recorded video footage.

Launch and start the program on the computer, import your source iPhone/iPad/iPod recorded video footage to the program by clicking "File"> "Add Video/Audio".


Step 2: Specify output file format.

From "Format" drop-down list, select to out "Adobe Premiere/Sony... "> "MPEG-2 (*.mpg)" format for editing with Sony Vegas.


Step 3: Merge into one file.

On the main interface of the program, check "Merge into one file" option to combine all the separate video footage into single one.

Step 4: Carry out the conversion process.

Press right-bottom conversion button to startiPhone/iPad/iPod recorded video to Avid MPEG-2 conversion process.

When the conversion is complete, you can easily import iPhone/iPad/iPod recorded videos to Avid for professional editing.

Read More:

Monday, November 2, 2015

Get Sony PXW-X70 XAVC to work with Premiere Pro

Summary:This article outlines how to transfer Sony PXW-X70 XAVC footage to Mac and import into Premiere Pro CC, CS6, CS5 for smooth editing. Keep reading for a brief how-to.

Sony PXW-X70 is a highly compact, single chip camera the images it produces are really very good. The XAVC HD recordings are 10 bit 422 long GoP at 50Mb/s, 35Mb/s or 25Mb/s. The quality of the 50Mb/s recordings is amazing with no compression artefacts that you can see. Even the 25Mb/s recordings look really good. You can shoot at up to 60fps in 60i mode and 50fps in 50i mode. In 60i mode you also have 24fps.

In general, as we know, Premiere Pro CC has added support for this new camera format. And for Premiere Pro CS5/CS5.5/CS6, you can download Rovi Totalcode, a Plug-in for Premire which has perfect support for Sony's 4K XAVC format. However, this third-party plug-in will cost you a lot of money. 

In this case, the following passage will introduce a cost effective and simple way- convert Sony PXW-X70 XAVC footages to Premiere Pro for editing.

Software Requirement 

Mac Sony XAVC Video Converter from Pavtube

The software does a good job in converting XAVC to Adobe Premiere Pro favorable format MOV/MPEG-2 with original quality kept, so as to allow you import Sony PXW-X70 XAVC to Premiere Pro CC, CS6, CS5, CS4 or CS3, etc. for extension editing without any hassles. Moreover, before starting the conversion, you are allowed to perfect the XAVC video files by rendering to the editing features provided. Becides, it allows you to join the XAVC clips together. (For windows user, turn to Pavtube HD Video Converter)

Step 1. Load Sony PXW-X70 XAVC footage to XAVC Video Converter.

Transfer XAVC files from Sony PXW-X70 to computer via USB cable. Download HD Video Converter for Mac from Pavtube and run the software as the best Sony XAVC converter. Click the "Add Video" button or "Add from folder" icon to load XAVC videos from PXW-X70.


Step 2. Set MOV/MPEG-2 format as output format for editing.

Click format bar to choose the format for output. Select "MOV (AVC)(*.mov)" or "MPEG-2 (*.mpg)" under Adobe Premiere/Sony Vegas for editing in Adobe Premiere Pro CC, CS6, CS5.


Step 3. Adjust video and audio settings to keep 1080p HD quality

Click "Settings" button, then you will be able to adjust audio and video parameters on the popup window to customize the output file quality, these adjustable parameters include codec name, aspect ratio, bit rate, frame rate, sample rate, and audio channel.

For example, to maintain original HD quality, you may set "original" in the fields of "Size", "Bitrate" and "Frame rate". To downsize the Sony XAVC files, just set a smaller bitrate.

Step 4. Click "Convert" button to convert Sony PXW-X70 XAVC to Premiere Pro CC, CS6, CS5

Once the conversion is finished by Sony XAVC to Premiere Converter, you can click "Open" button to get the output files effortlessly. Now you have got it right, just import and edit Sony PXW-X70 XAVC files in Adobe Premiere Pro CC, CS6, CS5 without rending time.

Read More:

Wednesday, October 28, 2015

Play MKV/VOB/Tivo/FLV/WMV/MPG/AVI on Asus ZenPad S 8.0

Summary: Here is a workflow about the SD/HD Videos to Asus ZenPad S 8.0 conversion, you can easily & quickly convert MKV, AVI, VOB, M4V, WMV, MPG, Tivo, FLV video to Asus ZenPad S 8.0 support video formats for smoothly playback.

You may be happiness with getting the Asus’ latest inexpensive tablet, the ZenPad S 8.0. This is a much different tablet than the Nexus you may still have on your coffee table or tucked in a drawer somewhere. In some ways that’s good, but it’s mostly a regression. However, ZenPad S 8.0 still can’t play some MKV/VOB/Tivo/FLV/WMV/MPG/AVI media files with the unnormal codec directly.

You may happen to have videos in MKV, AVI, VOB, WMV, MPG, M4V, Flash video(FLV/F4V), camera videos(MTS/MOV/MXF) or you like recording TV shows by Tivo, and want to transfer them to iPad Air to kill time on board. However, the problem is that not all these formats are supported by Asus ZenPad S 8.0.

Here suggest you this Pavtube Video Converter, which really does a nice job in the field of maintaining quality during the conversion. Still, you can make your very own videos by this converter and combine plenty of small clips into a whole one to play..

Tips: Mac users please turn to Pavtube Video Converter for Mac.


Other Download:
- Pavtube old official address: http://www.pavtube.com/video_converter/
- Amazon Download: http://download.cnet.com/Pavtube-Video-Converter/3000-2194_4-75734821.html
- Cnet Download: http://download.cnet.com/Pavtube-Video-Converter/3000-2194_4-75734821.html


Other Download:
- Pavtube old official address: http://www.pavtube.com/video-converter-mac/
- Amazon Store Download: http://www.amazon.com/Pavtube-Video-Converter-Mac-Download/dp/B00QIBK0TQ
- Cnet Download: http://download.cnet.com/Pavtube-Video-Converter/3000-2194_4-76179460.html

How to Play MKV/VOB/Tivo/FLV/WMV/MPG/AVI on Asus ZenPad S 8.0

Step 1. Load any videos into this converter

Install this converter on your PC, then click "File">"Add Video/Audio" to load your files. The latest H.265/HEVC can be decoded and encoded by this converter.


Step 2. Choose proper format for play videos on Asus ZenPad S 8.0

You can choose H.264 as the output option. Here choose H.264 MP4 for watching videos on Asus ZenPad S 8.0.


Step 3. Start to convert your files to watch on Asus ZenPad S 8.0

After setting the file location, you can click "Convert" to start your conversion. If you happen to forget to set the file location, you can click "Open output folder' in the conversion UI.

Now you have already transcode unsupported formats to the compatible files for playback videos on Asus ZenPad S 8.0.

Hot News: Happy Halloween and Hurry up!!! Pavtube's 2015 Halloweenn Promotion is on the road (Offer Valid from Oct. 23, 2015 to Nov. 6, 2015). This Time Pavtube offers up to 40% Off discount on its featured software apps. Never miss this chance to get what you need. 

Read More: