Monday, June 8, 2015

How to Play AVCHD/MTS Video on Mac&Windows PC?

Summary: AVCHD video file (.mts/.m2ts extension) is derived from the HD camcorder recording, which endows you the enjoyment of up to 1080p full-HD visual image quality. And if you are eager to play AVCHD video, just follow up with this page and you will learn how to play AVCHD videos (play MTS files) on your Windows PC, Mac as well as other popular devices.


When playing AVCHD video, you will experience a full 1920 x 1080 resolution effect which makes raindrops on roses and whiskers on kitten distinguishable. Meanwhile, when play AVCHD/MTS video on computer, you will also be delighted by its DVD-like navigation menus and chapters, even custom subtitles and audio tracks. That is to say, while watching AVCHD/MTS video, you can freely jump over the part you seen before and you can select or disable the subtitle at will, or listen to the exotic movie with the native language.

How to Play AVCHD/MTS Video on Windows PC and Mac OS X?
Unlike other general video formats, such as AVI, MP4, MOV, WMV, FLV, etc, which are acceptable by major video players, it has nit-picking rules for AVCHD/MTS video playback tools. On whichever platform to play AVCHD video, you definitely need a powerful AVCHD video player.

AVCHD / MTS videos player for PC:
It is possible to play AVCHD video with Windows Media Player (the most popular media player for Windows PC by far). However, since based on Dshow (DirectShow) Multimedia Framework, WMP supports to play AVCHD on Windows yet needs additional codec's installed. After installation, the additional codec ties MTS/M2TS files (AVCHD files) into Windows Media Player, and then, allows it to be compatible with this file type. The good news is that Windows 7 will have native support for AVCHD / MTS videos, but this luck seems not spread to Windows XP and Vista users.

AVCHD / MTS file player for Mac:
Presently, the default media player from Apple (QuickTime) cannot play AVCHD natively. To play AVCHD on Mac OS X, additional (free) software is required, such as VLC Media Player. It is a free and open source cross-platform multimedia player. It is quite easy to play AVCHD video with VLC player. You just need to launch it, drag the target AVCHD / MTS video into the display window. That is it. Or you can right click Media > Open File > Locate the .mts file > Click OK.

Play AVCHD / MTS video files on portable devices:
Playing AVCHD / MTS on your desktop or laptop is not the only choice for AVCHD video enjoyment. You can also enjoy them on your portable devices, like Apple iPhone, iPad, iPod, HTC, Sony Xperia, Microsoft , etc. Take iPhone 6 as an example: every picture and movement from AVCHD video you see on iPhone 6 looks amazing. Images in movies are stunning at almost any angle. That's because the pixel density is so high, your eye is unable to distinguish individual pixels. Simply with AVCHD video converter, you are able to play AVCHD on iPhone, play AVCHD on iPad, iPod touch, Android, Microsoft, etc.

The reason why we do not play AVCHD video natively upon our computer is plenty enough:

1.Compared to HDV, AVCHD requires 2-4x the processing power for real-time playback, placing a greater burden on the computer's CPU and graphics card. Improvements in multi-core computing and graphics processor acceleration are also hardly to bring AVCHD playable to mainstream desktops and laptops. Under such a circumstance, convert AVCHD video to friendly video formats will expand your computer's life-span.

2.If your computer is not armed with high-end equipment and its screen size is smaller than 1920x1080, it is hard to play 1080p AVCHD video smoothly. So you will not be allowed to play high resolution AVCHD / MTS video until resize it to match up with your computer displayer. Pavtube products can do you this favor by its resize/shrink feature.

3.All AVCHD camcorders except for AVCHD Lite models use recording 1080 Interlaced Video.When watching interlaced video on some software video players (since they don't always have built-in De-interlacing engine like flat-panel televisions), they simply blend two fields of each interlaced frame together, causing combing; when such video is scaled down it may exhibit ghosting instead of combing, in other word, the image you see from AVCHD video will not be true to the original.

Fortunately some powerful AVCHD Converter software will solve all troubles above, like Pavtube MTS/M2TS Converter. If you are running on Mac, you can choose the equivalent version- Pavtube MTS/M2TS Converter for Mac. After you convert AVCHD video to AVI, MPEG-4 and other general video formats, you can not only preserve original high quality visual effect, but also release your computer's CPU and graphics card great burden. Most of all, with Advanced De-interlacing Engine built-in, Pavtube MTS/M2TS Converter supports converting AVCHD video from interlacing to progressive scanning. It will bring you more vivid and smooth image. Moreover, its Shrink Function will resize AVCHD video to perfectly match up your computer screen for achieve ideal visual effect.


Other Download:
- Pavtube old official address: http://www.pavtube.com/mts-converter-mac/
- Amazon Download: http://www.amazon.com/Pavtube-MTS-M2TS-Converter-Download/dp/B00QIE3U0Y
- Cnet Download: http://download.cnet.com/Pavtube-MTS-M2TS-Converter/3000-2194_4-76177029.html

How to play AVCHD MTS video on Mac&Windows PC? (Take playing AVCHD MTS video on Mac QuickTime Player as an example)

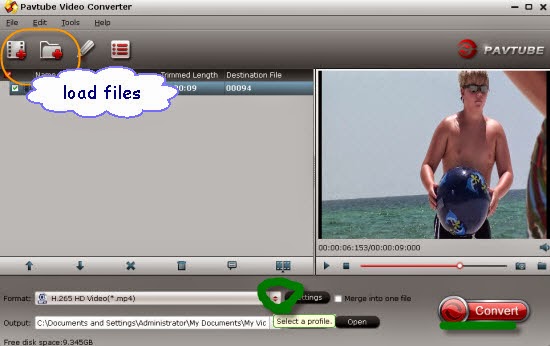
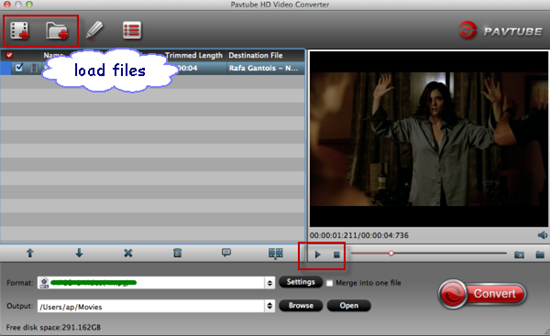
Step 1: Download and install the corresponding program. Run it as the best Mac MTS Converter, and click the “Add video” button to load AVCHD files. You may also directly drag and drop AVCHD files to application UI for importing files.


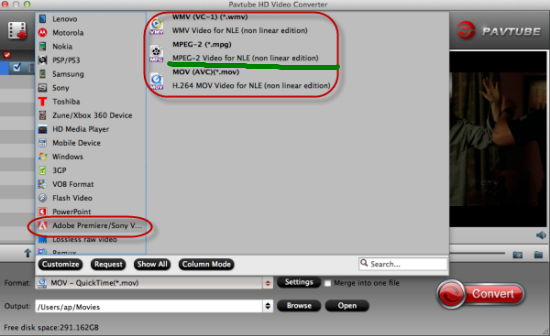
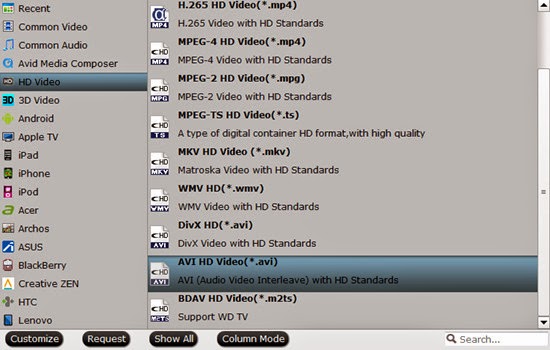
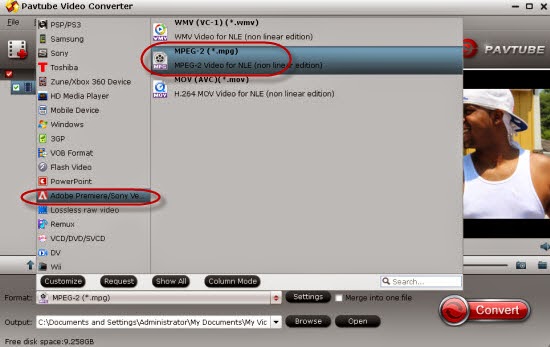
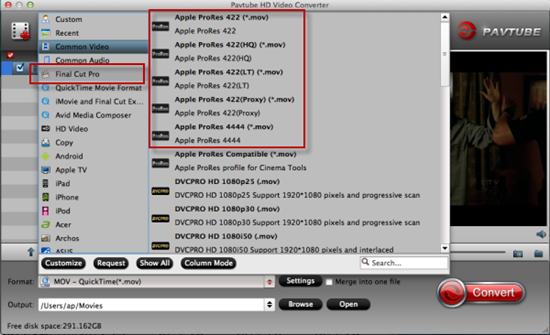
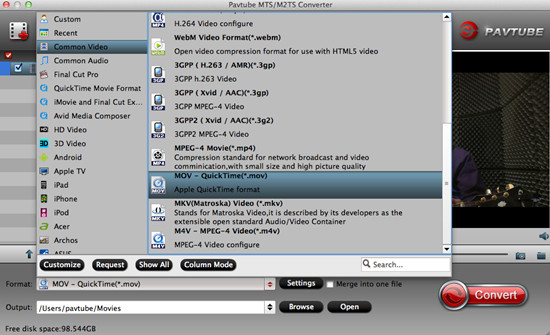
Step 2: Click “Format” bar to determine output format. Follow “Common Video” and select “MOV- QuickTime (*.mov)” as the output format.


Step 3: Adjust video and audio parameters, including the bit rate of video and audio, the codec of video and audio, video size, sample rate, frame rate, audio channels, etc., in the Profile Settings by hitting “Settings” button.

Step 4: Click “Convert” button to start converting AVCHD MTS to QuickTime MOV for QuickTime playing. You can get the generated files by clicking “Open” button.

Conclusion: If you don’t want to wait for the entire conversion process, you can tick off “Showdown computer when conversion completed” and go away to do other things.

Further Reading:

Wednesday, June 3, 2015

Edit Coolpix P900 Footage in FCP X/iMovie

Summary: Are you interested in how Coolpix P900 footage works with FCP X/iMovie? Would you like to join us to discuss the detailed steps about converting Coolpix P900 H.264 to ProRes MOV/AIC MOV for editing respectively in FCP X/iMovie directly and smoothly with lossless quality?


The Coolpix P900, a camera that offers an unprecedented and incredible 83x zoom along with superior performance, provides users with incredibly sharp NIKKOR optics and a 166x Dynamic Fine Zoom range capable of reaching previously unimaginable distances. In addition to its unrivaled zoom power, the 16-megapixel Coolpix P900 comes equipped with an array of innovative features and advanced controls for capturing sharp and detailed images as well as Full HD video from afar.

The Nikon P900 records video files in MPEG-4 AVC /H.264 format with resolution 1920 x 1080 (60p, 50p, 30p, 25p), 1280 x 720 (60p, 50p, 30p, 25p), and 640 x 480 (30p, 25p). Recording movies is easy, but editing them on Mac might be problematic. That’s mainly because H.264 is a highly compressed format suitable for capture and delivery, but not quite proper for editing. If you were getting into troubles working with Coolpix P900 1080/60p video on Mac through FCP X/iMovie, convert them first!

What format should we convert to for editing in FCP X/iMovie? If you are not familiar with this, you’d better get clear about FCP X supported formats and iMovie best accepted formats first. Then, all you need is a powerful third-party program. Having tested so many free and commercial programs, Pavtube HD Video Converter for Mac is highly recommended due to its fast conversion speed and high quality preserved. This application supports converting video recordings captured by all Nikon cameras, including but not limited to Nikon D7000, D7100, Nikon D7200, Nikon D5200, D5300, D5500, D3300, Nikon 1 J1/S2/J4/V3, Nikon D800/D810, Nikon D4S/D4, Nikon D750, Nikon Coolpix A, Nikon Coolpix S3700/S2900/L31/L32, Nikon Coolpix P610/L840/S9900/S7000/S6900 and Coolpix P900.


Other Download:
- Pavtube old official address: http://www.pavtube.com/hd-video-converter-mac/
- Amazon Store Download: http://www.amazon.com/Pavtube-Video-Converter-Mac-Download/dp/B00QI9GNZS
- AppStore Download: https://itunes.apple.com/de/app/pavtube-hd-video-converter/id502792488?mt=12
- Cnet Download: http://download.cnet.com/Pavtube-HD-Video-Converter/3000-2194_4-76177786.html

How to import Coolpix P900 footage to FCP X/iMovie for editing?

Step 1: Download and have a quick installation. The trial version will have a watermark on your converted files. Except for that, there are no time limitation, no virus, and no unnecessary bundle apps while downloading. After that, click “Add Video” button to load P900 videos. You can load several files at once thanks to “Add from folder” button.


Step 2: Here, you need to choose what you want the output to be. Click “Format” drop-down list, and then select “iMovie and Final Cut Express>>Apple InterMediate Codec (AIC) (*.mov)” as the best output format.


Tips: For editing in FCP X, you can choose “Final Cut Pro>>Apple ProRes 422 (*.mov)” as best output format.

Step 3: Click “Settings” button to customize the output video and audio settings by yourself. But if you are not good at it, you’d better use the default parameters, they will ensure you a good balance between file size and image quality basically. You can change the resolution, bit rate, frame rate as you need.

Step 4: When everything is done, you can take a preview by hitting “Play” button. If you are satisfied with the final result, you can click “Convert” button to finish the conversion work.

Conclusion: Once the conversion process is complete, you can click “Open Folder” button to get the generated files for editing Coolpix P900 footage in iMovie and FCP X with optimum performance.

Further Reading:

Monday, June 1, 2015

Edit DJI Phantom 2 Vision+ Video in Premiere Elements 13

Summary: With the Phantom 2 Vision+, you can records MP4 formats, but most users may find a problem when converting DJI Phantom 2 Vision+ MP4 to Premiere for editing. These MP4 files are clunky to edit requiring much rendering when in a Premiere Elements 13 timeline.


As we know, MP4 is widely used for saving media datum. And it can be found in lots of places, such as camcorders (GoPro/Sony or other camcorders), websites (YouTube/Fox or other Video websites) and even the newly aerial apparatus like DJI Phantom 2 Vision+. It is a common video format for users to share.

Although MP4 is in the supported file formats of Adobe Premiere Elements, sometimes, you will find it's not easy to import MP4 to Premiere Elements for editing. There are some video or audio codec problems when you try to use a MP4 file in Premiere Elements even with the latest Premiere Elements 13. Actually, this is due to the MP4 files codec: Adobe Premiere Elements only accept H.264 codecs instead of others. While, MP4 is a container format which hold various video and audio codecs and that's why you will encounter problems when you attempt to edit MP4 videos in Premiere Elements.

Afterwards, when you got a pile of MP4 files from different source, there’s no luck Premiere Elements 13 can support all of your MP4 media. To fix the problem, you can try to install MP4 codecs for Premiere Elements or change your MP4 file extension to MOV. If two methods do not work, there is also an easy way to fix the issue. The easy option is to convert MP4 to Premiere Elements supported file format like MPEG-2. Actually, it's not as difficult as you imagine. What's need is just a common video converter like Pavtube HD Video Converter for Mac, which can help you transcode MP4 to MPEG-2 video with maximum editing quality and efficiency when working with Premiere Elements 13 under Mac OS X Yosemite.

Several simple clicks to convert DJI Phantom 2 Vision+ video to Premiere Elements 13:

Step 1: Download Mac HD Video Converter, and follow the prompts to install the program. When the installation is complete, the best DJI Phantom 2 Vision+ MP4 Converter will launch automatically.

Step 2: Click “Add video” button to load DJI Phantom 2 Vision+ MP4 recordings or directly drag the files into file list. By default, the files are selected. You can delete files which you don’t want to import to.


Step 3: Click “Format” bar to determine output format. For best image quality, click the format bar and choose “Adobe Premiere/Sony Vegas>>MPEG-2 (*.mpg)” as output format.


Step 4: Click “Settings” button to customize the output video and audio settings by yourself. But if you are not good at it, you’d better use the default parameters, they will ensure you a good balance between file size and image quality basically. You can change the resolution, bit rate, frame rate as you need.

Step 5: You can preview to check the final result. Once you are satisfied with it, click the “Convert” button to start converting DJI Phantom 2 Vision+ MP4 to MPEG-2 for editing in Premiere Elements 13 flawlessly. It will take you a little while.

Conclusion: Once the conversion process is complete, you can click “Open Folder” button to get the generated files for editing DJI Phantom 2 Vision+ MP4 in Premiere Elements 13 with optimum performance.

Further Reading:

Wednesday, May 27, 2015

Edit Sony HX90V XAVC S in Sony Vegas/Pinnacle/WMM

Summary: Error when importing HX90V XAVC S to Sony Vegas/Pinnacle/WMM? Trouble editing HX90V XAVC S in Sony Vegas/Pinnacle/WMM? Don’t worry. I sincerely hope this paper can do you a favor.


Sony Cybershot HX90V is the world’s smallest superzoom camera that can record full HD 1080p videos in AVCHD or in the high-quality XAVC S format at 50 Mbps in multiple frame rates. While, there are a few issues when it comes to viewing, importing and editing Sony HX90V XAVC S files in editing software like Sony Vegas/Pinnacle/WMM. Luckily, I’ve figured out an effective way to import XAVC S to Sony Vegas/Pinnacle/WMM flawlessly.

“I’m using the Sony HX90V to make a short film and we are shooting XAVC S videos with it. Is there an easy way that allows easy import XAVC S from Sony HX90V to Sony Vegas/Pinnacle/WMM directly, without having to use any complex plug-in. I’m seeking for HX90V XAVC S best workflow.”

XAVC S format is efficient, but simply isn’t engineered to maintain quality during complex post production effects processing. Uncompressed HD format delivers superior image quality, but data rates and file sizes can stop a workflow dead in its tracks. On the contrary, best suitable format delivers both efficiency and quality without compromises. So, before editing HX90V XAVC S in Sony Vegas/Pinnacle/WMM and searching on their relatively official website, you’d better convert HX90V XAVC S to MPEG-2 for Sony Vegas, AVI for Pinnacle and WMV for Windows Movie Maker with a powerful third-party program. I recommend you to try Pavtube Video Converter, which is a professional tool for Windows users to transcode XAVC S to Sony Vegas/Pinnacle/WMM with the best quality. What’s more? It supports encoding XAVC S to more video editing software compatible file types like DNxHD for Avid Media Composer, MPEG-2 for Adobe Premiere Pro and etc.


How to edit Sony HX90V XAVC S in Sony Vegas/Pinnacle/WMM?

Step 1: Run the best XAVC S Converter, and click the “Add video” button to load XAVC S videos from Sony HX90V. If you want to load several files at one time, “Add from folder” button is available.


Step 2: Click “Format” bar to determine output format. Follow “Adobe Premiere/Sony Vegas” and select “MPEG-2(*.mpg)” as the output format. Besides, you can also choose WMV (VC-1) (*.wmv) if you want to get a relatively smaller output file.


Tips: For editing in Pinnacle, choose “HD Video>>AVI HD Video (*.avi)”.
For editing in Windows Movie Maker, choose “HD Video>>WMV HD (*.wmv)”.


Step 3: Adjust video and audio parameters, including the bit rate of video and audio, the codec of video and audio, video size, sample rate, frame rate, audio channels, etc., in the Profile Settings by hitting “Settings” button.

Step 4: Click “Convert” button to start encoding HX90V XAVC S to MPEG-2, AVI, WMV especially for importing to Sony Vegas/Pinnacle/WMM.

Conclusion: When the conversion task is finished, click “Open” button to get the exported files and then import the converted HX90V footage into Sony Vegas/Pinnacle/WMM to do further editing without hassles.

Further Reading:

Monday, May 25, 2015

Play Canon Videos on Windows Media Player

Summary: Canon digital cameras--both still and video devices--can record movie files. These files are saved onto either an SD memory card or a built-in hard drive. Once imported to a computer, users can view the Canon videos in any media player, including WMP. How to play Canon videos on Windows Media Player?


As the default media player in Windows operating system, Windows Media Player (abbreviated WMP), makes it easy to play audio, video and view images for Windows users. However, many files contain video streams that are encoded using codecs that WMP cannot normally interpret. When you attempt to playback such a file, problems may be encountered.

Canon videos to Windows Media Player playback problem:
“I have used Canon C300 camcorder borrowed from my friend one month ago. I recorded some exciting videos at weekends. But after I transferred the footages to my Windows computer and find that the Canon MXF files can’t be played by Windows Media Player, can you help me?”

“I found a codec that allows me to view Canon MXF files in Windows Media Player but it won't play the audio. Does anyone know of a codec/decoder that allows one to view MXF files with audio in WMP?”

Since Canon MXF becomes a popular recording video format, many people have been wondering “Can Windows Media Player play Canon MXF files?” According to Microsoft support website, Windows Media Player (WMP) still won’t support Canon MXF files. Though we can make Windows Media Player play Canon MXF video by install some codecs. If you search more you will learn that Canon MXF is a container format which may contain multiple video and audio streams. If the Canon MXF video or audio codec is not WMP installed codec supported one, WMP won’t play Canon MXF video of this kind.

In order to solve this incompatible issue, we had better convert Canon videos to Windows Media Player more supported video format like WMV, AVI. Here Pavtube Video Converter is just the right Canon video to Windows Media Player converter which can convert all kinds of Canon video files.


Other Download:
- Pavtube old official address: http://www.pavtube.com/video_converter/
- Amazon Download: http://download.cnet.com/Pavtube-Video-Converter/3000-2194_4-75734821.html
- Cnet Download: http://download.cnet.com/Pavtube-Video-Converter/3000-2194_4-75734821.html

Detailed steps about how to play Canon videos on Windows Media Player:

Step 1: Download, install and launch the smart Video Converter. Click “Add video” or “Add from folder” button to load Canon videos to the program. You can also directly drag the files to the main interface.


Step 2: For playing Canon videos in Windows Media Player smoothly, you can hit the “Format” bar to choose “HD Video>>AVI HD Video (*.avi)” as best output format.


Step 3: Click “Settings” button to customize the output video and audio settings by yourself. But if you are not good at it, you’d better use the default parameters, they will ensure you a good balance between file size and image quality basically. You can change the resolution, bit rate, frame rate as you need.

Step 4: Now everything has been settled, and don’t forget to set the file location. Click “Convert” button to start the conversion work and click “Open” when you finish your conversion to check your converted files.

Conclusion: Now, you can enjoy playing Canon videos on Windows Media Player without any hassles. We still have money saving bundles & deals for you. Why not seize the chance to purchase fantastic goods with attractive price?

Further Reading:

Wednesday, May 20, 2015

Work DJI Inspire 1 4K Videos with Adobe Premiere Pro

What would you do to work with the DJI Inspire 1 4K videos in Adobe Premiere Pro? How can I solve the problems if I was failed in importing DJI Inspire 1 4K videos? This post aims to teach you how to freely import the DJI Inspire 1 4K footage to Adobe Premiere Pro for editing.

"I am doing some inspire 1 4K video editing, I see my desktop is very powerful, however, when I palyback the video in Premiere, it's very choppy, and not easy to do the editing. Does any pros have any idea on 4K in Premiere workflow? Much appreciated!"


Frankly speaking, it is not easy to solve the problems when you wann edit your 4K videos in NLEs. Due to the supported formats for Premiere Pro, we cannot directly inhest DJI 4K footage to Adobe PPro. On the other hand especially for 4K, we have to say we need some other third-party tools to resize the 4K files to 1080p on Mac/PC there.

If you actually wanna edit the DJI Inspire 1 4K videos in Adobe Premiere Pro, just convert the DJI 4K to MPEG-2 is the necessary step. Thus, Pavtube Video Converter for Windows (Mac version) is highly recommended to you! This strong program can convert almost all 4K footage to be suitable for most hot NLEs like FCP, iMovie, Avid MC, or some media player for playback etc. What’s more, we can adjust the output videos so nicely with its’ functional items. Let’s have more details.

How to Convert DJI Inspire 4K videos to MPEG-2 for Adobe Premiere Pro?
Step 1: Click "Add" button on the top of the main interface to load original DJI Inspire 4K videos to the program. Or you can simply drag&drop the videos to the software.


Step 2. Go to "Format" pull down list to select Adobe Premiere/Sony Vegas> MPEG-2(*.mpg) as the best video format for Premiere Pro. WMV, MOV formats in this column are the good choices as well.


Tip: Click the "Settings" button, you are able to enter the "Profile Settings" panel to adjust video and audio parameters for the converted files, including video size, bit rate, frame rate and more.

Step 3: Tap the Convert button to start transcoding DJI Inspire 4K MP4/MOV to MPEG-2 for Adobe Premiere Pro.

As soon as you get the output videos from this program, we are glad to find the generated videos via "Open" button. Now, we would like to tell you to transfer the footage to Adobe Premiere Pro for editing.

Further Reading:

Monday, May 18, 2015

Samsung NX500 H.265 to FCP X Workflow on Mac OS X Yosemite

Convert and edit our Samsung NX500 H.265 movies in FCP X on Mac OS X Yosemite? Do you have any good suggestions for H.265 to FCP X workflow? Well, for those nonlinear editors, we here have already found a professional NX500 to FCP X decoder to edit the H.265 recordings in FCP X without troubles.

With the FCP X best supported and limited video formats, not only for Samsung NX500 H.265 but also for other high definition videos such like AVCHD, XAVC, etc, we are failed in directly importing H.265 projects to FCP X for editing. The NX500 supports both 4K and UHD video recording, utilizing BSI APS-C sensors, the largest BSI sensor currently available, which provides more flexibility when it comes to capturing movies. So a professional third-party H.265 to FCP X assistant is necessary for us to work the job well.


How to convert Samsung NX500 H.265 to ProRes MOV for editing in FCP X? 

After comparing with others, we found that Pavtube HD Video Converter for Mac can be the best solution to import NX500 H.265 video clips to FCP X for editing. With it, you not only can convert Samsung NX500/NX1 HEVC (H.265) videos to MP4, AVI, WMV, MOV, FLV for easily playing, but also can convert HEVC (H.265) files to the editing tools with professional codec. Besides, the built-in video editor allows you to modify your videos by trimming, cropping, adjusting video effects and more. You can take this H.265 to PPro workflow as a good example. What’s the specific details?

Steps on converting Samsung NX500 H.265 to ProRes MOV for FCP X:
Step 1. Launch the program and click “Add” button to import the Samsung NX500 H.265 files to the program. Batch conversion is supported.


Step 2. Select ‘Apple ProRes 422 (*.mov)’ as output format for opening with FCP X.
From the ‘Profile’ list, move to ‘Final Cut Pro’ catalogue, and select ‘Apple ProRes 422 (*.mov)’ as target format. Apple ProRes is the best suited editing codec for FCP X.


Step 3. Adjust video and audio settings (for advanced users)
If necessary, you can click ‘Settings’ button and go to ‘Profiles Settings’ panel to modify video and audio settings like video encoder, resolution, video bit rate, frame rate, aspect ratio, audio encoder, sample rate, audio bit rate, and audio channels.

Go back to the main interface and click the icon ‘Convert’, we can easily make the work done. Then just follow the FCP X transferring tips, it would be nice to edit the Samsung NX500 H.265 files in FCP X.

More Reading: