Wednesday, January 14, 2015

Get H.265(HEVC) Workflow to Adobe Premiere Pro CC on Windows 8.1/8

The following guide mainly goes through the discussion on how to make it smoothly when editing our H.265/HEVC footage in Adobe Premiere Pro on Windows 8.1/8. Join us to learn more details.


Source and advantage of H.265/HEVC codec videos:
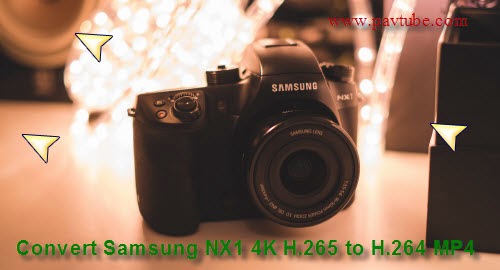
As soon as the newest codec H.265/HEVC has released out on our video market, it was popular among the video studios. Comparing to the H.264 codec, H.265/HEVC recordings higher quality and smaller size, which has become the biggest highlight there. However, not so many camcorders can shoot the H.265/HEVC recordings, Samsung NX1 is the typical one as you know. 

Troubles in working H.265/HEVC workflow from 4k camcorders.
Every coin has two sides, H.265/HEVC codec is not excepted. For some NELs, such as Avid MC or Adobe Premiere Pro,etc. In this way, what we need is the professional H.265/HEVC encoder/decoder to present a workaround to make H.265/HEVC footage be compatible with Adobe Premiere Pro CC on Windows 8.1/8. Would you like to join us to watch more?

Pavtube Video Converter---Professional H.265/HEVC Decoder for Adobe Premiere Pro.
Cause the H.265/HEVC recordings cannot be directly import to Premiere Pro for editing, we suggest you to decode your H.265 videos to the most suitable MPEG-2 MPG, which could be nicely imported. Fortunately, Pavtube studio has announced that the Windows product has been upgraded to 4.8.2.0, which is specially designed to encode and decode H.265 videos. Is that cool?

More details on how to convert H.265/HEVC to MPEG-2 MPG for editing in Adobe Premiere Pro CC on Windows 8.1/8.

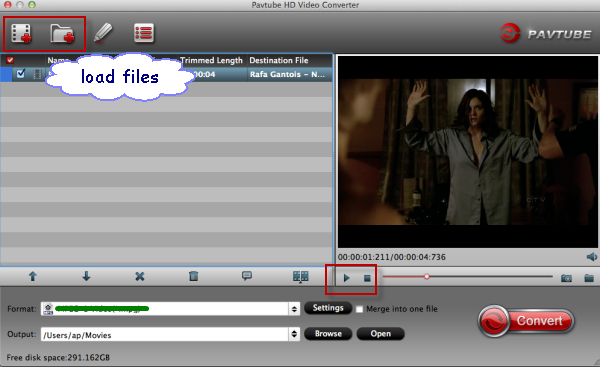
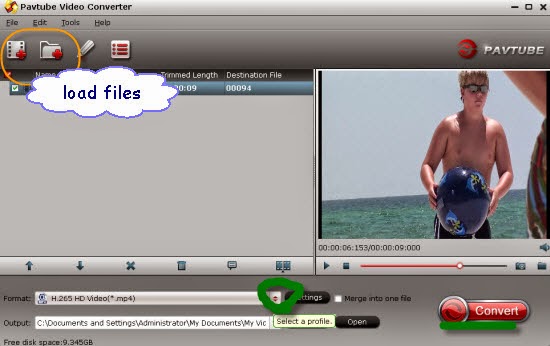
Step 1. Add H.265 footage
After you install the H.265/HEVC decoder correctly on your computer, drag you files in this program directly or with two adding buttons. ‘Add video’ and ‘Add from folder’.


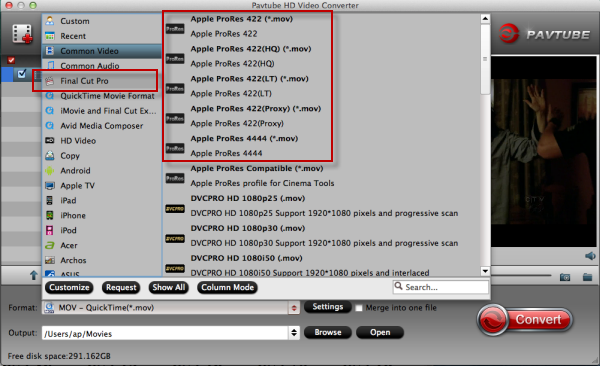
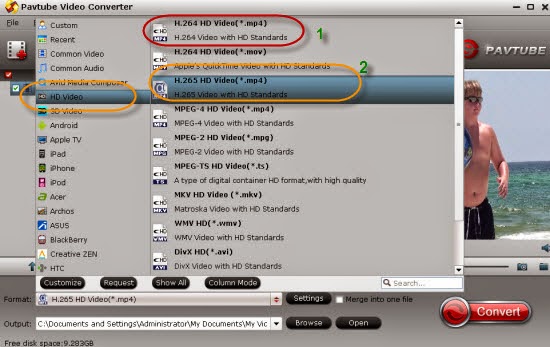
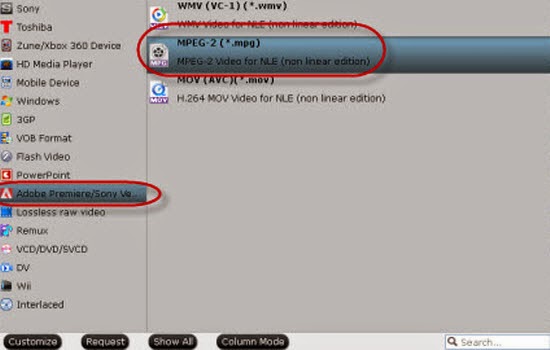
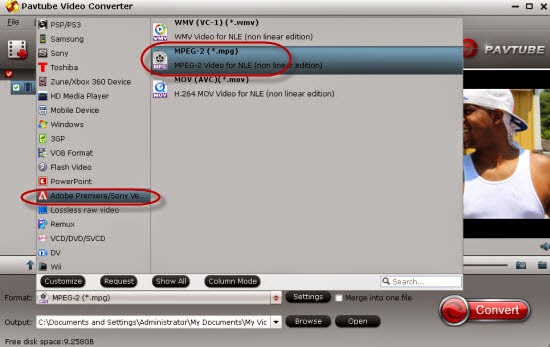
Step 2.Choose the Adobe Premier Pro’s supported item.
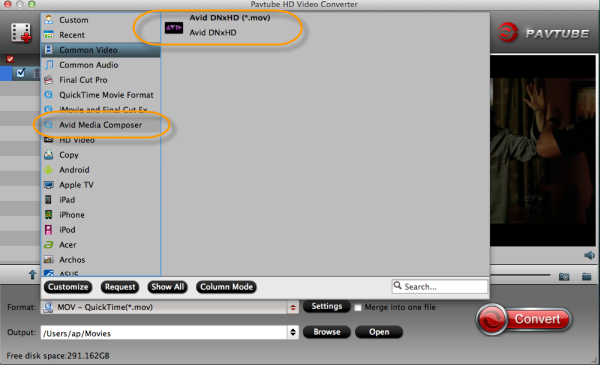
Come to the output list and choose Adobe Premiere/Sony Vegas > MPEG-2 (*.mpg) as the best video format for editing Samsung NX1 H.265 files in Adobe Premiere as well as good video quality. Of course, you can choose other format for editing in Avid MC, After Effects, etc.


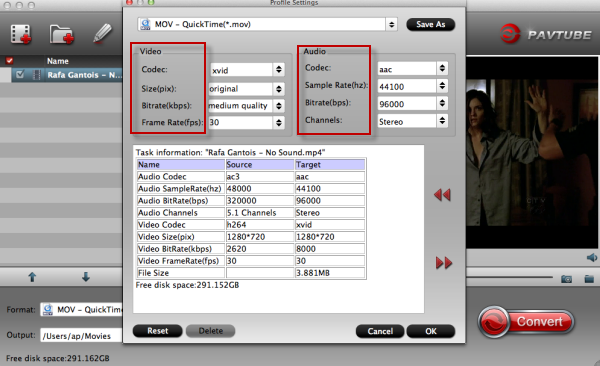
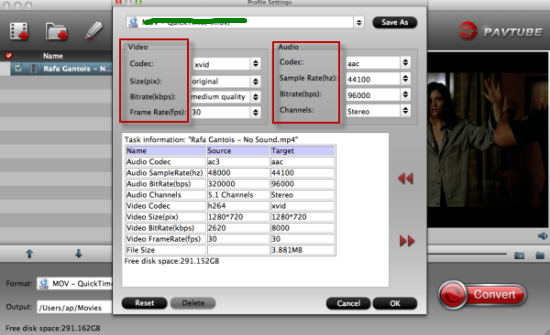
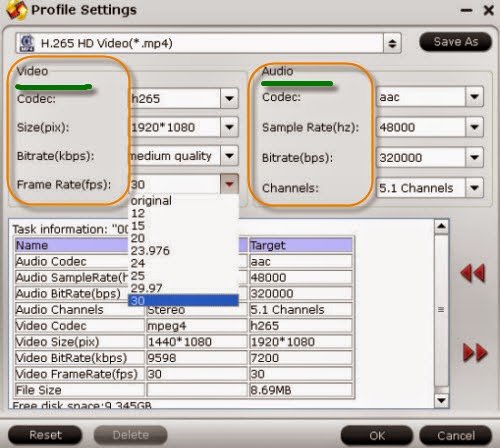
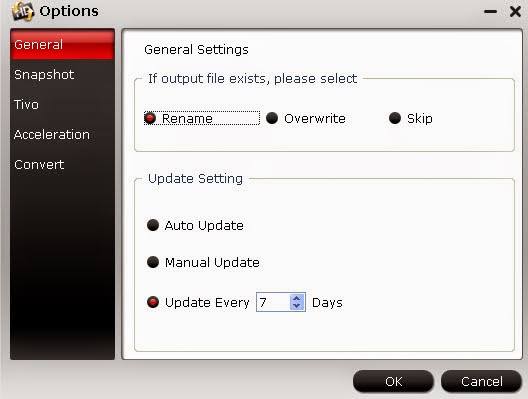
Step 3: Optional adjustments of output videos
Adjust the video and audio parameters, including the Bitrate of Video & Audio, Video Size, Sample Rate, Frame Rate, Audio Channels, etc., by clicking the Settings button on the main interface for getting the best quality.

At the end, just press on the ‘Convert’ icon on the main interface, we can smoothly get our conversion work started. If you have already owned the Pavtube Video Converter, just open the main interface and select the “Help” >>”Update” to upgrade/download to the latest version 4.8.2.0 for free. Then we can freely transfer our H.265 recordingsto Adobe Premiere Pro CC for editing on Windows 8.1/8.

Notes: Cinemartin Cinec---Import H.265 videos to Premiere Pro directly?


Another way you can take a reference to import H.265/HEVC videos to Adobe Premiere Pro CC is also allowed below. That’s the Cinemartin Cinec H.265 plug-in. However, it cannot be suitable for all operation systems on our computers. What’s more, it will trouble us a lot if we meet the crashing issues when importing our files in. 

More?

Monday, January 12, 2015

Encode Canon EOS 7D Mark II to Apple Aperture 3

Let me show you around this article if you have no ideas of encoding Canon EOS 7D Mark II MP4 files to Apple Aperture 3.

If you are a professional video editor or a camera lover, you must hear of the Canon EOS 7D Mark II camera, right? With advanced and stable capacity of photo dispose, is has a good reputation in our hearts. While for Apple Aperture 3, it is not strange if you don’t know much about this guy, including the 4K files too. As we will have a talk on how to encode Canon EOS 7D Mark II MP4 files to Apple Aperture 3 for a further editing, let’s learn the introduction of Apple Aperture 3 for a first step. 


Apple Aperture 3---It gives your photography the professional treatment it deserves, with more sophisticated tools to perfect your images and powerful ways to browse and choose your best shots. And now that Aperture is optimized for the Mac Book Pro with Retina display, it’s a whole new way to see everything. From MP4 to MPG, which we all think the best one to work with Apple Aperture 3, we need the MP4 to Aperture 3 converter for Mac to make it available. This assistant can smoothly make various video formats to the compatible one to those NELs.

Just show me the conversion ways?
According to the instructions to install the program in a nice way, normally, you can click the ‘Add video’ for each video clips or ‘Add from folder’ to get the complete one. Drag your files in is not a bad an idea too! Especially for Apple Aperture 3, we here recommend you the ‘Adobe Premiere Pro/Sony Vegas’ for ‘MPEG-2 (*.mpg)’ as the best output.


Extract/remove Video/audio files at your needs? Back to the main interface, could you see the pencil case ‘Editor’? In any ways, most people will get here to adjust what they want. In this way, some people also call the program as ‘Tiny Editor’


Finally, go back to the main interface to find the 'Convert' button to get started. With no problems when editing Canon EOS 7D Mark II to Apple Aperture 3 for nice editing, just enjoy yourselves!

Related:

Friday, January 9, 2015

Nicely Encode Sony F5/F55 XAVC to FCP X for Editing

What will you learn in this article? With the best solutions below, we can easily work Sony F5/F55 XAVC files with FCP X for a nice editing.


Overview: The following paper mainly gives us an introduction of Sony F5/F55 camera and offers us the best solutions to edit XAVC footage in Final Cut Pro X. In other words, just change the XAVC files into ProRes for FCP X. Would you have some interests on how to handle this job well? Come on!

If you are a professional video editor, I guess you must have similar experience of troubled in the incompatible formats with popular editing software, right? So today here these two main characters are Sony F5/F55 XAVC and FCP X. Such as related question XAVC to Premiere or AE has always troubled us for a long time. Let’s see how this paper offered us solutions to make them good friends with each other.

Q: How much do you know about the SonyF5/F55 camera and FCP X?
The F5 and F55 both give shooters plenty of options in resolution and formats, capturing HD, 2K, QFHD (3840×2160) and true 4K (4096×2160). Though with these attractive features, the XAVC footage it shot cannot be so compatible with some popular editors, FCP X is the typical one. 

Q: Find as assistant that can handle this work well.

To achieve the goal, Pavtube HD Video Converter for Mac is highly recommended here. (Windows version)The program is an easy-to-use yet professional Sony XAVC Converter for Mac. It’s able to convert XAVC files from Sony F5/F55 to Mac fully compatible format and keep original quality at the mean while.

Supported OS:
Mac OS X Yosemite(10.10), Mac OS X 10.9 Mavericks, 10.8 Mountain Lion, 10.7 Lion, Snow Leopard 10.6, Leopard 10.5

Successfully load your original files and choose the right output ones:
Install the program for a first step, with ‘Add video’ and ‘Add from folder’ you can load your videos smoothly. On the output list, just choose the ‘Final Cut Pro’>>’Apple ProRes Codec 422(*.mov)’ as the best one. The two measures we took above are the main steps we need to do during this conversion work.


Additionally for other advanced users, you can adjust our videos in the ‘Settings’ button. Adjust the video and audio parameters, including the Bitrate of Video&Audio, Video Size, Sample Rate, Frame Rate, Audio Channels, etc., by clicking the Settings button on the main interface for getting the best quality. If you want to convert 4K XAVC to 4K ProRes, just keep the original video size and bitrates.


Now is it time to start your conversion? Back to the main interface and tap the red button ‘Convert’ is okay. After the conversion, it is easy to import Sony F5/F55 XAVC videos to Final Cut Pro X for further editing. Related FCP X transferring steps are also offered here for those people who are the first time to work with FCP X.

More Topics:

Wednesday, January 7, 2015

Workflow: Sony a7 II XAVC S to Avid Media Composer on Mac OS X

If you got some troubles in editing Sony a7II XAVC S recordings in Avid Media Composer for further editing, here we can give you some suggestions.

You cannot get rid of the trouble when importing your XAVC S MP4 recordings to Avid Media Composer which shot from Sony a7 II camera?  If so, you may wish to read this post. It explains an easy job to convert Sony a7 II XAVC S video for editing in Avid with good quality. From XAVC S MP4 to DNxHD MOV, you are supposed to get a XAVC to Avid Converter that can do this work well.


Issues when importing Sony a7II XAVC files to Avid Media Composer?
”Hi, I’m trying to import video recordings from the new Sony a7 II to Avid MC6. The camera uses a flavor of MP4 that is called XAVC-S. I have tried the traditional importing method, but there’s no go. I have also tried the AMA plug-in created by Sony, unfortunately, it doesn’t seem to support Sony a7 II XAVC-S footage. Does that mean I have to use 3rd party software to convert formats? If so, does anyone know of a good XAVC-S Converter that is worth trying?’

Related Questions in NELs: Import MXF files in FCP XMTS files in DaVinci Resolve? Here you can take a close reference if you need.

Relationship between XAVC S files and NELs(Example: Avid MC)
Since the XAVC S footage is a peripheral non-standard format which is not supported by Avid Media Composer, Some other NELs are not suitable too, such as FCPSony Vegas etc.  In order to import Sony Alpha a7II XAVC S footage into FCP for smoothly editing, we can render to the famous third-party software Pavtube XAVC S to Avid MC Converter for Mac to help us to convert XAVC to DNxHD .mov. 

Tips: For those Windows users, Windows XAVC Converter is also allowed here. What I need to mention is with the upgraded version 4.8.2, this windows product can support the latest video codec H.265/HEVC well. Do you wanna a try?

Guide: How to convert XAVC S to DNxHD MOV for editing in Avid MC?
Step 1: Start up HD Video Converter as a professional Sony a7 II XAVC S MP4 Converter. When its main interface pops up, click ‘Add File’ to input your source media with individual clips or in a complete folder.


Step 2.Select suitable output for Avid
Convert Sony a7 II XAVC S MP4 files to DNxHD for Avid MC. From ‘Format’ bar on the main interface, just drop down the list and select ‘Avid Media Composer DNxHD (*.mov)’ as output format under ‘Avid Media Composer’ column.


Step 3. Optional function to customize video and audio settings
If necessary, you can click ‘Settings’ button and go to ‘Profiles Settings’ panel to modify video and audio settings like video encoder, resolution, video bit rate, frame rate, aspect ratio, audio encoder, sample rate, audio bit rate, and audio channels. 3D settings are also available.


Step 4. Then we are going to come to the final step, click the ‘Convert’ button on the main interface and start out job. If you are the first time to work XAVC files with this Avid MC, some related tips you can take a reference in this transferring article. What’s more, this third-party can hold almost all formats for editing in other popular editing tools, that’s why it has a good reputation online.

More guides:

Monday, January 5, 2015

H.265 Workflow: Encode Samsung NX1 4K H.265 Video to H.265/H.264 MP4

Looking for an easiest way of converting H.265 videos to H.265/H.264 MP4 for a further editing or playback on Windows? Let me show you around this article.


Meet the New Samsung NX1, a 4K Mirrorless Camera that Encodes to H.265
The past week has been replete with major camera announcements. However, Samsung, a relative newcomer in professional camera manufacturing, just announced the NX1, a mirror less camera that delivers many of the specs that we were hoping for from today's announcement of the Canon 7D MKII. Not only does the NX1 offer 4K recording at 24fps, UHD at 30fps, and 1080p at 60fps, but in the higher resolutions, it encodes using the new, highly-efficient h.265 codec, a first for a camera of this type.

Smoothly enjoy your Samsung NX1 4K H.265 recordings?

However, which is known to all that H.265/HEVC, the new codec which has not been accepted by most editing tools or media players, we are usually trapped in this H.265 workflow. So it is necessary for us to encode 4K H.265 to H.265/h.264 MP4 with the professional H.265 Video Converter, which produced by Pavtube studio and with therecent upgraded version 4.8.2, it can encode and decode H.265 files smoothly, is that cool?

P.S: Do you wanna learn how to encode your H.265 footage on Windows with FFmpeg Alternatives?

Overall, this H.265 Encoder can make us get closer to the H.265/HEVC codec. Yon will have no worries about the recordings from Samsung NX1 camcorder any more. For so many different kinds of formats you can choose as the output, such as MP4, AVI, WMV, MOV, etc, in this case, do you still worry about the editing or playing H.265 recordings? Moreover, here we can learn how to convert H.265 to H.264 MP4 step by step:

Guide on encoding Samsung NX1 4K H.265 Recordings to H.265/H.264 MP4:
Step 1. Add your NX1 4K H.265 Recordings
Launch the NX1 4K Movie Converter and click the “Add video” button to browse your computer hard disc and load the NX1 4K H.265 video files you want to convert to the software.


Step 2. Select your output format
Could you find the ‘Format’ bar on the left of the preview window? Open this icon and drop down the list, you can find the new items in ‘HD Video’ there. Here we can meet the different requirements, choose ‘H.265 HD Video (*.mp4)’ or ‘H.264 HD Video (*.mp4)’? Each one you can make a nice selection. 


Notes: Cause the H.265 codec can bring us the higher quality and smaller size, at the same time, if you choose the ‘H.265 MP4’ as the output format, I think you should wait for much more time of the conversion result.

Step 3(Optional)Video/Audi Settings:
To get the best video quality and sound effect, you are allowed to easily adjust video/audio parameters such as bitrate, sample rate, frame rate, codec, channels, etc after clicking on “Settings”.For example, if your raw video is 4K and there is not such high setting in the drop-down menu, the way to solve this is to type the resolution into the “Size” option manually. Just leave the original default is not a bad idea too.


Step 4: Start your conversion
Go back to the main interface and hit the ‘Convert’ button there, we can easily convert out H.265 files to H.265/H.264 MP4. Any suggestions or tips you can leave as comments below. Thanks for your reading!

Additional Tips: Until now, only the Windows products can support the H.265 codec files well. What’s more, If you have Nvidia CUDA/ATI AMD ready graphics card, you can have GPU encoding. Check the status of the CUDA/AMD button on the main interface of this upgraded H.265 Video Converter and you’ll learn if CUDA/AMD encoding is in use. Note you can only select the GPU Decode Acceleration when your files are output as baseline profile.

More posts:

Wednesday, December 31, 2014

Work MP4 Files with Adobe Premiere Pro, Premiere Elements, After Effects

Today in the following article, we are going to offer you the best solution to work MP4 videos with Adobe Premiere Pro, Premiere Elements and After Effects.

Summary: Facing the problems when importing MP4 videos to Adobe Premiere Pro, Premiere Elements and After Effects? Just go through a quick reading on the article below, here you will find an efficient way to fix the issues well.


As Adobe Editing studio is a digital motion graphics, visual effects and compositing app developed by Adobe Systems used in the post-production process of filmmaking and television production. The point here, you will find it a painful experience to import MP4 files to After Effects for movie editing. There're some frequently asked questions quoted as below. 

Questions: Why can’t I nicely work MP4 files with my Adobe editing programs, including the Premiere pro, Premiere Elements or After effects? Sometimes, only Audio plays without image there. It seems like that Adobe can support the MP4 files for editing from the news, it that true?

Answers: In fact, these are the common problems encountered by many AE users. Actually, After Effects like CS4, CS5, CS6, CC supports MP4 natively. However, MP4 codec is a final delivery codec it is not one you want to use for editing. Thus, there are many video, audio codec problems while importing MP4 video into After Effects for editing. Plus, even the Adobe program can ingest your MP4 files directly, it takes a long time for rendering. The best method to avoid those problems and save time is to convert MP4 to a more editing-friendly format, such as AE's MPEG-2 (the most compatible video format for AE). 

Best MP4 to Adobe Video Converter
---which you need to work the Adobe programs well:
To smoothly convert MP4 footage to Adobe Premiere, Elements or After Effects, we need some third-party tools to do a favor. After countless tests, I highly recommend Pavtube Video Converter to all of you which can help the users to encode any MP4 files to Adobe editing programs supported formats at super fast speed. 

Simple step by step guide you can take reference to convert MP4 to MPEG-2 for Adobe as follows:
Step 1.Load source MP4 files

Launch the MP4 video converter on Windows, click the ‘Add video’ or ‘Add from folder’ to let your MP4 recordings in. If you have already stored your files on your computer disk, why not drag them directly in?


Step 2. Suitable output for Adobe suggested here
In order to find the most suitable one for Adobe editing programs, in the searching box, you can tap the ‘MPEG-2’ to get the result. Or on the output list, we can drop the list to select the ‘Adobe Premiere pro/Sony Vegas’ >>’MPEG-2 (*mpg)”in another way.


Step 3. Optional functions you may be interested:
Besides the ‘Settings’ and ‘Edit’ we are all familiar with, today here are going to introduce the ‘Options’ button the main interface, you have my words you won’t be disappointed with it. Just enjoy yourselves.


For a final step, go back to the main interface to tap the red big button ‘Convert’ to finish the work? To transfer the files into Adobe, just according to the common instructions. Any more questions? Welcome to leave them as comments below.

Tips: With the recent upgraded version 4.8.2.0 of this video converter, it can support theH.265 encode and decode, so if you get the needs, why not download or update it to have a try?

Others?

Read More:

MP4 to VirtualDub
Best solution for solving “MP4 to Premiere Pro CC 2017” issue
Import MP4 to Final Cut Pro/Export FCP to MP4
Transcode MP4 to Sony Vegas Pro friendly format for editing
Problems when importing MP4 files into WMM
No Audio Channels - Import Sony A7s MP4 to Resolve 10/11
How to Put MP4 Footage into Avid Media Composer?
Workflow on MPEG-4/H.264 Footage to Final Cut Pro X
Top 5 Free MP4 Video Converter Review

Sunday, December 28, 2014

Surprise for Pavtube Upgraded Windows Products! H.265/HEVC or XVAC Codec Supported!

Pavtube Studio has upgraded their all Windows products to the newest versions which can support the H.265/HEVC or XAVC codec videos.


Good news for everybody! Thanks to the Pavtube Studio, we can realize our hope to enjoy the super high quality videos encoded by H.265 or HEVC. During this 2014 Christmas holidays, it is indeed a big Christmas gift for everyone who loves shooting high definition videos, right? Let’s find more details about this great job!

Tips: Development and prospect of Pavtube Studio---News for Upgraded H.265/HEVC Converter!

Main new features we may be interested in:
1. H.265/HEVC encode supported
2.H.265/HEVC decode supported
3.Support MXF in XAVC Video Codec
4.Add H.264 baseline/main/high output profiles

What Windows products are upgraded well?
For videos:
Pavtube HD Video Converter
Pavtube Video Converter
Pavtube MXF Converter
Pavtube MXF MultiMixer
Pavtube MTS/M2TS Converter

For DVD and Blu-ray:
Pavtube BDMagic
Pavtube ByteCopy
Pavtube DVDAid

Both for Videos and DVD/Blu-ray:
Pavtube Video Converter Ultimate

What is HEVC(H.265)? 

High Efficiency Video Coding (HEVC) is the latest generation video compression standard. This standard was developed by the ISO/IEC Moving Picture Experts Group (MPEG) and ITU-T Video Coding Experts Group (VCEG), through their Joint Collaborative Team on Video Coding (JCT-VC)
HEVC is also known as ISO/IEC 23008-2 MPEG-H Part 2 and ITU-T H.265

HEVC provides superior video quality and up to twice the data compression as the previous standard (H.264/MPEG-4 AVC)
HEVC can support 8K Ultra High Definition video, with a picture size up to 8192×4320 pixels

The benefits of H.265
H.264 has been a huge success. It’s a flexible codec standard that’s used by streaming services, satellite providers, and for Blu-ray discs. It’s scaled remarkably well since it was first proposed and is capable of handling 3D, 48-60 fps encodes, and even 4K. The Blu-ray disc standard doesn’t currently include provisions for some of these technologies, but the H.264 codec itself is capable of handling them.

The problem with H.264, however, is that while it can handle these types of encodes, it can’t do so while simultaneously keeping file sizes low. A new standard is necessary to push file/stream sizes back down while driving next-generation adoption, and that’s where H.265 comes in. It’s designed to utilize substantially less bandwidth thanks to advanced encoding techniques and a more sophisticated encode/decode model.

With the popularity of H.265(HEVC) and XAVC, more and more users are fond of enjoying this high resolution videos. So in this way, Pavtube Studio has offered us an efficient way when meeting troubles in editing incompatible H.265 videos in NELs or play on media players. Pavtube products I think that can do you a big favor.

Official website: http://www.pavtube.com/
Source From: http://digisns.com

More guides: