Monday, April 7, 2014

Convert and Transfer Argo 47 Ronin Blu-ray movies to Galaxy NotePro 12.2 for playing

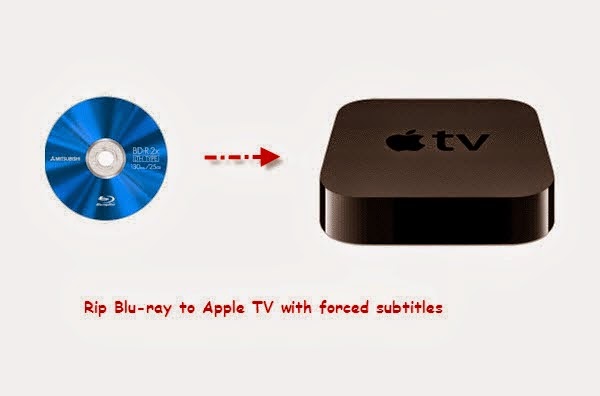
Summary: This gudie will show you the simple guide on how to rip Blu-ray movie to Samsung Galaxy NotePro so that you enjoy the new released 47 Ronin Blu-ray disc with your Galaxy NotePro 12.2 anytime and anywhere.

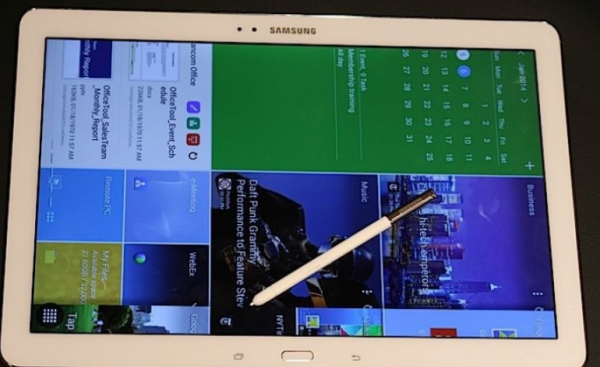
Available in the U.S. for a while, the Galaxy NotePRO 12.2 has officially been released in Canada for $769.99. With this size and price it is aimed directly at the professional market, where Samsung would love to make some inroads against the iPad. The 12.2-inch display is 2560 x 1600 resolution (247ppi), powered by the eight-core Exynos 5 Octa processor with 3GB of RAM and 32GB of internal storage. So Galaxy NotePRO 12.2 became an amazing video player to enjoy high definition Blu-ray movies.


However, Galaxy NotePRO 12.2 can not read Blu-ray disk. Then can I import 47 Ronin the new released 2D/3D Blu-ray movie at April 1, 2014 to Galaxy NotePRO 12.2? Of course yes. For watching 47 Ronin Blu-rays on Galaxy NotePro 12.2 without any problem, you need to rip Blu-ray to Galaxy NotePro 12.2 supported video format, such as HD MP4 before trasferring.

In that case, a professional powerful ripping program will help you a lot. Pavtube Blu-ray to Galaxy Converter is such a tool with the easiest workflow to help you rip off Blu-ray disc/ISO/folder protection, then convert the decrypted movie to MP4 format with best video settings for Galaxy NotePro 12.2. Get Blu-ray to Galaxy Converter for Mac here; well support Mac Mavericks!

Tutorials: How to transfer 47 Ronin Blu-ray to Galaxy NotePro 12.2?

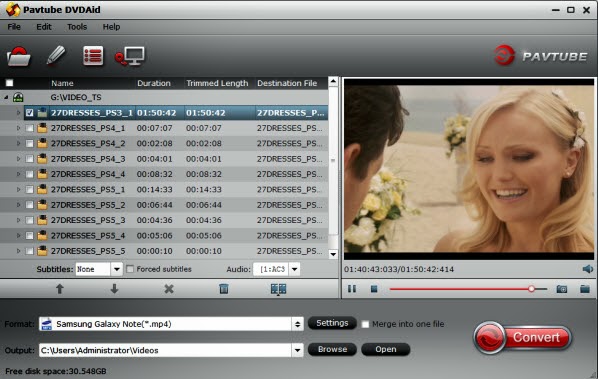
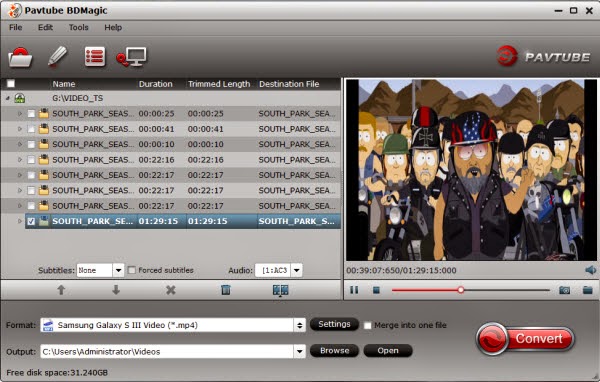
Step 1. Download it, Run Blu-ray to Galaxy Converter; load Blu-ray.

This converter does not only support Blu-ray disc/folder/ISO, but also able to convert DVD disc/folder/ISO/IFO files. Your ISO image file would be recognized automatically so there's no need to run virtual drive to mount it any more.


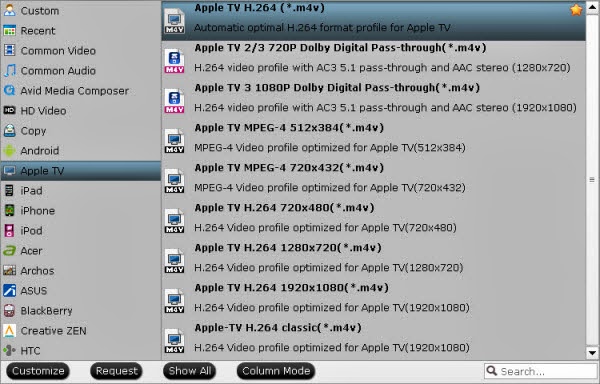
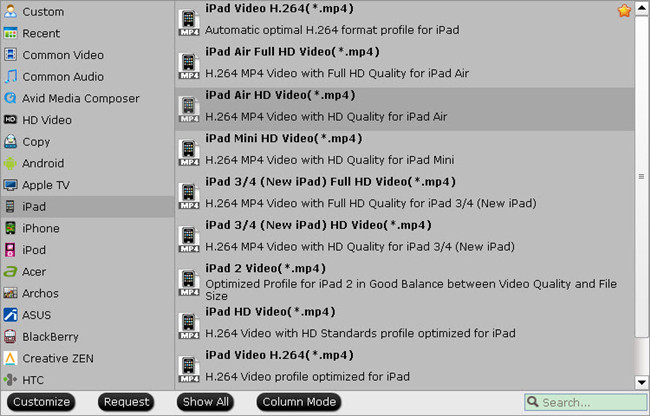
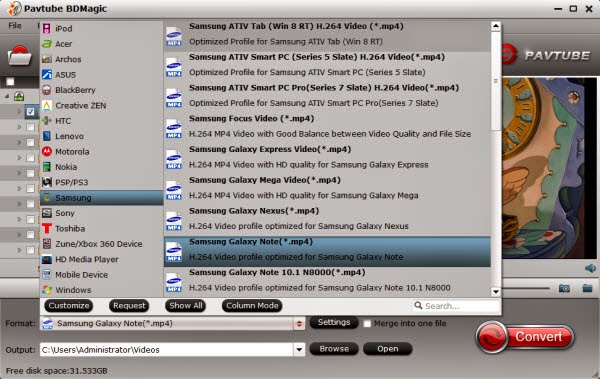
Step 2. Choose Format.

Click the drop-down list besides "Format" list, you can find many presets and columns for different devices and programs. Let's switch to "Samsung" column and select "Samsung Galaxy Note(*.mp4)" as the best preset for Galaxy NotePro 12.2. Or you can enter "Galaxy Note" in the small search box at bottom right corner.


Step 3. Adjust specs or edit video before conversion (Optional).

If you want to customize output video size, bitrate, frame rate and others, just click "Settings" to enter profiles settings window.

And you can click the pencil-like icon on the top to crop, trim, edit audio/subtitles/ or add watermarks before conversion.

Step 4. Start conversion.

Now hit the big red "Convert" to start converting 47 Ronin Blu-ray movies to Galaxy NotePro 12.2 MP4 with best settings for playback.

After the conversion, you can get the converted videos in .mp4 format by tapping the Open button.

How to sync the converted video to Galaxy NotePro via Kies?

Related articles

Thursday, April 3, 2014

Rip your Blu-ray collection for Apple TV with forced subtitles

Want to make Blu-ray portable on Apple devices with preserving forced subtitles? This article mainly introduces the way to put Blu-ray on Apple TV with forced subtitles.


We like surfing, email, ebay, remote work, reading, watching movies on our IOS devices iPad2, iPad3, iPad mini, and also on Apple TV. Now I have Blu-Ray which I wanted to view via my AppleTV and store on my media drives. I hope to be able to set Forced subtitles, and write directly out to Apple TV format. Is there any way? 


Indeed, you can not play Blu-rays directly on your Apple devices like Apple TV. To make Blu-ray portable with Apple TV, the answer is to rip Blu-ray to Apple TV compatible videos so you can transfer them for smoothly playback.

What's more, some Blu-ray contains the unknown language like Avatar and you cannot understand it without subtitles. So how to keep the subtitles for full Blu-ray enjoyment on Apple TV?

In this case, Pavtube BDMagic is the ideal software to you. It will help to rip and convert Blu-ray to Apple TV friendly MP4 format with fast speed and high video quality. Moreover, you can choose the desired subtitle for output and select forced subtitles for some unknown languages. Now let's go to learn how to do it.


How to convert Blu-ray to for Apple TV with forced subtitles?

Get your Blu-ray drive ready and insert Blu-ray you need to the drive. And keep networked when ripping Blu-ray.

Tips: If you are running on Mac, please try BDMagic for Mac.

Step 1. Load Blu-ray to Blu-ray to Apple TV Converter.

Run the best Blu-ray to Apple TV Converter, click "Load file" button to select the inserted Blu-ray and import it for transferring to iTunes. It will take only few seconds to rip Blu-ray. Then the software will recognize the actual main title of Blu-ray and pick it automatically. You do not need to look for the main title manually.

Press the selected main title you can preview the whole Blu-ray movies on the preview window on the right, which works like a media player.


Step 2. Check forced subtitles for output.

Because Blu-ray always contains multiple subtitle and audio tracks, you can go to choose the desired subtitle and audio on the interface for output.

Beside subtitles option, "Forced subtitle" is optional and uncheck by default. Go to check "Forced subtitles" for output. Take note that it will output forced subtitles only if it is checked.

Step 3. Choose Apple TV compatible format.

Choose "Format" dropdown list and go to "Apple TV" options to find "Apple TV H.264 (*.m4v)". This format is best for playing on Apple TV.


Tips: For some advances users, you can go to adjust video and audio parameters like bitrate, resolution, channels, etc. Click "Settings" button you can go to check and change them as you like.

Step 4. Convert Blu-ray to Apple TV.

Before conversion you can go to "Browse" your computer to find the folder for output files. Then click "Convert" button to get Blu-ray to Apple TV conversion started. After a while, you can find the generated file for Apple TV quickly via "Open" button. In this way, you can enjoy your favorite Blu-ray with forced subtitles on your Apple TV wherever you are.

Related articles:

Mac Tivo to ATV solutions- Play commercial-free Tivo recording on Apple TV
Get Blu-ray movies to Apple TV 3 for watching on Mac
Sync DVD ISO/IFO images to Apple TV 3, Apple TV 2 and Apple TV

Wednesday, April 2, 2014

Mac Tivo to ATV solutions- Play commercial-free Tivo recording on Apple TV

Description: Best Tivo to ATV solutions on Mac, this guide show you how to trim out commercials in your EyeTV Tivo recordings, and convert to best M4V file for your Apple TV on Mac.

"I just got EyeTV and recorded some *.tivo recordings when I'm out of town. It works great but I'm wondering how can I remove all the commercials inside? Can I get a pure video file to be streamed to Apple TV at home? If yes, how can I do that?"

Elgato's EyeTV is Mac OS X software that provides a user interface to the various TV Tuners from Elgato and some licensees. It is bundled with TV Tuner products sold by Elgato and is offered separately as well. Its main function as a PVR is to show the Tuner's received TV programs on the computer screen. It can show live programs and also offers Time shifting. It can record programs permanently to disk, by pre-programming.

However, the recorded TiVo files usually are not compatible with most media players, TVs we adopt. Thus, if you want to get a pure tivo recording to ATV, it's advisable to trim out ads firstly, and then convert TiVo files to H.264 M4V format for better preservation or sharing with family and friends.

Solution 1. Comskip

Comskip is a free mpeg commercial detector. It is a windows console application that reads a mpeg file and analyses the content based on a large amount of configurable parameters. After analysis it generates a file in various possible formats containing the location of the commercials inside the mpeg file.

Here is a thorough thread of how to use Comskip to remove commercials in your Tivo recordings, then stream it to ATV via iTunes after it's done. Although this software is free and open source, you will need to donate $10 via PayPal or more to pay for the Comskip site

Shortcoming:

Comskip is a console window program. This means it does not have a nice windows user interface. As it's not completely compatible with your OS, you may need to run Comskip manually which can be confusing for many users.

Solution 2. Pavtube iMedia Converter for Mac

It's not a free software but not overpriced. Comparatively it has a better (simple and straight) interface which allows users trim out commercials freely on their own.

This makes tv viewing a lot more pleasurable and efficient, and is especially helpful controlling advertiser access to children.

Download a free trial here.


Step 1. Enter Tivo key and import Tivo files.

Launch Pavtube iMedia Converter for Mac, click "Option" icon and switch to Tivo tab, submit your tivo key firstly.


Now drag and drop your tivo recordings to it directly. Or you can click the top left two icons to load single Tivo file or the entire folder from local path.

Step 2. Trim out commercials.

Click this edit icon on top:


Then you enter the Video Editor.

Check the "Trim" tab, enter the start and edit time manually, or you can drag the small point on progress bar.

There're are two small icons to let you adjust frame by frame.


Don't forget to click "Ok" to confirm the change.

Step 3. Choose format and star conversion.

Click the "Format" list and choose preset according to your ATV model. As I'm using Apple TV 2 also want surround sound, I chose Apple TV 2/3 720P Dolby Digital Pass-through(*.m4v).

Back to main UI, click the big red "Convert" to start converting commercial-free Tivo recording to Apple TV format.

After conversion, click "Open output folder" and you can find the converted video easily.

Related articles:

Mac solution: Get Blu-ray movies to Apple TV 3 for wathing
Sync DVD ISO/IFO images to Apple TV 3, Apple TV 2 and Apple TV
Ripping Blu-Ray on iMac and Stream 1080p on Apple TV 3 with Dolby 5.1 Sound 

Tuesday, April 1, 2014

DVD to iPad Air : Copy/Transfer DVD Movies For Playback on iPad Air

This simple tutorial mainly shows you how to convert and rip DVDs to iPad Air supported video formats so that you can play DVD movies on Apple iPad Air anytime, anywhere. 

Apple finally released the fifth-generation tablet iPad Air alongside the iPad Mini 2 with Retian Display on October 22, 2013, just weeks after the sensational iPhone 5S and iPhone 5C launch event. This time iPad Air is slimmer and narrower than its brothers, while remaining the existing 9.7-inch screen size. With that in mind, it is tempting to get this glamorous gadget for watching DVD movies and videos on its HD retina display.


However, iPad Air doesn't have a built-in DVD-ROM or DVD player. If you have some DVD movie collections and want to enjoy DVD movies on the iPad Air, you need to convert DVD to iPad Air accepted videos on computer as your first move along with some help from third-party softwares. To help those who wanna get DVD movies off of DVDs and onto iPad Air for playback, below, I would throw a quick tutorial up.

As mentioned above, in order to download and put DVD movies to iPad Air, we need use a 3rd-party tool to rip DVD movies to iPad Air compatible video formats such as MP4, AVI etc. DVD Ripping software varies. You may confused about choosing a suitable tool. If so, I recommend you try Pavtube DVD to iPad Air Converter (Alternative Mac version of DVD to iPad Air Converter). It is easy to use for editing and conversion and makes great quality copies of my DVDs.

To be honest, Pavtube DVD Ripper can help you rip and convert all the DVD discs even DVD ISO/IFO image files. Besides, the audio/video synchronization is very good, the size of the subtitles too. If you have any requirements of outputting 3D (Anaglyph, T/P, SBS) or keeping multiple audio tracks/subtitles, you are suggested to try this Blu-ray/DVD to iPad Air Converter Pro. Below is how.

A Simple guide: How to convert DVD movies to iPad Air compatible video formats

Note: The quick start guide below uses DVD Ripper Windows screenshots. The way to rip DVD movies to iPad Air on Mac is almost the same. Just make sure you get the right version according to your computer operating system.

1. Run this Pavtube DVD Ripper as the best DVD to iPad Air Converter; load disc.

Click the top left icon, you can choose to import DVD from ROM, DVD folder or DVD ISO/IFO. It will check the main title by default; moreover, ISO files could also be recognized automatically so that you no longer need to run virtual drive to mount it.


2. Choose format.

Click "Format" drop-down list and choose "iPad>iPad Air Full HD Video(*.mp4)" as the compatible MP4 preset with best video quality. Or you can choose other presets if you don't need full size videos. To get the customized profile, you'll need to download a patch here;


3. Start Conversion.

You can hit the big red "Convert" to start converting DVD to iPad Air MP4 with best video settings. After the conversion, click "Open output folder" in the conversion window, or "Open" in main interface to quick locate the converted video.

After getting the converted movies files, you can transfer them to new iPad Air via iTunes. If you don't know how to put and play movie onto new iPad Air , just follow the steps to realize it:

1) Make sure you have install iTunes. If not, you can free download iTunes here at first. And launch the iTunes.

2) Connect iPad Air to Mac/PC.

3) Choose "File –> Add File to Library…"

4) Drag the .mp4 file you want to the iPad Air icon

So there you have it. Prette simple. Now, you can enjoy and view DVD movies on iPad Air anytime everywhere for great digital fun.

Additonal Tips:

If your movie isn't already in one of the iPad Air supported formats or it's still on a DVD or a Blu-ray, you can get the Video Converter Ultimate or the iMedia Converter Mac) which can help you convert Blu-ray/DVD/ISO/IFO and various formats of 720p/1080p HD videos in MKV, AVI, TiVo, VOB, MPG, MTS, etc. to your iPad Air, iPhone 5C, iPhone 5S, iPad 3, iPod 5, Apple TV 3 and other iOS/Android/Windows 8 tablets/phones for smoothly playing. (

Read More:

Wednesday, March 26, 2014

Backup your Blu-ray/DVD video to Media Player Classic for watching in full screen

Description: This article will give you the solution to backup your Blu-ray/DVD video to watching on Media Player Classic for watching in full screen with unlocking the aspect ration.

I'm a Blu-ray and DVD fan and collector,now I wanna share my experience here for viewing BD/DVD on MPC Player. As I like watching movies, so I need to backup my precious discs then watch most of my Blu ray films in full screen. Then I'm looking for a way converting my dvd/bluray movies to a file format that unlocks the aspect ration so that I can use Media Player Classic to watch them in full screen glory. And I'm wondering if any converter can do this.


To transfer Blu-ray/DVD to play on my Media Player Classic, I think the first step is to remove commercial Blu-ray discs and DVDs protection from film studio, and then do the conversion. After googling several review sites, I have found this Pavtube BDMagic which does a great job in quick decrypting the protected discs within a few clicks.

Not so much the feature that made me choose over other brand but I read reviews to see which one got better ratings. However, the feature that I stated in number one was paramount. Took some experimenting to find the best format for my needs, I find MKV HD is the best format for outputting. In this way, I can freely watch my favorite on my MPC Player in full screen. Also, I can convert Blu-ray/DVD onto my two iPhone and Samsung Galaxy for watching films with it.


You are free to try free trial version (Pavtube BDMagic for Mac is for Mac users).

Now let me show you how to backup Blu-ray/DVD to Media Player Classic for watching in full screen with unlocking the aspect ration.

Note: A blu-ray drive is needed before Blu-ray conversion.

1. Import Blu-ray/DVD to Pavtube BDMagic.

Click "Load file" icon on the top left to load the Blu-ray/DVD disc.


2. Choose MKV HD format for playing on Media Player Classic.

Under "Format" menu, there are lots of video formats. Go to find "HD Video" option and choose "MKV HD Video (*.mkv)", I find it is the best format for playing in Media Player Classic after severial trials.

Tips: If you want to convert Blu-ray to other video formats or portable devices, just choose the video format you need or select portable devices in the dropdown list.

3. Adjust video specs or change aspect ratio (Optional)

If you are not satisfied with default specs, then click “Settings” to enter Profiles Settings windows; here you can customize video frame rate, bitrate,size and other settings freely.

Note: If you want to trim, crop, editaudio/subtitles or adjust aspect ratio, click the pencil-like icon and switchto “Crop” tab. Choose Advanced mode, lock the “Keep Ratio” and you can free change aspect ratio. Usually it will be set to “Original”, you can change it to 16:9 when playing on TV, or select other options.

4. Start conversion.

Click big "Convert" button to start conversion. It won't take much time for conversion and then you will get MKV HD once completed. Hit "Open" button you will go to location of generated files.

Then go to fully enjoy your favorite Blu-ray/DVD whenever you wanna on Media Player Classic in full screen glory.

Main features in BDMagic:

* Full Disc Copy can 1:1 backup the whole Blu-ray/DVD disc with original structure including chapter markers.

* Directly Copy will backup 100% intact Blu-ray main movie with all the multiple tracks excluding menu.

* Rip and Convert latest Blu-ray/DVD to various video formats for playback or editing, edit the video before conversion including trim, crop, effect, etc, add *sst and *ass subtitle into video part and so on.

Read more:

Ripping my DVDs to MP4s for viewing on my Android
Top Blu-ray Ripper- Convert Blu-ray to MP4 format
Rip my Blu-rays to Plex Media Server for streaming

Monday, March 24, 2014

No way to Rip Schwarzenegger Blu-ray Collection? ByteCopy Help you!

Description: Look no further when coping or ripping Schwarzenegger Blu-ray Collection? Here is a brief guide to help you to freely watch Schwarzenegger Blu-ray movies with perfect video/audio sync and best quality.

Arnold Schwarzenegger is an Austrian/American actor, politician and businessman who started his career out as a weight-lifter. Born July 30, 1947 in Thal, Styria, Austria, Schwarzenegger with a keen interest in physical fitness and seemingly indomitable drive, parlayed his notoriety as a five-time Mr. Universe and seven-time Mr. Olympia champion to turn himself into a Hollywood movie star and public personality.

Arnold Schwarzenegger is known for:


The Terminator (1984): A human-looking indestructible cyborg is sent from 2029 to 1984 to assassinate a waitress, whose unborn son will lead humanity in a war against the machines, while a soldier from that war is sent to protect her at all costs.

Predator (1987): A team of commandos, on a mission in a Central American jungle, find themselves hunted by an extra-terrestrial warrior.

Total Recall (1990): When a man goes for virtual vacation memories of the planet Mars, an unexpected and harrowing series of events forces him to go to the planet for real, or does he?

True Lies (1994): Harry Tasker is a secret agent for the United States Government. For years, he has kept his job from his wife, but is forced to reveal his identity and try to stop nuclear terrorists when he and his wife are kidnapped by the terrorists.

If you are keen to collect the hot Schwarzenegger Blu-ray Collection, but it’s not easy to get these Blu-ray movies playback on your PC or portable devices without external Blu-ray drive and Blu-ray player. Also frequent watching Schwarzenegger Blu-rays will make your discs easy to be scratched.

So how can we watch Schwarzenegger Blu-ray movies without limitation? What’s the best format to convert to? Can we finish all the tasks with one go?

Here Pavtube ByteCopy is recommended. It will help you to remove the copyright protection of the disc and convert to whatever videos you want. With it, you can enjoy your favorite Blu-ray movies at any time and safe the original discs from being ruined at the same time. And it will provide you various ways to backup of the Schwarzenegger Blu-ray discs, just choose the one you like most.

First of all, free download Windows version (Bytecopy for Mac is for Mac users) and run the software to learn how to copy Schwarzenegger Blu-ray disc in three ways.

Step 1. Import Blu-ray discs to Pavtube ByteCopy.

Run the best Blu-ray backup software, click "Load files" icon to load the Blu-ray discs. After successful 100% load, click the select main title you are able to preview the whole movie in the preview window, which works just like a media player.

Note: When loading discs, please make sure your computer is networked and Blu-ray disc drive is installed properly.


Step 2. Different ways for copying Schwarzenegger Blu-ray disc to avoid scratched by children.

Here I will show you three different ways of lossless backup Schwarzenegger Blu-ray disc:

Method 1. Full disc copy: 1:1 backup the entire disc with original structure and chapter marks

If you want to copy a Schwarzenegger Blu-ray discs for further playback with keep the original structure of disc, that is what exactly "Full disc copy" can do for you.

Click "Copy the entire disc" icon on the interface and you are brought to conversion progress immediately. After conversion, go to "Open output folder" you will get a generated folder combined with two folders: "BDMV" and "CERTIFICATE". All the M2TS files are located in BDMV folder.


Method 2. Directly Copy: 100% backup the intact main movie of Schwarzenegger Blu-ray discs

If you just want to copy the main movie for playback without the menu and promotional clips etc, "Directly Copy", which will takes less time for conversion and occupies less space than Full disc copy, is right for you.

Click "Format" menu and go to "Copy" option, choose "Directly Copy" for output format.

Then click "Convert" button to start conversion. Once finished, you will get a converted file in M2TS format for Schwarzenegger Blu-ray disc.

Read more detailed steps: Lossless backup Blu-ray main movie in original format

Method 3. Lossless Multi-track MKV: lossless backup Schwarzenegger Blu-ray to MKV with multitracks preservation.

If you want to convert to MKV files without quality loss and preserve all multiple audio and subtitle tracks from original Schwarzenegger Blu-ray disc, or want to select some audio and subtitle tracks you need for output, Lossless Multi-track MKV is perfect. And chapter mark is preserved in MKV files. In this way, you can select any audio and subtitle track and chapter mark you want when playing it in media player.

Go to find "Multi-track Video" option under "Format" dropdown list, then choose "Lossless/encoded Multi-track MKV (*.mkv)" for output.

Then click "Convert" button to start and definitely you will get a MKV file with multiple tracks.

Read more detailed steps: Keep multiple audio and subtitle streams when backing up Blu-ray Disc to MKV/MP4/MOV

Note 1: If you want to remove the unnecessary audio or subtitle track to shrink the output MKV files, you can go to click "Settings" button to uncheck what you do not need. What’s more, do not check "Encode" for the output MKV if you wanna a lossless file.


Note 2: Not all media player can support to play multi-track videos, so you can try powerful VLCPlayer to play output multi-track MKV files with chapter mark. And the generated folder made by "Full disc copy" also can be played with them.

Every time when the conversion is finished, "Open" button on the main interface will help you to locate the generated files. If you try to copy one Schwarzenegger Blu-ray disc in different ways, you do not need to worry about that the previous one will be covered because of the same file name. In this case, the software will automatically add number 1, 2, 3… in the end of file name because of built-in setting of renamed the same file name.

Above all, you can choose any way of them to copy your Schwarzenegger Blu-ray disc without quality loss and then share them with your family or friends.

More features:

However, what ByteCopy can do for you is more than it. It can support adding srt, ass, ssa subtitles and converting Blu-ray disc to various formats for many popular devices, like MP4/MOV with multi-track audios, M4V, AVI, WMV, MPG, M2TS, etc for playback on iOS/Android/Windows Tablets/Phones, HD Media Players (WDTV), editing software including Avid Media Composer, Adobe Premiere, etc, and more. So it is also a good helper for you to easily enjoy Schwarzenegger Blu-ray disc when out of home or edit it.

View Pavtube Special Offer page to get more Money-saving Tips:

ByteCopy($42) + Video Converter Ultimate($65) = Only $79.9, Save $27.1 
ByteCopy($42) + DVD Creater($35) = Only $44.9, Save $32.1 
ByteCopy($42) + Vidpie($29) = Only $54.9, Save $16.1 
ByteCopy($42) + MXF MultiMixer($45) = Only $69.9, Save $16.1 

Related articles:
Backup Arnold Schwarzenegger Blu-ray Movies to PC/Mac
Copy Arnold Schwarzenegger DVD Collections to hard drive for watching in future
Rip/Copy Stallone Blu-ray Collection to Mac/Tablet/Phone/HD Media Players for playing

Saturday, March 22, 2014

[HOT] Get Pavtube ByteCopy Giveaway worth $42 For free

Giveaway!!!! Giveaway!!!! Giveaway!!!!

Hi, Friend! I'm so excited to tell you the amazing news that we are going to have a giveway of Pavtube ByteCopy for Windows or Mac at 0:00 on March 23th, 2014, U.S.A. California Los Angeles time. This is only a 24 hours giveway which is providing the great and strong BD/DVD multi-track tool totally the same as Pavtube official (42usd) retail version; no time limit, no watermarks. 

Key features for Pavtube ByteCopy (Windows/Mac) are as below:


  • Backup BD/DVD to MKV without quality loss (keep 1080p quality at 16:9 aspect ratio). 
  • Convert/rip/shrink/copy latest Blu-ray/DVD movies for Android/iOS/Windows device, editing program, HD player, game console, etc. 
  • Allow full preservation of all audio tracks, subtitles and chapter markers. 
  • Remove unwanted subs streams and audio tracks 
  • Preserve soundtracks and subs in multiple languages, e.g. English, Spanish, French, Deutsch… 

The giveaway page is here:

ByteCopy (Windows) giveaway:

http://giveaway.glarysoft.com/pavtubebytecopyv1.0-728/

ByteCopy (Mac) giveaway:

http://giveaway.glarysoft.com/pavtubebytecopyv1.0(formac)-729/

Note: The giveaway version may not be updated in the future.

How to get the giveaway?

The way to get licence is very easy and convenient. Just visit the Glarysoft Giveaway page and click download now when the giveaway start to get fully licensed software for free. Only available on 23th, please don't miss this chance.

Hurry Up!

Got it? Great! I know you're gonna like the software but you can click the thumb to praise and say “Thanks” by tweeting this link and sharing on Facebook. By doing this, you're giving your friends a $42 dollar gift and you're supporting us to host more giveaways! Come on, sharing only takes about 5 seconds.

More featured titles:

Blu-ray Ripper is capable of 1:1 copying BD/DVD Disc content to local computer or external hard drive in original file structure with all subtitle tracks and audio streams preserved. Pavtube Blu-ray Ripper also supports backing up only movie content without extras to save time and storage space. At the same time, it rips/converts 3D Blu-ray discs, 2D Blu-ray discs, and standard DVDs to your desired HD and SD media formats.

Pavtube DVD Ripper provides movie lovers, children and people in any group with the easiest and fastest way to backup and rip DVD movies. It rips and converts DVD movies to MP4/AVI/MKV/WMV and many other video and audio formats with high quality. It lets you enjoy DVD movies on any portable device like iPhone 5, Galaxy S4, Lumia 920, PS4, Xperia Z, Surface, etc.

Pavtube Video Converter Ultimate provides 1:1 backup Blu-ray/DVD movies from disc to PC hard drive for disc burning and ISO image creating. It converts Blu-ray, DVD and video to MP4/AVI/MKV/WMV any popular video and audio formats. Besides, it allows for video editing tools including trimming, cropping, splitting, attaching srt/ass/ssa subtitles and special effects to add more fun when watching movies and videos.

More step-by-step guides can be found here:

Bytecopy windows guides: http://www.multipelife.com/bytecopy/tips
ByteCopy for Mac guides: http://www.multipelife.com/bytecopy-mac/tips

Source: Pavtube ByteCopy for Mac v1.0 Giveaway [Save 42$]