Thursday, October 17, 2013

Rip Blu-ray and DVD movies to Kindle Fire HD 8.9 for watching with best video quality

Have you ever thought of copying some of your Blu-ray titles onto the 8.9-inch Kindle Fire to make full use of 1920x1200 8.9" HD display? Like many other tablets, Kindle Fire HD 8.9 does not deliver native support for Blu-ray/DVD movies, so if you have the intension to watch Blu-ray or DVD movies on it, you need to convert the Blu-ray movie into a format compatible with your Kindle Fire HD 8.9 in advance.

Q1: How to convert DVD movies to Kindle Fire HD 8.9?

"I am taking a chance that perhaps someone can give me some feedback I am having with. When I convert my favorites Blu-ray and DVD movies to Kindle Fire HD compatible video format, here is my confusion, which one should I save to? Could you give me some advice?"

A1: From Kindle Fire HD official website we know that Kindle Fire HD video format supported are: MP4, 3GP, VP8(.webm), and my suggestion is H.264 MP4 since this is popular video type that you could play on many other portable devices and your local computer. If you have trouble with detailed operation, check this webpage, it tells you exactly how to convert DVD movies to your Kindle Fire HD 8.9.

Q2: How to put Blu Ray Dvds to Kindle Fire HD?

"I'd like to transfer my Blu Ray Dvds to my Kindle Fire HD 8.9. However, while I have had no problems with the original disks, the files play fine on my device, but everything I converted has the same error message: "video cannot be played". What is the problem?"

A2: First of all, check the transferred file location, you need put them to Gallery app directory and your tablet can find them and play well; and remember Android systems compatible Memory cards have a limit of 4GB per file because of the FAT32 file system, including Kindle Fire HD. 720p and 1080p movies today can be up to 10GB, and that's definitely will not transfer to the MircroSd card. So you need re-encode and downsize the file;
or if don't wanna re-encode and lose video quality, use Pavtube Blu-ray Ripper to rip your BD/DVD disks again, but this time, use its Split feature. Don't how-to? 

Don't worry, I find a guide page can help. 

The best way to get over 4GB file size limitation for Android Devices

According my experience, H.264 MP4 format is the best format for Kindle Fire HD 8.9. You'd better get a Top Blu-ray DVD Ripper software. After convert the movies to h.264 mp4, just transfer the generated videos to your Fire HD 8.9. 

Guide: How to Rip Blu-ray and DVD Movies to MP4 for Kindle Fire HD 8.9?

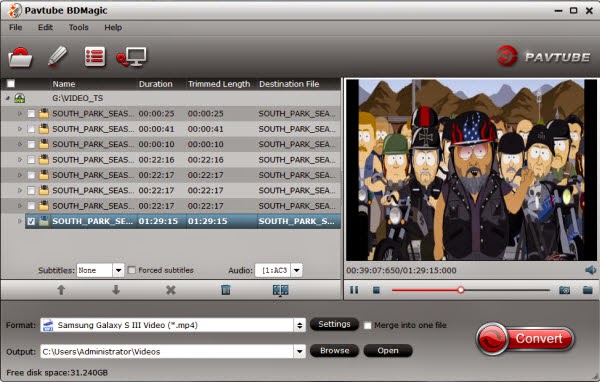
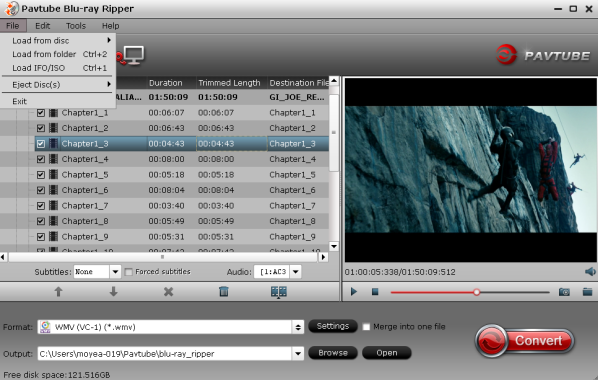
Step 1. Load Blu-ray/DVD movies.

Install and launch the best Blu-ray/DVD to Kindle Fire HD converter.

Note: An external Blu-ray drive is required for ripping Blu-ray/DVD disc.

Load Blu-ray Disc, DVD or ISO image to the Kindle Fire HD 8.9 movie Converter with one click.


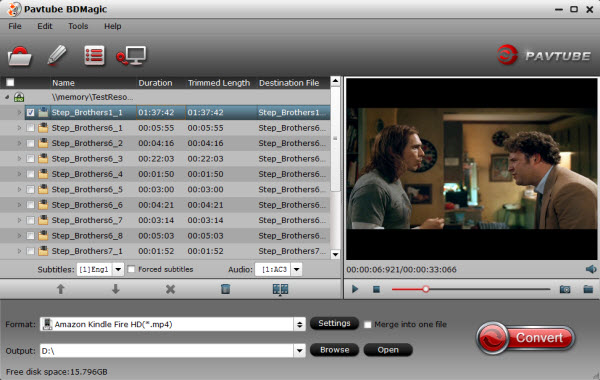
Step 2. Select preferred language from drop-down list of "Subtitles" and "Audio" box.

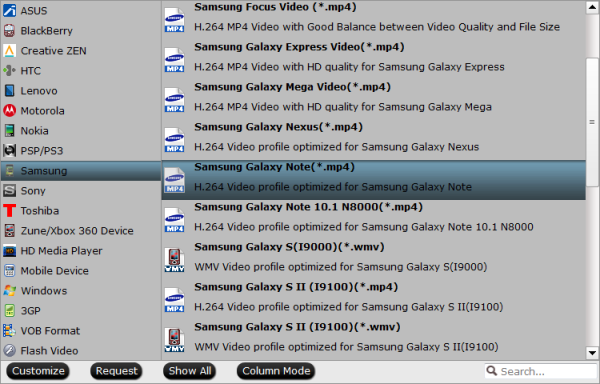
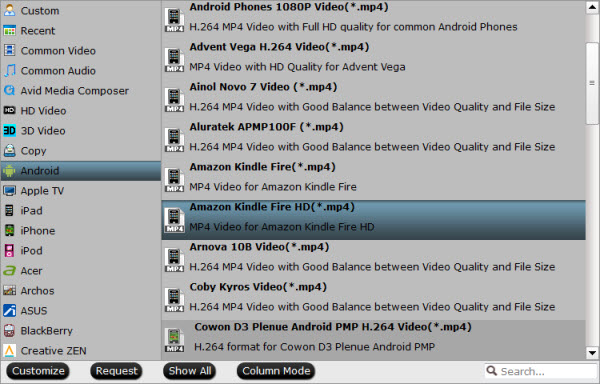
Step 3. Click "Format" bar and select a MP4 format for Kindle Fire HD 8.9 playback. "Android -> Amazon Kindle Fire HD H.264 (*.mp4)" format is recommended for faster conversion and best movie effect.


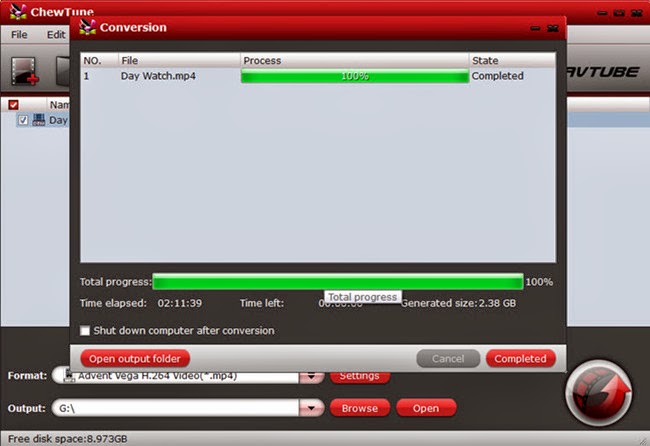
Step 5. Click "Convert" to start ripping 1080p Blu-ray to Kindle Fire HD 7/8.9 compatible video.

Click the "Open" button to find the converted files when conversion completes and then you can transfer movies to Kindle Fire HD 8.9 easily, and bring your favorite Blu-ray and DVD movies when traveling.
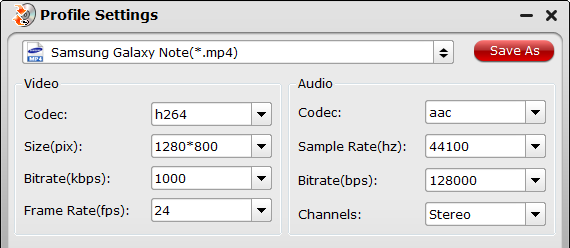
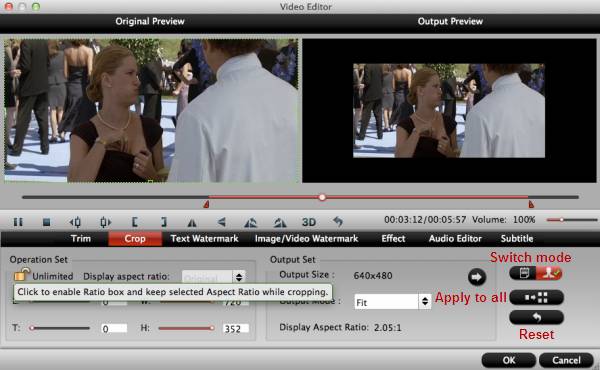
Custom Settings

If you'd like to customize profile settings for better quality or higher resolution, proceed as follows before you start converting Blu-ray to Kindle Fire HD 8.9 video:

Click on "Settings" button. The pop-up Profile Settings window shows you a/v settings you're using.


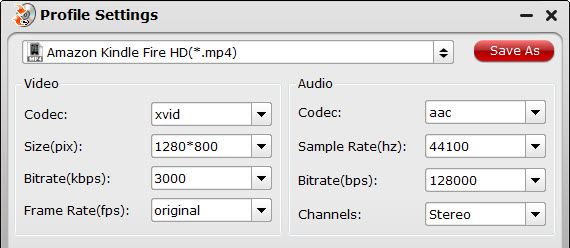
To take advantage of your screen, set the video size exactly as the display resolution- i.e. 1920 x 1080 for Kindle Fire HD 8.9.

For better quality, set higher bitrate. We find the best balance between 2500kbps to 3000kbps on 8.9-inch screen. To shorten conversion time, set lower quality. Note that when you lower file size, you lower video quality.

Save your preference for future use

One thing good in Pavtube is that you can create new preset for use. For instance, I've decided the best settings work for converting videos to play on the 10.1-inch Kindle Fire HD, and wanna save it for future use, now all I need is save it as a custom preset. This is easy. Just proceed as follows.

1. In the settings window, press "Save As" button.
2. Give the custom preset a name, say "Kindle Fire HD Video 1920 x 1080 (*.mp4)".
3. Click "OK".

The next time you open up the Blu-ray ripper for converting movies to Kindle Fire HD, just press on "Format" bar and find the new preset under "Custom" group.

View Kindle Fire HD column to learn more related articles.

Read More:
  

Tuesday, October 15, 2013

View DVD movies on Sony Xperia Z1/Xperia Z Ultra/Xperia Z with best quality

Description: Get the best DVD to Sony Xperia Z ripper to convert your DVD collection to the best video format for Sony Xperia Z1, Xperia Z Ultra and Xperia Z.
Have you gathered boxes of DVD movies at home? Have you had the thought of moving them to your Sony Xperia series smartphones including Sony Xperia Z1, Xperia Z Ultra and Xperia Z so that you can watch your favorite movies anytime and anywhere you like? With this DVD to Sony Xperia Converter you can convert DVD movies to Sony Xperia playable MP4 files and play the created movies on your Sony Xperia Z1, Xperia Z Ultra and Xperia Z smoothly. Read Review

First of all, you need download and install a free copy of the best DVD to Sony Xperia Converter – Pavtube DVD Ripper on your computer.

Then let’s go through the whole process of ripping DVD movies to Sony Xperia Z1/Xperia Z Ultra/Xperia Z with best quality.

1. Click this “Load Disc” button to browser to your disc drive and import your source disc.

dvd to song xperia converter

2. Choose the wanted audio track from “Audio” drop-down list and desired subtitles from “Subtitle” tab.

3. Hit the “Format” menu you could choose the suitable profile for Sony Xperia Z1/Xperia Z Ultra/Xperia Z. When you cannot find the particular profile for your device from Pavtube DVD Ripper, don’t worry, it includes several general presets which are compatible for most Android phones and tablets.

rip dvd to sony xperia z

4. Click the “Settings” icon on program interface, you are allowed to set presets to get better video and audio performance on your Sony Xperia Z1/Xperia Z Ultra/Xperia Z.

best video format for sony xperia z1

Note: Higher Bitrate leads to better video quality in saved file, but it also creates larger video size. Don’t forget the balance between video quality and size.

5. Hit the “Convert” icon and start ripping DVD to Sony Xperia Z1/Xperia Z Ultra/Xperia Z. After it finishes, you would get a created MP4 file in output destination. Now you are ready to transfer your DVD movies to Sony Xperia Z1/Xperia Z Ultra/Xperia Z and enjoy your DVD collection there.

Related Articles:

Monday, October 14, 2013

Best solution to make Galaxy Note 3 play Blu-ray and DVD movies (Mac/Windows)

Description: Find the easiest way to convert the latest Blu-ray and DVD movies to Samsung Galaxy Note 3 highly supported video formats with subtitles. Then you can watch Blu-ray/DVD movies on your new Note 3 anytime with perfect audio and video synchronization.

With the releasing of Samsung Galaxy Note 3, more and more folks are talking about how to play Blu-ray and DVD movies on new Galaxy Note 3 phone. Yeah sure, can anything be more fun than watching HD Blu-ray and DVD movies on this remarkable Android phone that carrying a 1920×1080 pixels display?

We all the Galaxy Note 3 does not support an external Blu-ray or DVD drive, besides, most commercial Blu-ray/DVDs are encrypted by film studio which makes it much more difficult to play Blu-ray/DVD on Galaxy Note 3 everywhere.

But it’s not big deal; finally we find this Best Blu-ray/DVD Ripper (Blu-ray/DVD Ripper for Mac), a professional Blu-ray/DVD to Galaxy Note 3 Converter software to help remove disc encryption and transfer Blu-ray/DVD to Galaxy Note 3 compatible format for playing. (Note: The Mac Version opertaion steps are similar above, I'm not repeat here.)

This Galaxy Movie Converter fully supports all Samsung Galaxy devices including: Galaxy Note 3, Galaxy Note 2, Galaxy Note 10.1, Galaxy Note, Galaxy Tab 3, Galaxy Tab 2, Galaxy Tab, Galaxy S4, Galaxy S3, Galaxy S 2, Galaxy S, Galaxy Gear, Galaxy Nexus, Galaxy Fit, Galaxy Mini, Galaxy Gio, Galaxy ACE, Galaxy ACE Plu, Galaxy S Plu, Galaxy Pro, Galaxy W, Galaxy Beam, Galaxy S Advance, Galaxy Y, Galaxy Beam, Galaxy Chat, Galaxy R Style, Galaxy Player.

Big surprise: this Top Blu-ray/DVD to Galaxy Note 3 Converter is also able to rip commercial DVD/Blu-rays and put it on many other Android/Apple/Windows 8 tablets & smartphones, now is 30% off, you can save $15. 

Tips: Another choice for users who want to keep multi audio track and several soft subtitles, see this: ByteCopy.

Now, let’s start on how to put Blu-ray or DVD movie on Galaxy Note 3, this tutorial is also work for other Galaxy devices.

Step 1. Run the best Blu-ray/DVD to Galaxy Note 3 Converter and import disc.

Click “Load files” to import Blu-ray, DVD, Blu-ray ISO, DVD IFO/ISO or Blu-ray/DVD folder. Choose subtitles, languages or forced subtitles in the main interface.


Step 2. Choose proper video format for Galaxy Note 3.

Click “Format” drop-down list, choose “Samsung>Samsung Galaxy Note(*.mp4)” as the best profile for Galaxy Note 3.


Step 3. Customize specs.

Click “Settings” to customize output video size, frame rate, bitrate, and other settings, all according to your needs. Usually bitrate is directly related with video quality; for Galaxy Note 3, it’s all fine to set it to 1500~2500kbps.


Step 4. Start the Blu-ray/DVD to Galaxy Note 3 MP4 conversion.

Now back to main interface, click “Convert” to start converting Blu-ray/DVD to MP4 for Galaxy Note 3. After the conversion, you can click “Open output folder” to quick locate the output MP4 video on your hard drive.

Step 5. Connect your Galaxy Note 3 to computer through the USB cable. Your computer shoulde detect it as a mobile drive. Copy the MP4 video to the “Movies” folder. That’s all, now you can enjoy the Blu-ray/DVD Movies on your new Galaxy Note 3 smartphone anytime and anywhere. (Learn more about 

Samsung Galaxy Note Media(Music, Video, Movie, Photo) Files Transfer.)
  
Related Articles:


Friday, October 11, 2013

40% OFF: Upgrade Pavtube Free MTS/M2TS Converter for Mac to official retail version (only $17.4)

Good news on this weekend (2013, Oct 12~13th)! Pavtube now offer 40% OFF to upgrade your Free MTS/M2TS Converter for Mac to Paid MTS/M2TS Converter for Mac, the official retail version, which is just updated several days ago and perfect support more latest cameras from Sony, JVC, Panasonic and Canon. 

The Pavtube Free MTS/M2TS Converter for Mac, a powerful free Mac MTS/M2TS Converter software to help convert your 2D/3D MTS/M2TS/M2T/AVCHD file at 1080i/1080p/720i/720p to MKV/MP4/MPG/WMV/MOV/FLV/F4V for editing in NLEs such as Avid Media Composer, Adobe Premiere Pro, After Effects, Apple Aperture 3, Kdenlive, Keynote, Avid Xpress Pro, Adobe Creative Suite 6, DaVinci Resolve, iPhoto, or playback on iPad 4, iPhone 5S, iPhone 5C, iPhone 5, iPod 3, Samsung Galaxy Tab 3 10.1/8.0, Galaxy Note 3, Google new Nexus 7, Asus Fonepad 7, Motorola Droid Mini, Moto X, Asus Transformer Book T100, Asus Transformer Pad TF701T, Kindle Fire HD, Surface RT/Pro, Surface 2, Surface Pro 2; it well supports Apple TV and other HDTV videos outputting and other devices like XBox 360, PS3, WD TV, Wii, TVs, etc.

As we can see, it has a simple and straightforward interface to enable quick conversion within a few clicks. As long as your camera is recognized by Mac directly, it could detect your MTS/M2TS/M2T/MOD/TOD/AVCHD footage automatically without risky of losing intact file structure.

And the most important thing is your can download it totally Free in App Store with 100% safety.


See this specification: 


This Free MTS/M2TS Converter for Mac comes with bellowing features: 

Full Support to AVCHD footage
Support interlaced and progressive AVCHD 1920*1080, 1440*1080, 1280*720 videos shot with Sony, Panasonic, Canon, JVC, etc.

Simple gauss blur effect
Simple gauss blur effect is very useful to recorded file formats, since it can eliminate the recorded videos noise. If you like, you can also add other special effects including simple laplacian sharpen, gray, flip color, invert, aged film and deinterlacing. What is worth mentioning is the deinterlacing, which can convert interlaced video into a non-interlaced form so that you can enjoy a better and clearer video effect.

Accurate trim and crop your AVCHD (*.m2ts or *.mts)
The accurate trim and crop function allows you to trim the proper time length for MTS/M2TS videos, as well as cut off any unwanted area. Its original video and output video preview windows will also be convenient for you to edit.

Replace original audio
To replace the original audio is easy to be realized under the Editor sections.

Split selected video file
Using the Split function, you can split the selected video file into required video clips by specifying the clip quantity, duration time and file size.

Audio and video sync technology
The program adopted advanced audio and video sync technology; never let you troubled by the audio and video issues.

Built-in codec
Its built-in codec will not install any codec on your computer, so as to avoid the unexpected codec problem.

Note: Comparing with Pavtube MTS/M2TS Converter for Mac, the Free MTS/M2TS Converter for Mac removed Apple ProRes codec for Final Cut Pro and Apple Intermediate Codec(AIC) codec for iMovie & Final Cut Express.

Learn more Free products from Pavtube:

  
Wondering how to do the conversion?
 
More step-by-step guide of how to start the conversion:
 

Download/Record iTunes Videos to Sony Xperia Z1/Xperia Z Ultra keeping subtitles and high quality

Are you troubling how to sync your iTunes video/music to Sony Xperia Z1/Xperia Z Ultra? The post will help you find the best DRM Removal program to legally remove DRM protection from iTunes videos and record them to Sony Xperia Z1/Xperia Z Ultra with high quality and keep subtitles.

Sony has unveiled its latest addition to its Xperia Z series, Xperia Z1 and Xperia Z Ultra. Packing a large size HD display (Xperia Z1 in 5.0-inch and Xperia Z Ultra in 6.4-inch) that runs at 1080p resolution, the new Xperia Z series best other similarly handsets that all currently hover around 702p, which makes them the new favorite portable devices to provide smooth and high quality video playback. For many movie lovers who own lots of iTunes purchased M4V videos and movies, it is disappointing that iTunes movies cannot be transferred to Xperia Z1 or Xperia Z Ultra due to the DRM protection. In order to enable iTunes videos on Xperia Z1/Xperia Z Ultra, you need remove DRM protection from iTunes movies in advance.

How to enable iTunes video/music DRM-free for Sony Xperia Z1/Xperia Z Ultra? 

Step 1: Install the DRM Removal program – Pavtube ChewTune.

Pavtube ChewTune is developed as a professional DRM Removal tool and DRM Video Recorder to help users legally strip off DRM protection from iTunes M4V movies, Amazon Instant Videos and Digital Copy so that you are able to watch almost all DRM movies on multiple smartphones and tablets anywhere you like.

Step 2: Start the Top DRM removal software, hit the “Add video” button and browser the source iTunes videos location for loading.


Note: If you are running a trial version of Pavtube DRM Removal Tool, make sure you have turned off iTunes before running this app to ensure its stability.

Step 3. From the “Format” drop-down list, choose suitable profile for Sony Xperia Z1/Xperia Z Ultra. Here I suggest you choose “Common Video -> H.264 Video (*.mp4)” as output format.


Optional - If you like, you could adjust profile settings including video codec, bitrate, frame rate, etc to get better video and audio quality for watching iTunes movies on Sony Xperia Z1/Xperia Z Ultra.

Step 4. Hit the “Convert” button to start recording iTunes movies. After it finishes, click the “Open” icon to locate the recorded iTunes movie, and you are ready to transfer it to your Sony Xperia Z1/Xperia Z Ultra, it’s very eary.


Tip 1: Because of 1:1 video recording, it takes as long as the source movie length to finish the whole ChewTune DRM-free process, so if your source iTunes movies is about 1 hour, ChewTune needs more than 1 hour to complete the iTunes to Sony Xperia Z1/Xperia Z Ultra recording. So if you wanna get a test before fully purchasing, it’s better to select a small sample video for testing.

Tip 3: Since Pavtube ChewTune supports batch processing facility, you could import more than one DRM videos and run overnight, and you would get all videos recorded the next morning. Don’t forget to set up Windows power options to never turn off monitor or never let the computer system standby.

Related Articles:

Thursday, October 10, 2013

Workflow: Enable Avid MC/Premiere Pro Load AVCHD/MP4 from Canon Vixia HF G30

AVCHD/MP4 files Avid MC/Premiere Pro solution: step by step guide showing you how to importCanon Vixia HF G30 AVCHD/MP4 to Avid MC/Premiere Pro for further editing.
  
The Canon VIXIA HF G30 is a prosumer camera that shoots 1920 x 1080 Full HD video in either AVCHD or web-friendly MP4 format. It also supports Native 24p Progressive Mode recording, which will give your footage a more cinematic look. Videos are shot in AVCHD up to 35 Mbps and recorded in full HD 1080 60p, which is not supported by most editing programs. Hence it could be a problem when Mac users need to ingest the Canon Vixia HF G30 AVCHD/MP4 video in Adobe Premiere Pro, Avid Media Composer smoothly.


To edit Canon Vixia HF G30 AVCHD in Adobe Premiere Pro, Avid Media Composer on Mac, you are suggested to convert the AVCHD MTS to Adobe preferred H.264 MOV or DNxHD for Avid. To accomplish this, I recommend this Mac AVCHD to MOV Converter, a powerful and professional AVCHD converting program which support outputting various videos formats for different usage..

Now follow these steps to quick convert Canon Vixia HF G30 AVCHD into DNxHD or AVC MOV.

Free download Pavtube HD Video Converter for Mac, get it installed. 


(Tip: Download a dmg file for Mac OS X 10.5 users)


Step 1: Connect your camcorder to Mac and Load recorded files.

Connect your camcorder to Mac, and you can see all recorded AVCHD/MP4 files as soon as this program has detected the device. Now, you can untick the files you don't want, and then click the "Add" button to load the files you want to this AVCHD/MP4 to MOV Converter for Mac, or drag and drop your videos into it directly. Batch conversion is offered.


For Windows user: Connect an HD video camera/camcorders to your PC with a USB cable. Once connected and powered on, the camcorder should appear on the desktop as a new disk. It is desirable that you copy the videos to your PC's hard-drive before converting or editing them. 

Step 2. Choose proper video format.

Open the “Format” list then choose "MOV" under "Avid Media Composer" section as output format for editing Canon Vixia HF G30 AVCHD/MP4 files in Avid Media Composer. 


choose "MOV"/”MPEG-2” under "Adobe Premiere/Sony Vegas" section or “Apple ProRes 422(*.mov)” under "Final Cut Pro" section as output format for editing Canon Vixia HF G30 AVCHD/MP4 files in Adobe Premiere Pro. 


In fact, if you are about to play the AVCHD/MP4 video files on iPhone, iPod, iPad, Android, Windows 8 devices or edit in iMovie, Final Cut Pro X, FCE etc., you can choose the optimized preset for the device or app offered.

Step 3. Customize video size, bitrate, frame rate, and other settings.
  
Tips:
  • For 1080 50p AVCHD files, you can set the video size as 1920*1080, and set the video frame rate as 25fps.
  • For 1080 60p AVCHD videos, set the video size as 1920*1080; while, set the video frame rate as 30fps.

FYI: Tf you want to trim, crop the videos before transcoding, you can click Edit like this:


Pavtube AVCHD Converter for Mac also support deinterlacing, editing audio and adding sutitles.

(Note: If you want to add 3D effect (Side-by-Side, Top-Bottom, or Anaglyph 3D in MKV/MP4/MOV/WMV/AVI), you can try Video Converter Ultimate or Video Converter Ultimate for Mac.

Step 4. Start conversion.

Click the "Convert" button to start converting Canon Vixia HF G30 AVCHD/MP4 to MOV for Avid MC, converting to MOV/MP4G-2/Apple ProRes for Adobe Premiere Pro.

After this Top HD Video Converter for Mac finishes the conversion process, you can click "Open Folder" to find out where you saved the converted files.

Now let’s click the “Convert” to start this conversion easily. Wait for a while and you can click the “Open” to locate the converted video easily.

You may want to read:
  

Wednesday, October 9, 2013

Copy G.I. Joe: Retaliation Blu-ray/DVD Movie to Computer Hard Drive without quality lossless

G.I. Joe Retaliation is a good and popular film now. You may just purchase the Blu-ray version of this movie. If you want to copy G.I. Joe: Retaliation Blu-ray movies to computer hard drive, it may take a lot of energy. However, Magic Blu-ray copy can help you with its simple interface and powerful function. Here this article will do you a favour.

To be honest, it will take much space, if you want to backup the full Blu-ray disc on the computer. In general, about 25GB. In fact, we just need to backup the main movie. The fake title and other titles are useless and take much space. This article will give you a solution to easily copy G.I.JOE retaliation main title on computer with quality lossless. You can follow below steps to rip G.I. Joe: Retaliation Blu-ray to computer hard drive.

Pavtube BDMagic is an efficient and top Blu-ray Copying software. It can easily remove Blu-ray protection, and lossless copy G.I. Joe Retaliation Blu-ray movies to your hard drive.

Before copying G.I. Joe: Retaliation Blu-ray discs check what you need:
  1. An external Blu-ray drive.
  2. Top Blu-ray Ripper software - Pavtube Blu-ray Ripper (30% off now)
  3. Internet connection.
  4. G.I. Joe Retaliation Blu-ray disc.

You can also free download Pavtube Blu-ray Ripper and have a try. It is easy to use.


Step 1. Install and run the Top Blu-ray Ripper. Insert G.I. Joe: Retaliation Blu-ray disc into the Blu-ray drive, the Ripper will automatically load the disc information.

Make sure you have enough space on your drive (depending on the disc, this could be up to 50 GB).


Step 3. Choose the "Directly copy" option in "Copy". (The main movie is selected by default.)


Step 4. Hit the "Convert" button and your G.I. Joe: Retaliation Blu-ray movie should start copying.

When it's done, just double click on the resulting file and it will play in VLC or other media players.

Additional Tips

The Top BDMagic is designed for G.I. Joe: Retaliation Blu-ray/DVD users. It can help you remove Blu-ray protection and rip G.I. Joe Retaliation Blu-ray to common formats: MP4, AVI, MOV, MKV, WMV, SWF, FLV, F4V, etc. Most popular portable devices are also supported, so that you can enjoy G.I. Joe Retaliation Blu-ray movies on your iPhone 5S, iPhone 5C, iPad 4, iPad 3, Surface RT/Pro, Surface 2, Surface Pro 2, Sony Xperia Z1, Motorola Droid Mini, Moto X, Samsung Galaxy Tab 3 10.1/8.0, Galaxy Note 3, Google new Nexus 7, Kindle Fire HD...

Plus, Pavtube application takes advantage of the NVIDIA CUDA technology and AMD APP technology, and the conversion speed can be increased up to 6 times faster than ever before. Moreover, Pavtube programs support adding *.srt and *.ass subtitles into video and merge into one file for output.

Related Articles: