Showing posts with label Apple. Show all posts

Friday, November 22, 2013

Watch Blu-ray movies on iPad Mini 2 with Forced Subtitle on Windows 8.1/8/7

Apple’s iPad series including iPad Air, iPad Mini 2, iPad Mini, iPad 4, iPad 3, iPad 2 and the original iPad are great portable media player.

ipad mini 2

With more and more movies released in Blu-ray version, many people own a large collection of Blu-ray disc; or you may prefer to rent latest Blu-ray movies or exchange them with friends. Are you annoying that you have to take these blu-ray discs on your heavy luggage when you are in travel or on business?

Don’t worry, I’ve had success using Pavtube Blu-ray Ripper software to rip my favourite Blu-ray discs and some DVDs to a proper format playable for syncing to my iPad Mini 2 via iTunes 11. I’ve found the quality to be excellent, and see no differece when compared to playing the discs themselves. This is the Top 5 Blu-ray Ripper Review on 2014. If you enjoy having everything organized and save memory space while keeping the original quality of your HD movies and videos then this is what you are looking for.
  
This article will give you a step-by-step guide to teach how to rip and convert Blu-ray movies to iPad Mini 2 on Windows 8.1/8/7. With this you can enjoy all of your Blu-ray movies anywhere and anytime.

Required tools:
  • PC running Windows 8.1 Blue, Windows 8, Windows 7, Windows Vista, Windows XP
  • Blu-ray Disc
  • Blu-ray to iPad Mini 2 Converter tool - Pavtube BDMagic (For Mac users: BDMagic for Mac)
  • BD-ROM for ripping Blu-ray movie to iPad Mini

How to Rip and Sync Blu-ray to iPad Mini 2 on Windows 8.1/8/7?

Step 1: Getting started.

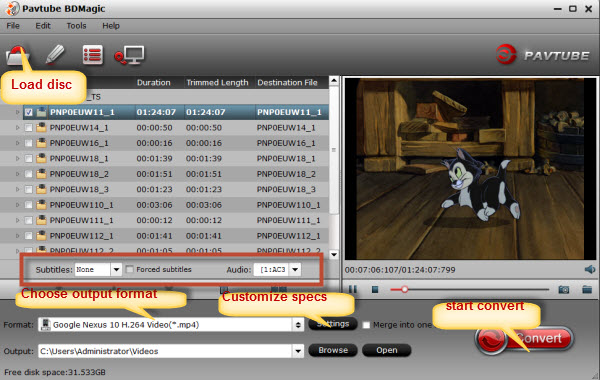
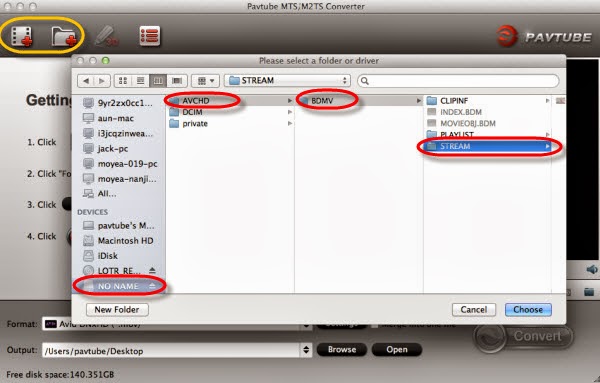
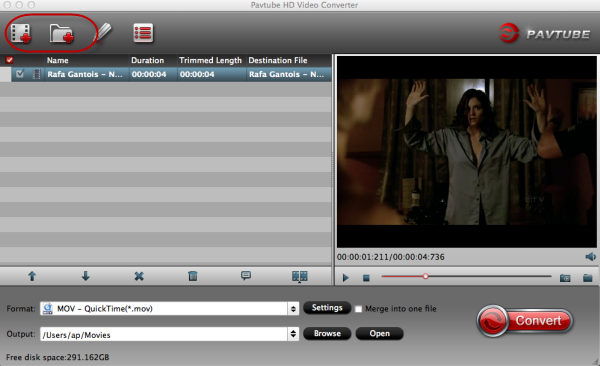
Free download the best Blu-ray to iPad Mini 2 Ripper, install and launch it. Hit the “Load disc” button to browser to disc drive and import source Blu-ray.

The Blu-ray to iPad Mini 2 Ripper can do with all kinds of BD/DVD sources: protected and unprotected Blu-ray Disc, BDMV folder, BD ISO, physical DVD, VIDEO_TS folder, DVD ISO and IFO file.


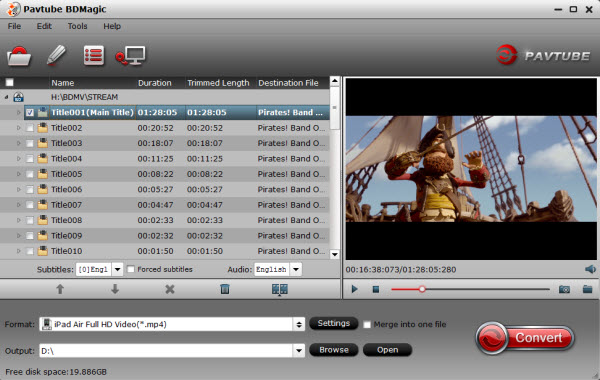
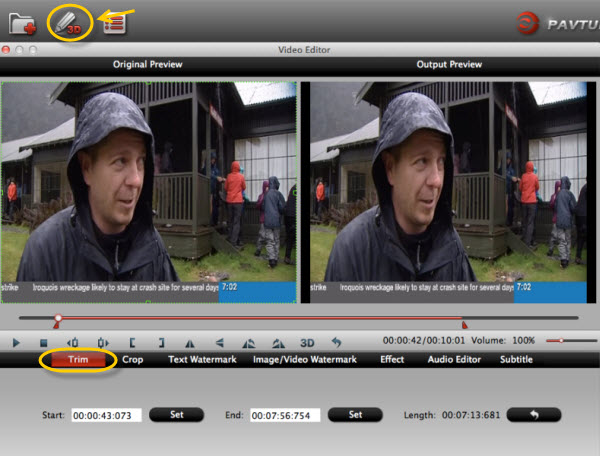
Tip 1: The main title is checked by default and no need to re-select correct Blu-ray main movie. Don’t forget to choose one wanted audio track and subtitles from the drop-down list of “Audio” and “Subtitles” for your output Blu-ray movies.

Tip 2: If you would like to show subtitles only when actors are speaking a different language, Pavtube offers an option called “Forced subtitles” to enable you to do that. Just choose one main subtitle track from Subtitles menu e.g. English and click the “Forced subtitles”, you would find subtitles only show when a foreign language is speaking.

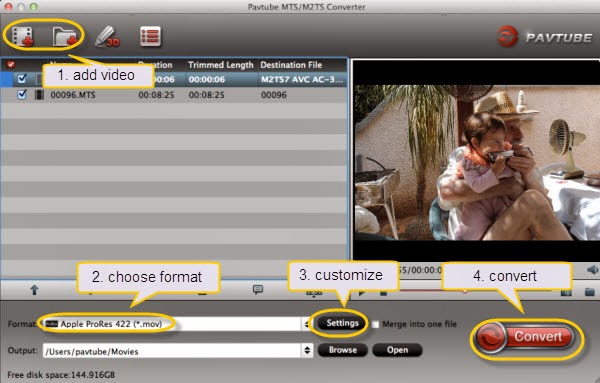
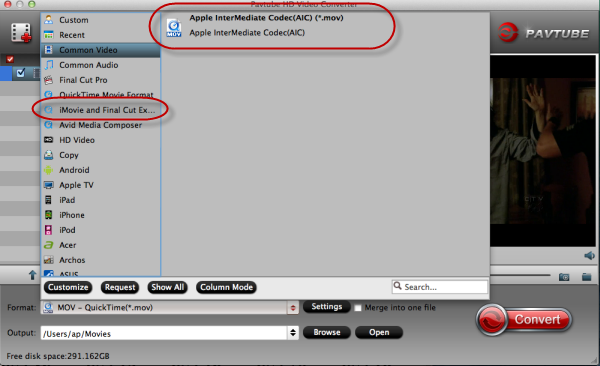
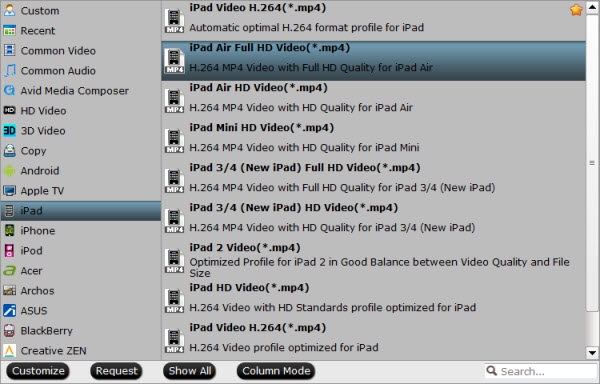
Step 2: Choose iPad Mini compatible output format

Now choose the output format for playback on your iPad Mini. You can get optimized video for iPad under iPad> iPad Mini HD Video (*.mp4). And choose the destination folder to save the converted videos.


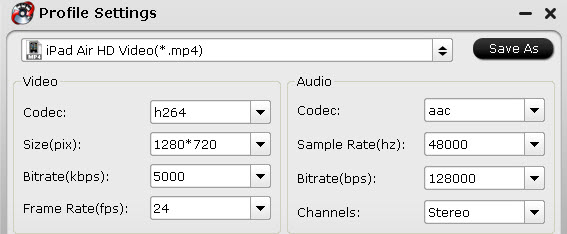
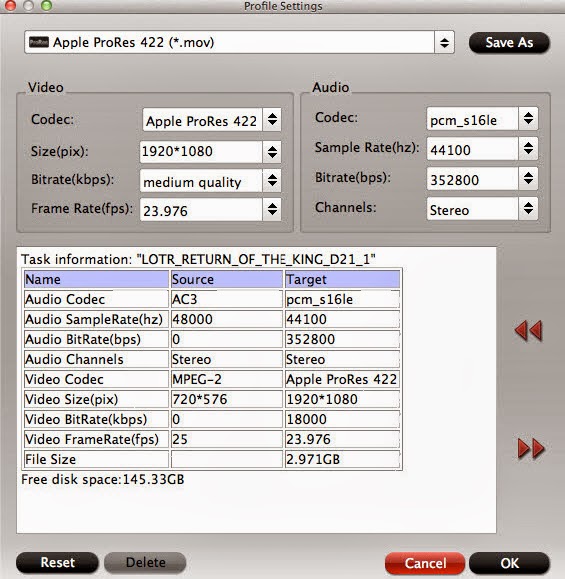
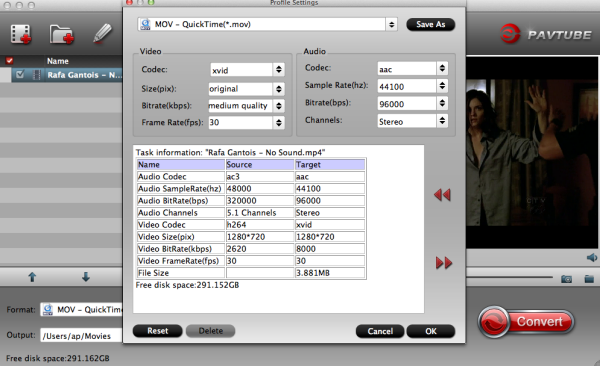
Tips: you can click “Settings” to tweak the detailed video and audio encoding settings. Remember the file size is based more on bitrate than resolution which means that bitrate higher results in big file size, and lower visible quality loss.

ipad mini 2 video settings

Step 3: Start VC-1 Blu-ray to iPad Mini 2 ripping

After all the above settings, simply click “Convert” button to start converting VC-1 Blu-ray to iPad Mini 2 videos. Just wait for the converting process to be done. After that, find the converted videos in your output folder and transfer them to your iTunes library and sync your iPad Mini. 

1. Launch the iTunes and connect iPad Mini 2 to PC.
2. Choose “File – > Add File to Library…”
3. Drag the .mp4 file you want to the iPad icon.

So there you have it. Now you are free to watch Blu-ray movies on new iPad Mini 2 with subtitles anytime and anywhere as you like. Enjoy.
  
Related Articles:

Thursday, November 14, 2013

Convert DVD ISO/IFO to Multi-track MP4 for watch on iPad Air

Description: This article tell you how to watch DVD ISO/IFO movies on iPad Air in multi-track MP4 format so you can switch to the desired language during playback.

If you own many DVD movies which have been backed up in ISO/IFO files on computer hard drive and would like to convert DVD ISO/IFO movies to multi-track MP4 so that you may watch movies on the new iPad Air with any language by switching to the desired one, the Pavtube DVD to iPad Air Converter is your great choice to rip DVD ISO/IFO and original DVD disc to iPad Air compatible MP4 format as well as multiple audio tracks saved for iPad Air playback.

How to Rip DVD ISO/IFO to Multi-track MP4 for watch on iPad Air? 


Part One. Rip/Convert DVD ISO/IFO to Multi-track MP4 for iPad Air


Step 1. Free download the Multi-track DVD Converter (Mac users can download here), install and launch it. Click the “Load ISO/IFO” button to import source DVD ISO/IFO files.

blu-ray-to-multi-track-mp4

Step 2. Choose “Multi-track Video > Multi-track MP4 (*.mp4)” from the “Format” drop-down list as output format.

blu-ray-to-multi-track-mp4

Tip: This profile extracts more than one audio track from source DVD ISO/IFO movies in saved MP4 files. And you are allowed to remove unwanted audio track by unchecking the “Check” box in front of each audio source.

Step 3. Hit the “Convert” button on Pavtube ByteCopy main UI to start ripping DVD ISO/IFO to Multi-track MP4 for iPad Air. Once the conversion process finishes, open output folder and locate the created multi-track MP4 movie.

Part Two. Stream and watch Multi-track MP4 movies on iPad Air
 

Step 1. Install multi-track player on iPad Air. When typing in the keyword “multitrack player” in Apple Store, many free or charged apps would show up, choose one and install on your iPad Air.

Step 2. Open iTunes, and add created multi-track MP4 movie to this multi-track player.

Step 3. Open this multi-track player, open the source multi-track MP4, and choose wanted language during movie playback.


iPad Air related articles:
Get more money-saving tip:

Wednesday, November 13, 2013

Solve no audio issue when converting HVX200 P2 MXF to ProRes 422 for FCP X

Summary: Follow this article you will know how to solve Panasonic HVX200 MXF editing problems with Final Cut Pro X on Mac as well as how to work out the "no audio issues".
 
To start, the HVX200 becomes only the second camera in Panasonic’s lineup to employ true variable frame rates! While, when you want to import Panasonic HVX200 P2 MXF files in FCP X on Mac for editing, you will get frustrated due to the video codec incompatibility problem as below.

I would like ton convert MXF files from my Panasonic P2 AG-HVX200, to ProRes 422 for FCP X. As the files have proved to be not so well-suited when they are about to be edited in my Final Cut Pro X. I have converted many files from this same camera with no problem but for some reason now it has no audio.

I try the Free HD Video Converter For Mac, and it work well. So I bought and register HD VIDEO CONVERTER FOR MAC, but when I convert MXF files to Prores422, I have no audio. So I bought MXF CONVERTER FOR MAC and I have the same problem, no audio. What's the problem? Is there a way someone can help walk me through this?

To edit Panasonic HVX200 P2 video footage with Final Cut Pro, you have to convert P2 MXF to FCP natively supported video format like MOV with Apple ProRes Codec. Here we recommend you the best P2 MXF to FCP X Converter for Mac which can help you to transcode Panasonic P2 MXF to Apple ProRes .mov format for FCP on Mac OS X quickly and easily. Here comes the detailed guide. 

Note before converting:

1. Please ensure that the computer you are using to do P2 MXF conversion has Final Cut Pro installed, otherwise, the converted files will have audio only without image.

2. If you are using FCP X, please make sure you have installed ProApps QuickTime Codecs, or you may get files with sound only without video. The FCP X does not install the ProApps QuickTime Codecs automatically, so you need download and install the codec manually.

While importing MXF clips to Pavtube MXF to ProRes converter for conversion, please make sure you have the entire MXF file structure as it saved on your camcorder’s P2 card. If you only have some loose .MXF clips, your files will have image only without audio. See MXF file structure on Panasonic’s P2 card as below.


The above screenshot clearly shows .MXF clips are all saved in ‘VIDEO’ folder, while audio files are all stored in ‘AUDIO’ folder. When you importing .MXF clips from the correct file structure, Pavtube MXF to FCP Converter is able to recognize audio tracks from ‘AUDIO’ folder automatically, which ensures the generated ProRes 422 MOV files have both image and sound correctly. 

Guide: Convert Panasonic HVX200 MXF files to FCP X on Mac

Step 1: Add MXF video files.

Download and run Pavtube MXF Converter for Mac. Click the button "Add video" or "Add from folder" to add Panasonic HVX200 MXF files, or directly drag and drop your P2 MXF files.

canon c300 mxf to fcp converter

Step 2: Select an output format for FCP X and set the output folder.

Click on the "Format" and get the dropdown menu, then move you pointer to Final Cut Pro -> Apple ProRes 422 (*.mov), it’s the best format for editing in FCP X.


Step 3: Click "Settings" icon to adjust audio and video parameters.

Click the "Settings" icon and you will go into a new interface named "Profile Settings". You can adjust codec, bit rate, frame rate, sample rate and audio channel in the interface according to your needs and optimize the output file quality.

Tips: If your default audio track is in mute when recording, you may get only video without audio. So you can switch to the audio stream ID option to choose the right audio track.


Step 4: Start Converting.

Click the "Convert" button; it will convert Panasonic HVX200 P2 MXF files to Apple ProRes for FCP X on Mac immediately.

After the MXF to ProRes conversion, you will be able to get the output files for FCP X via clicking on "Open" button effortlessly. Afterwards, you can import the converted videos to FCP X freely for further editing without any trouble.

Futhermore, if your MXF files have 2 audio tracks or more, here is a new program named iMixMXF with multi-track preserving and mixing features. You can download the trial version for evaluation! (Read the multi-track MXF Converter guide)

Read more:

MP4 to FCP ǀ AVCHD to FCP ǀ MOV to FCP ǀ H.265 to FCP

Monday, November 4, 2013

Rip VC-1 Blu-ray movies to iPad Air, iPad series for enjoyment

Description: This best Blu-ray to iPad Air converter brings the most efficient way of ripping Halloween Blu-ray movies to iPad Air or other iPad series, so that you could effortlessly watch Blu-ray movie on iPad Air.
  
More and more Blu-ray movies are encoded in VC-1 codec, including the recent released Back to the Future: 25th Anniversary Trilogy, Inception, he Mummy Trilogy, Life, etc. If you own any of them and would like to put on the new iPad Air/4/3, you may need to convert VC-1 encoded Bllu-ray movies to iPad Air/4/3 playable format for playback. The following article shows you how to rip VC-1 Blu-ray movies to iPad Air or iPad series with a Top Blu-ray to iPad Air Converter - Pavtube Blu-ray Ripper.

Step-by-step guide:

How to convert VC-1 Blu-ray M2TS streams to iPad Air or iPad series?

Step 1: Getting started.

Free download Pavtube Blu-ray to iPad Air Converter (Mac Blu-ray to iPad Air Converter is available for Mac users), install and launch it. Hit the “Load disc” button to browser to disc drive and import source VC-1 Blu-ray.


Tip 1: The main title is checked by default and no need to re-select correct VC-1 Blu-ray main movie. Don’t forget to choose one wanted audio track and subtitles from the drop-down list of “Audio” and “Subtitles” for your output Blu-ray movies.

Tip 2: If you would like to show subtitles only when actors are speaking a different language, Pavtube VC-1 Blu-ray to iPad Air Converter offers an option called “Forced subtitles” to enable you to do that. Just choose one main subtitle track from Subtitles menu e.g. English and click the “Forced subtitles”, you would find subtitles only show when a foreign language is speaking.

Step 2: Choose iPad Air/5/4 compatible output format.

The best VC-1 Blu-ray to iPad Air/5/4 converter includes multiple profiles for different devices. When you cannot find the particular one for your iPad Air, just download the corresponding Profile Patch. Once the profile patch is installed and extra profiles would be added to certain category under your program. And you may choose “iPad ->iPad Air HD Video(*.mp4)” as output format.


Step 3: Adjust profile presets, (Optional)

Pavtube Blu-ray to iPad Air converter allows user to set video and audio parameters including video codec, bitrate, size, frame rate, etc under “Settings” option, so you are able to customize the output video and audio quality in your own way.


Step 4: Start VC-1 Blu-ray to iPad Air/5/4 ripping.

Now hit the “Convert” button on Pavtube main UI to start ripping VC-1 Blu-ray to iPad Air/5/4. When it finishes, open output folder and sync the ripped movies to iPad Air or iPad series for watching with ease.

If you don’t know how to put video to new iPad Air , just follow the steps to realize it: 
  1. Make sure you have install iTunes. If not, you can free download iTunes here at first. And launch the iTunes. 
  2. Connect iPad Air to Mac/PC. 
  3. Choose “File – > Add File to Library…”
  4. Drag the .mp4 file you want to the iPad Air icon
So there you have it. Prette simple. Now, you can enjoy and view 1080p/720p HD/SD videos and movies on iPad Air anytime everywhere for great digital fun. 

Additonal Tips: 

1. If your movie isn’t already in one of the iPad Air supported formats or it’s still on a DVD or various HD/SD Videos, you can get the Video Converter Ultimate (or the iMedia Converter Mac)which can help you rip Blu-ray/DVD, and convert various formats of 720p/1080p HD videos in MKV, AVI, TiVo, VOB, MPG, MTS, etc. to your iPad Air, iPad Mini 2, iPad 4, iPad 3, iPhone 5C, iPhone 5S, Apple TV 3, and other IOS tablets/phones for smoothly playing. 

2. Get more info at Apple TV Column

Read More:

Friday, October 25, 2013

How to Put and Play MKV files to iPhone 5S, iPhone 5C on Windows/Mac?

iPhone 5S/5C has been so hot since its release since last month; with the eye-catching iOS 7, many of us may be curious about how the video play feature works with frosted glass effect. 

Have you got a new iPhone 5S or iPhone 5C? Having lots of MKV videos in hand but couldn’t play MKV files on your iPhone 5S/5C? Why? Wondering what we can do to make it working? 

What is MKV?

MKV, short for Matroska Video, unlike MP3, MP4 and things like those, is not a media format but an extensible open standard Audio/Video container. We can definite it as a multimedia container. MKV can't be played in Mac by default. However, by converting MKV to iPhone 5S/5C friendly formats (MP4, M4V, MOV), you can enjoy MKV movies on iPhone 5S/5C designed with 4-inch widescreen multi-touch display would be a cool thing.

So you should first convert it with a third party MKV to iPhone 5S/5C Video Converter - Pavtube iPhone 5S/5C Video Converter (iPhone 5S/5C Video Converter for Mac). This tutorial is going to show you how to convert MKV files to iPhone 5S/5C support formats.
  
Note: The best iPhone 5S/5C Video Converter handles not only MKV files, but AVI, VOB, Tivo, WMV, MPG, EVO, VRO, MXF, MTS, M2TS, M2T, TS, FLV, F4V, 3GP and more to the most suitable profile for iPhone 5S/5C with simplest workflow and reliable video quality.

How to Convert MKV to iPhone 5S/5C on Windows/Mac?

Step 1. Download it, Load MKV files to this MKV to iPhone 5S/5C converter

Run this Pavtube Video Converter as the iPhone 5S/5C Video Converter. Click “Add video” or “Add from folder” to import MKV videos, or you can directly drag and drop MKV from computer to this app.

mkv to iphone 5s 5c video converter

Step 2. Choose video format for iPhone 5S/5C.

Note: To get best video quality, please download a patch before run the best iPhone 5S/5C Video Converter.

Click the drop-down list besides “Format”, select iPhone -> iPhone 5S/5C H.264 Full Screen 1136*640(*.mp4)” as the best profile for playing MKV movies on iPhone 5S/5C with full screen.

Tips: You can click “Settings” button to set the output video resolution for iPhone 5S/5C. (Optional)

best video quality for iphone 5s/5c

Step 3. Edit video before MKV to iPhone 5S/5C conversion. (Optional)

Click the pencil-like icon on top to enter Video Editor interface. You can choose to trim, crop, watermark, effect, audio or add srt/ass/ssa subtitles before conversion.

Back to main interface, click “Settings” to customize video size, frame rate, bitrate and other settings.

Step 4. Start MKV to iPhone 5S/5C conversion.

Just start to convert MKV to iPhone 5S/5C by pressing the "Convert" button in the bottom-right corner of this MKV to iPhone 5S/5C Converter. Do you see this app is converting MKV files? Yeah, you do. And you can also clearly see the conversion progress bar. When it reaches 100%, just hit the “Open” or “Open output folder” button at the bottom to quick find these converted video files.

Now, it’s time for you to import these output files to iTunes library. When you try to do it, you’ll find these originally-unsupported MKV files can be loaded without any trouble. After that, you need to sync them to your iPhone 5S or iPhone 5C.

More articles:

Sunday, October 6, 2013

Convert Sony HVR-Z5U MTS to Apple ProRes 422 for editing in FCP

This article will show you how to easily transcode Sony HVR-Z5U MTS footage to Apple ProRes 422 for FCP editing; it also support to output compatible format for playback on Mac or portable devices all at your needs.
  
“I’m a videographer and editor. Recently I replace my camera with a new Sony Z5U and shoot some pretty good videos. The ultimate usage is to edit in FCP and use in a video contest in our town. So my question is, is there any easy, reliable work flow of file transferring process from my Sony Z5U to my Mac and Final Cut Pro?”

You may also encounter the problems above after shooting videos in summer vacation, festivals, holidays, or any special days for you and your family. Surely we shoot the most valuable moments that shinning in our memories, and we always want it to be flawless. In this case, it could become important to edit in NLE programs like Final Cut Pro 6/7/X, iMovie and so on; but the mts footage we shot are not supported by the editing programs or Mac natively.


So How to convert Sony HVR-Z5U MTS to Apple ProRes 422 for Final Cut Pro?

The Mac Sony MTS to ProRes Converter is such a powerful MTS/M2TS to Apple ProRes converter program which works well by allowing you to convert MTS files from Sony Z5U to Final Cut Pro editable format on Mac.

Simply follow this guide and learn how to accomplish this within a few clicks.

1. Connect your Sony Z5U to Mac and keep it on. Click the top left two icon to load the whole AVCHD folder, or load the mts videos inside.

Follow AVCHD>BDMV>STREAM to locate the mts videos; attached the screenshot:


2. Choose Apple ProRes as output format.

Click “Format” and choose “Final Cut Pro -> Apple ProRes 422(*.mov)” as the best video codec for FCP.

There are other four presets for ProRes: Apple ProRes 422 HQ, Apple ProRes 422 LT, Apple ProRes 422 Proxy and Apple ProRes 4444. Usually the ProRes 422 HQ has better video quality than ProRes 422 and could meet your needs.


3. Click Settings to customize video size, bitrate, frame rate and other specs.


4. Click the “Convert” button to start converting Sony HVR-Z5U MTS to Apple ProRes 422 for FCP on Mac OS X. There’s no need to wait in from of computer, the Mac Sony MTS to ProRes Converter will keep running and shut down computer for you automatically.

You may want to read:

Read more:

MP4 to FCP ǀ AVCHD to FCP ǀ MOV to FCP ǀ H.265 to FCP

Saturday, September 28, 2013

Problem Importing M4V files into Final Cut Express

Having difficulty in importing M4V in Final Cut Express? This detailed guide will show you the reason and how to convert M4V files to Final Cut Express for smooth editing.

“I'm trying to edit together many .M4V files in Final Cut Express but it is saying they are not supported. Is there any software out there that can convert these to a supported file or anyway to update FCE to support this file type? Any info will be helpful, thanks”

Do you have difficulty in importing M4V in Final Cut Express? Many Apple users have downloaded a mass of videos from iTunes and they want to make their own funny videos with Final Cut Express for sharing with family and friends or uploading to their blogs. But when they try to put M4V files into FCE, the files are just grayed out and they cannot edit it. What’s wrong?

FCE is professional video editing software designed for advanced editing of digital video as well as high-definition video, which was used by many amateur and professional videographers. And it is very picky about video formats. M4V format is a standard video file format developed by Apple and uses MPEG-4 compression. Due to video codec issue, M4V file is not supported by FCE. In order to edit M4V files in FCE you need a professional M4V to FCE converter to transcode M4V to AIC MOV for FCE.

Pavtube HD Video Converter for Mac can meet your need completely. Various native codecs like ProRes, Apple Intermediate Codec and DNxHD etc are provided, and the optimized preset is also available for Final Cut Express. So you can convert M4V to the optimized formats for FCE with one click.

Now let me show you how to convert M4V files for editing in FCE. First of all, make sure that you have downloaded and installed it. 

1. Import M4V files.

Click “Add video” icon to browse your computer and import the M4V files, or click nearby “Add from folder” button to import the whole folder. And directly drag and drop the M4V files to the software is all right as well. Multiple tasks can be imported for conversion together. 


Note: If you want to combine several videos into one output file, “Merge into one file” on the interface will help you to get it done.

2. Choose video format for FCE.

Click “Format” menu to go through the dropdown list. There is a preset “iMovie and Final Cut Express”. Hit it to choose “Apple Intermediate Codec(AIC)(*.mov)” for output. 


Note: The video and audio parameters for output can be adjusted. If you want to do it, click “Settings” button to check and change parameters like bitrate, channels, size, etc.

3. (Optional) Edit the video.

Some simple edit can be done to the videos before conversion. You can trim video for your needed length, crop video to get rid of annoying black edges, add text/image/video watermark or add subtitles, etc. If you need it, click “Edit” icon to simply edit the videos.


4. Convert M4V to FCE.

It’s time to convert M4V to AIC MOV for FCE on Mac OS X. Click “Convert” button to get started. Then press “Open” button to get the generated files for FCE.

Lifetime license will provide you lifetime free upgrade and service support. Easy-to-sue workflow and output high quality videos will give you a pleasing experience. Just go to try it.

Read More Topics:

Can Final Cut Pro X Edit DJI Phantom 4K video?
Import and Edit Sony A6300 4K XAVC S to Avid Media Composer
Tapeless MTS Workflow with Final Cut Pro 7
Premiere Pro CC 2015 cant import MPEG2 files
Importing Typhoon-H 4K videos to FCP X for editing
Tips for Importing and Editing Canon 5D Mark IV 4K MOV with Avid MC
Top 5 best MXF video converter for Mac

Monday, September 23, 2013

iPhone 5S vs iPhone 5 vs iPhone 5C: Side By Side Hardware Comparison [VIDEO]

Here's a complete side by side video comparison of iPhone 5S vs iPhone 5C vs iPhone 5. This video that we have put together compares all the said phones, you can find it embedded at the end of this post.

Apple released their seventh and eighth iteration into their iPhone category with the addition of the iPhone 5S and the iPhone 5C. Whilst the 5S – as is typically the case with 's' upgrades – stays physically very similar to the iPhone 5, the new iPhone 5C is very different. Instead of an aluminum rear housing, we see a solid unibody polycarbonate construction, resulting in a slightly deeper handset.

When I opened the box of my iPhone 5C, I was expecting to be presented with what could only be described as a 'cheap alternative' to the iPhone 5S. I was expecting a shoddy product that Apple were trying to shift for a price not far off from the premium. I don't particularly know why I was expecting this, it seems I shouldn't do so in the future, as Apple have so far only impressed me with the iPhone 5C.

 
iPhone 5 vs iPhone 5S vs iPhone 5C. Red iPhone 5 courtesy MendMyi Color Lab

The plastic unibody construction of the rear shell results in a phone which fits snugly in the hand, and the tapered edges only add to this experience. Whilst the iPhone 5S certainly feels more premium than the iPhone 5C, it's hard not to when the entire phone is constructed with aluminum and glass, Apple have done an incredible job by making the 5C not feel second best. This may well have something to do with the fact that the 5S could now be classified as an outdated design, as we've been accustomed to it for a little over a year now in the iPhone 5 itself. We've put together a hardware comparison to compare the iPhone 5S, 5C and, which can be found below.

 
Blue iPhone 5C with Space Gray iPhone 5S

It's certainly too early for me to pass full judgment on any of these devices. A few hours of playing around is only enough to give you a consolidated first impression. With this being said, I'll be surprised if my base opinion changes much. If it does, I'd be more inclined to say that the 5C is likely to be my favorite out of the two new additions to Apple's lineup, the camera and speed optimizations may well be the iPhone 5S's saving grace, however. It's certainly interesting to see Apple continue with the tradition of including an ‘s' model after a redesign, and whether this will ever change or develop into something more.


Source: Redmond Pie

Related Tips:


Monday, September 16, 2013

Smoothly Import AVCHD .mts files to iMovie (From Sony NEX-VG10/VG20/VG30 camcorder)

If you want to edit AVCHD .mts files shot by Sony NEX-VG10/VG20/VG30 smoothly in iMovie, here is right for you. Go to following article to get the instruction.

Sony NEX-VG10/VG20/VG30, which offer excellent image and video quality with interchangeable-lens systems, capture footages in both AVCHD format high definition video and MPEG-2 format standard definition video. Most users prefer to choose AVCHD format in order to get high quality videos. However, many users will face the similar issue about editing in iMovie on Mac OS X as below:  

“I'm strictly an amateur hobbyist hoping to make some good videos for a hugely popular blog. I wanted to covert the AVCHD 60p clips from my recently purchased Sony NEX-VG10 to a mac friendly format for editing in imovie.” 

That is probably because the AVCHD .mts files cannot be recognized by iMovie. In this case, we can count on third-party software to transcode them to a compatible format for iMovie. Here comes Pavtube MTS/M2TS Converter for Mac, a professional MTS to iMovie Converter tool for converting MTS/M2TS/M2T/TS files to a variety of video formats. It will help to transcode Sony NEX-VG10/VG20/VG30 AVCHD .mts files to iMovie friendly AIC codec MOV format, which is intermediate format that features high performance and quality, being less processor-intensive to work with on Mac OS X. With it you are able to edit AVCHD .mts files in iMovie smoothly and then share a better video with friends or post the edited videos to blog. Now follow me to learn how to convert AVCHD .mts files to iMovie on Mac OS X Mavericks.

You are free to download the MTS to iMovie Converter and install on your Mac. Then go to the guide here:

1. Load AVCHD .mts files to the MTS to iMovie Converter.

pavtube mts to imovie converter for mac

Tips: You can joint multiple AVCHD files on to one output file by checking "Merge into one file" on the interface. 

2. Select AIC MOV format for iMovie.

Many output format here and you are recommended to select “AIC .mov” files under “iMovie and Final Cut Express” because it best compatible format for iMovie.

3. Adjust output settings and edit the video. (Optional)

Settings: You are allowed to change the parameters of video and audio, such as Size, Bitrate, Frame Rate, etc.

Edit: Here you are able to edit the video before conversion. You can cut off the unnecessary part of the video in Trim, crop the video, add watermark or 3D effect, attach subtitle and so on.

video editor

4. Convert AVCHD MTS to iMovie.

Click “Convert” button to start conversion and then click “Open” button to locate the generated files for iMovie.

If you want to convert more videos in different formats, you could try iMedia Converter for Mac, which is capable of converting both various HD videos and latest DVD/Blu-ray. You are also allowed to 1:1 backup the whole discs for further playback or editing. 20% discount will be provided if you get it during the time of Back to School Promotion. Just give a try.

Read More: